
Over time, mineral deposits build up inside your coffee maker, impacting its performance and the taste of your coffee. This comprehensive guide will walk you through the simple process of descaling your coffee maker using common household items. By following these steps, you’ll ensure your coffee brews hotter, faster, and tastes significantly better. Regular descaling is key to enjoying your daily brew.
Are you tired of coffee that tastes bitter, brews slowly, or just doesn’t seem hot enough? The culprit might be hiding right inside your beloved coffee maker: mineral buildup. Over time, the minerals present in your tap water, especially calcium and magnesium, leave behind deposits. These deposits, often referred to as “scale,” accumulate within the internal components of your coffee maker, acting like a stubborn clog. This buildup not only affects the performance of your machine but also diminishes the quality of your daily brew.
But don’t worry! Descaling your coffee maker is a straightforward process that can be done at home with common household items. This guide will equip you with everything you need to know to effectively descale your coffee maker, bringing it back to its peak performance and ensuring every cup of coffee is as delicious as it should be. We’ll cover why it’s important, what you’ll need, and provide clear, step-by-step instructions to get your coffee maker sparkling clean and brewing like new again.
Key Takeaways
- Understand the Problem: Mineral buildup, primarily calcium and magnesium from water, clogs internal components of your coffee maker.
- Benefits of Descaling: It improves brewing temperature, speed, coffee flavor, and extends the lifespan of your appliance.
- Frequency Matters: Descale every 1-3 months, depending on your water’s hardness and usage.
- Simple Solutions: White vinegar or commercial descaling solutions are effective and readily available.
- Step-by-Step Process: A clear, multi-step cleaning process ensures thorough removal of mineral deposits.
- Rinsing is Crucial: Proper rinsing after descaling is vital to remove any lingering cleaning solution taste.
- Preventative Measures: Using filtered water can significantly reduce the frequency of descaling needed.
Why is Descaling Your Coffee Maker Important?
Before we dive into the “how,” let’s quickly touch on the “why.” Your coffee maker is essentially a small heating and water delivery system. When minerals from your water heat up and repeatedly flow through these components, they leave behind a chalky residue. This residue can:
- Slow down brewing: The mineral buildup obstructs water flow, making your coffee maker take longer to brew a pot.
- Reduce brewing temperature: It insulates the heating element, preventing water from reaching the optimal brewing temperature, which impacts flavor extraction.
- Alter coffee flavor: Stale mineral deposits can leach into your coffee, giving it a bitter or metallic taste.
- Shorten your machine’s lifespan: Persistent clogs and strain on the heating element can lead to premature wear and tear.
- Increase energy consumption: A less efficient machine has to work harder, using more electricity.
Regular cleaning and descaling are the most effective ways to combat these issues. It’s a small effort that yields significant improvements in taste, speed, and longevity of your appliance.
How Often Should You Descale Your Coffee Maker?
The ideal frequency for descaling your coffee maker depends on a few factors:
- Water Hardness: If you have hard water (high mineral content), you’ll need to descale more frequently.
- Usage: How often do you use your coffee maker? A daily brewer needs more frequent attention than one used weekly.
- Type of Coffee Maker: Some machines are more prone to mineral buildup than others.
As a general rule of thumb:
- For daily use with moderately hard water: Aim to descale every 1-2 months.
- For less frequent use or soft water: Every 3-6 months might suffice.
- If you notice slower brewing, reduced heat, or off-flavors: It’s time to descale, regardless of the schedule.
Many coffee maker manufacturers also provide specific descaling recommendations in their user manuals. It’s always a good idea to consult yours.
What You’ll Need for Descaling
You don’t need a lot of fancy equipment. Most of what you’ll need is probably already in your kitchen:
- White Vinegar: The most common and effective descaling agent. It’s acidic and breaks down mineral deposits.
- OR Commercial Descaling Solution: Specifically formulated for coffee makers. Follow the product’s instructions precisely.
- Fresh Water: For rinsing the machine thoroughly.
- Clean Cloth or Sponge: For wiping down external parts.
- Coffee Filter (Optional but Recommended): To catch any loose debris during the process.
Step-by-Step Guide to Descaling Your Coffee Maker
Let’s get down to business! Follow these steps for a squeaky-clean coffee maker.
Step 1: Prepare Your Coffee Maker
Before you begin the descaling process, ensure your coffee maker is clean from any coffee grounds or old coffee residue.
Empty and Rinse
- Discard any leftover coffee from the carafe.
- Remove and discard any used coffee filter from the brew basket.
- Rinse the carafe and the brew basket with warm water.
Wipe Down Exterior
Use a damp cloth to wipe down the exterior of your coffee maker, including the warming plate and any accessible surfaces. This is a good time to give it a general tidy-up.

Visual guide about How to Descale a Coffee Maker for Better Performance
Image source: fueledbycoffee.com

Visual guide about How to Descale a Coffee Maker for Better Performance
Image source: timscoffee.com
Visual guide about How to Descale a Coffee Maker for Better Performance
Image source: thespruce.com
Step 2: Prepare Your Descaling Solution
This is where you choose your cleaning agent.
Using White Vinegar
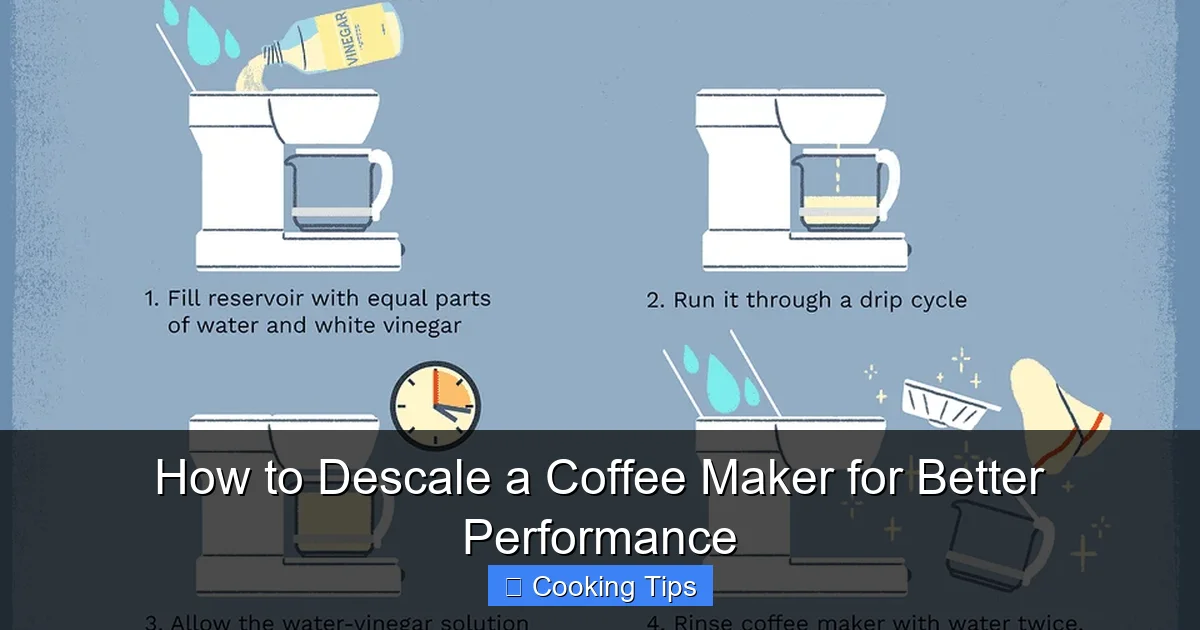
This is the most common and budget-friendly method. You’ll typically use a 1:1 ratio of white vinegar to water.
- Fill the water reservoir: Pour equal parts white vinegar and water into the coffee maker’s water reservoir. For example, if your reservoir holds 12 cups, use 6 cups of white vinegar and 6 cups of water.
Using a Commercial Descaling Solution
If you’re using a commercial descaling solution, carefully read the instructions on the packaging. They will specify the correct dilution ratio with water.
- Follow product instructions: Mix the descaling solution with water in the reservoir according to the manufacturer’s directions.
Step 3: Run the Brew Cycle (Vinegar Method)
Now, it’s time to let the solution work its magic.
Start the Brew
Place an empty coffee filter into the brew basket. This helps to catch any loose mineral particles that might break free during the cleaning process.
Place the empty carafe on the warming plate.
Turn on your coffee maker and let it run a full brew cycle, just as you would if you were making coffee.
Let it Sit
Once the brew cycle is complete, turn off the coffee maker. Let the hot vinegar-water solution sit inside the coffee maker, in the reservoir and internal tubing, for at least 30 minutes. This extended soak time is crucial for breaking down stubborn mineral deposits.
Step 4: Discard and Rinse
After the soaking period, it’s time to flush out the cleaning solution.
Discard the Solution
Carefully discard the hot vinegar-water solution from the carafe. It will likely have a cloudy appearance and might even contain visible flecks of mineral deposits.
Run a Water-Only Brew Cycle
Fill the water reservoir with fresh, clean water.
Place a fresh, empty coffee filter in the brew basket.
Run a full brew cycle using only water.
Discard the water from the carafe.
Step 5: Repeat Rinsing (Crucial Step!)
This is a critical step to ensure no vinegar taste remains in your coffee.
Multiple Rinse Cycles
Repeat Step 4 (running a full brew cycle with fresh water) at least two more times. Some people prefer to do three or even four rinse cycles to be absolutely sure the vinegar smell and taste are gone.
Tip: Between rinse cycles, you can smell the water in the carafe. If you still detect a strong vinegar odor, run another rinse cycle.
Step 6: Final Wipe Down and Reassembly
Almost there! Just a few finishing touches.
Clean Removable Parts
Wash the carafe and brew basket thoroughly with warm, soapy water. Rinse them well.
Wipe the Exterior
Give the exterior of your coffee maker another quick wipe down with a clean, damp cloth.
Reassemble
Once everything is clean and dry, reassemble your coffee maker.
Troubleshooting Common Descaling Issues
Sometimes, even with the best intentions, you might encounter a minor hiccup.
Lingering Vinegar Smell/Taste
Problem: You’ve run several rinse cycles, but your coffee still smells or tastes like vinegar.
Solution: Run another 1-2 plain water cycles. Sometimes, very stubborn deposits can trap residual cleaner. Ensure you’re using the brew basket slot for the water-only cycles to help flush everything through the system.
Coffee Maker Still Brewing Slowly
Problem: Despite descaling, the brewing speed hasn’t improved.
Solution: The mineral buildup might be more severe than anticipated, or there could be another issue. If you have extremely hard water or haven’t descaled in a long time, you might need to repeat the descaling process. If problems persist, it might indicate a mechanical issue with the heating element or pump, and you may need to consider professional servicing or replacement.
Visible Mineral Deposits in the Water Reservoir
Problem: You can see white, chalky deposits clinging to the inside of the water reservoir.
Solution: For visible deposits, you might need to use a soft brush or a slightly damp cloth to gently scrub them loose before or after the vinegar soak. Be careful not to scratch the plastic.
Preventative Measures for a Cleaner Coffee Maker
Once your coffee maker is clean, you can take steps to keep it that way longer.
Use Filtered Water
This is perhaps the single most effective way to reduce mineral buildup. Using filtered water significantly lowers the mineral content that enters your coffee maker. A simple water filter pitcher or a filter integrated into your refrigerator can make a big difference.
Regular Rinsing
After each use, consider rinsing the brew basket and carafe. This removes coffee grounds and oils that can contribute to residue buildup.
Occasional Wipe Downs
Keep the exterior clean with a damp cloth to prevent dust and coffee splatters from becoming ingrained.
Conclusion
Descaling your coffee maker is a simple yet essential maintenance task that will dramatically improve the quality of your daily coffee and extend the life of your appliance. By dedicating a little time every couple of months to this process, you’ll ensure your coffee maker operates at its best, brewing hotter, faster, and tasting far superior. Say goodbye to bitter, lukewarm coffee and hello to a consistently delicious cup, brewed by a machine that’s as well-maintained as it is loved. Happy brewing!