
Unlock the full potential of your air fryer by converting your favorite oven recipes! This guide provides clear, step-by-step instructions on how to adjust temperatures, cooking times, and techniques for perfectly crispy results. Learn the key principles and gain the confidence to air fry almost anything, from roasted vegetables to baked goods, with effortless ease.
Key Takeaways
- Understand the Core Difference: Air fryers circulate hot air more intensely than conventional ovens, leading to faster cooking and crispier exteriors.
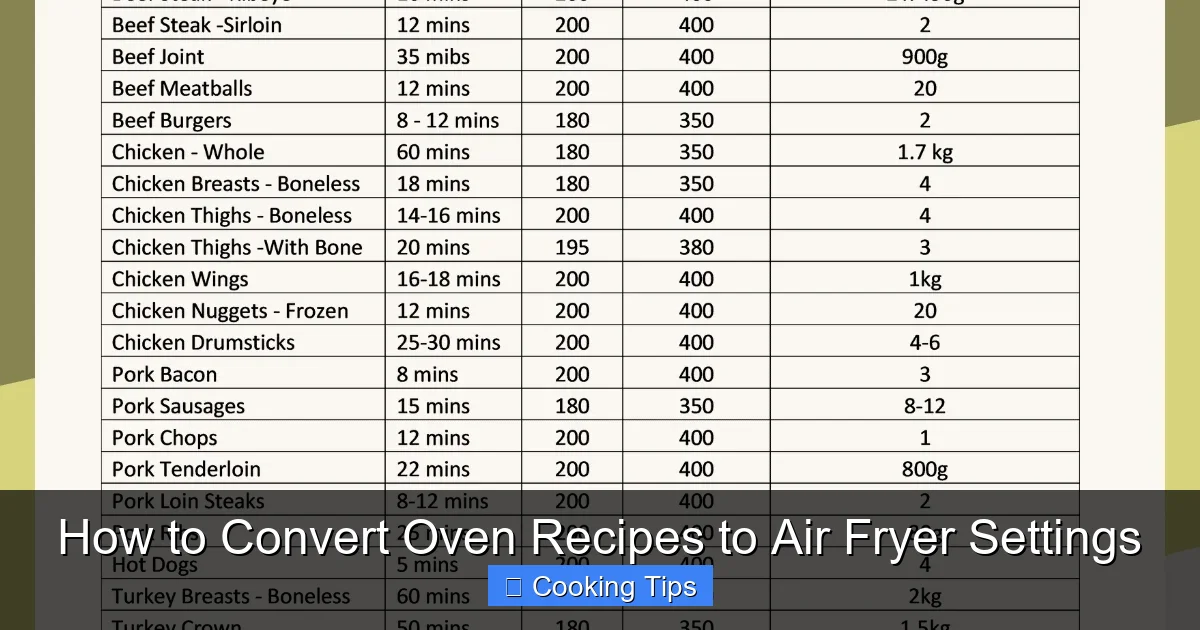
- Temperature Adjustment is Crucial: Generally, reduce the oven temperature by 25-50°F (15-25°C) for air fryer recipes to prevent burning.
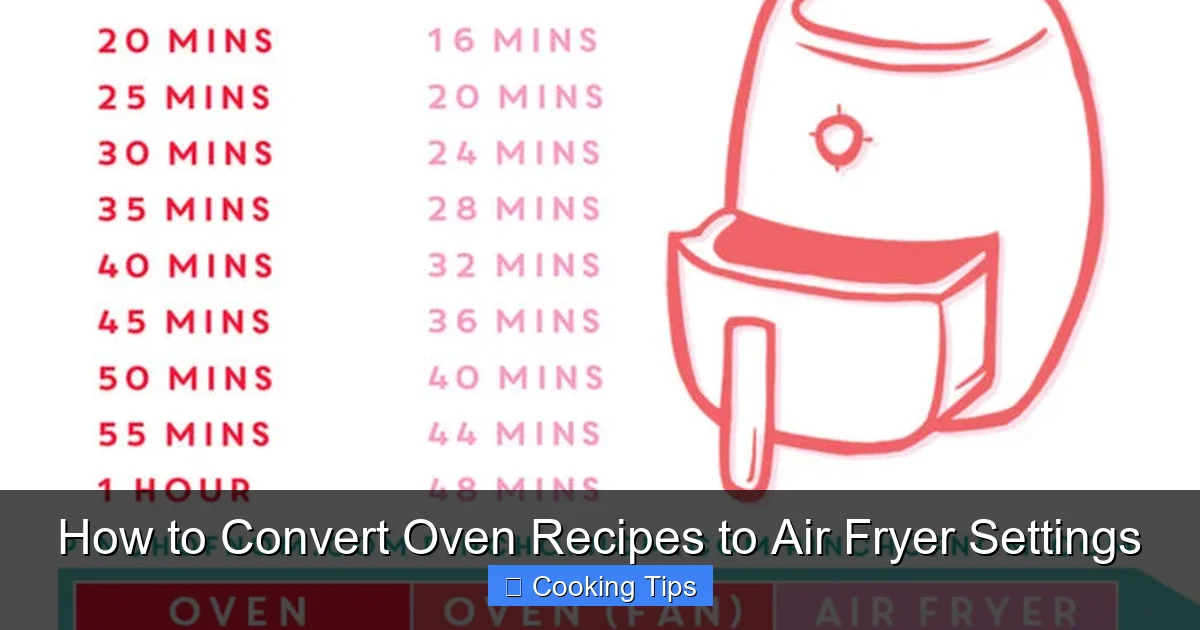
- Time is Shorter: Expect to reduce cooking time by 20-50% compared to oven recipes, as air fryers cook more efficiently.
- Don’t Overcrowd the Basket: Allow ample space for air to circulate; overcrowding leads to uneven cooking and soggy results.
- Shake or Flip for Evenness: For smaller items, shaking the basket is ideal. For larger items, flipping them halfway through is necessary.
- Preheating is Usually Recommended: Most air fryer recipes benefit from a brief preheating period to ensure immediate crisping.
- Consider Moisture Content: Foods with high moisture content may require slightly longer cooking times or a higher temperature for crisping.
How to Convert Oven Recipes to Air Fryer Settings
So, you’ve got a delicious recipe from your grandma’s cookbook, or maybe a favorite online find, that calls for your trusty oven. But lately, your air fryer has been stealing the spotlight, and you’re wondering if you can get those same amazing results with it. The good news is, absolutely you can! Converting oven recipes to air fryer settings is easier than you might think, and it often leads to faster cooking times and unbelievably crispy food.
This guide is here to walk you through the process. We’ll cover everything you need to know, from understanding how air fryers work differently from ovens to making those crucial adjustments to temperature, time, and technique. Get ready to unlock a whole new level of convenience and deliciousness in your kitchen!
Understanding Your Air Fryer: The Magic of Convection
Before we dive into the “how-to,” let’s quickly touch on why air fryers are so effective. An air fryer is essentially a compact, high-powered convection oven. It works by circulating extremely hot air around your food at a very high speed. This intense convection effect is what gives you that signature crispy exterior, often in less time than a traditional oven. Because the cooking chamber is smaller and the fan is more powerful, the heat is more concentrated and direct. This is the primary reason why we need to make adjustments when converting recipes.
Step-by-Step Conversion Guide
Converting your oven recipes to air fryer settings involves a few key adjustments. Follow these steps for success:
Step 1: Temperature Adjustments
Visual guide about How to Convert Oven Recipes to Air Fryer Settings
Image source: i.pinimg.com
This is arguably the most important adjustment. Because air fryers are so efficient and the heating element is closer to the food, you’ll generally need to reduce the oven temperature.
The Golden Rule: Reduce by 25-50°F (15-25°C)
* For most recipes, a good starting point is to reduce the oven temperature by 25°F (15°C).
* If the original recipe calls for a very high oven temperature (400°F/200°C or above), you might want to reduce it by 50°F (25°C).
* **Why?** This prevents the outside of your food from burning before the inside is cooked through. Air fryers create a more intense “sear” or crisping effect.
Example: If your oven recipe calls for baking chicken at 400°F (200°C), try air frying it at 375°F (190°C) or even 350°F (175°C) depending on the thickness of the chicken.
Step 2: Time Adjustments

Visual guide about How to Convert Oven Recipes to Air Fryer Settings
Image source: i.pinimg.com
Air fryers cook faster. Much faster! The intense air circulation cuts down cooking times significantly.
Expect Shorter Cooking Times: Reduce by 20-50%
* As a general guideline, start by reducing the cooking time by about 20%.
* For many items, especially smaller ones or those that cook quickly in an oven, you might need to reduce the time by 30-50%.
* **Always check for doneness early!** It’s much easier to add a few more minutes than to salvage overcooked food.
Example: If your oven recipe for roasted broccoli takes 25 minutes, try air frying it for 12-15 minutes, checking for tenderness and crispness around the 10-minute mark.
Step 3: Basket Management is Key
Visual guide about How to Convert Oven Recipes to Air Fryer Settings
Image source: i.pinimg.com
This is where the “air” in air fryer really comes into play. Proper basket management ensures even cooking and that signature crispiness.
Don’t Overcrowd!
- This is a cardinal rule of air frying. You need space for the hot air to circulate freely around your food.
- Cook in batches if necessary. It might take a little longer overall, but the results will be far superior.
- Overcrowding leads to steaming rather than frying, resulting in soggy food.
Layering and Arrangement
- Arrange food in a single layer as much as possible.
- If you are cooking multiple layers of food (like fries), give them space.
Practical Tip: Think of it this way: if you can’t see much of the basket, you’ve probably put too much in.
Step 4: Shake, Flip, or Rotate
For even cooking, especially with smaller, uniformly shaped items, you’ll need to agitate the food during the cooking process.
For Smaller Items (Fries, Nuggets, Vegetables): Shake the Basket
- About halfway through the cooking time (or even at intervals of 5-7 minutes), pull out the air fryer basket and give it a good shake.
- This mixes the food up, ensuring all sides get exposed to the hot air.
For Larger Items (Chicken Breasts, Fish Fillets, Patties): Flip or Rotate
- For larger, individual pieces of food, you’ll need to flip them over halfway through the cooking time.
- This ensures both sides get nicely browned and cooked through.
Example: When air frying chicken wings, shake the basket every 5-7 minutes. When air frying salmon fillets, flip them after about 6-8 minutes of cooking.
Step 5: Preheating Your Air Fryer
Most air fryer recipes benefit from preheating, just like you would preheat an oven.
Why Preheat?
- Preheating ensures that your food hits a hot environment immediately, which is crucial for crisping.
- It helps achieve that perfect golden-brown exterior from the start.
How Long to Preheat?
- Most air fryers require about 3-5 minutes of preheating at the target temperature.
- Consult your air fryer’s manual for specific recommendations.
Note: Some air fryer models have a “preheat” function. If yours doesn’t, simply set it to your desired cooking temperature and let it run for a few minutes before adding food.
Step 6: Considering Moisture Content
The amount of moisture in your food can impact how it cooks in an air fryer.
High Moisture Foods
- Foods with a lot of natural moisture, like certain vegetables or foods that have been marinated, might take slightly longer to crisp up.
- You might also consider slightly increasing the temperature (by 10-15°F / 5-10°C) towards the end of cooking to achieve extra crispiness.
Low Moisture Foods
- Foods that are naturally drier or have had moisture removed (like dehydrated fruits) will cook very quickly and can become tough or burnt easily. Adjust time and temperature accordingly.
Tip: Patting down very moist foods with paper towels before air frying can help speed up the crisping process.
Special Considerations for Different Food Types
While the general steps apply broadly, here are some specific tips for common recipe types:
Vegetables
- Oven Method: Toss with oil, season, spread on a baking sheet, roast.
- Air Fryer Conversion: Toss with less oil (air fryers use oil more efficiently), season, place in a single layer in the basket. Cook time is significantly reduced. Shake frequently. Start checking around 8-10 minutes for most vegetables.
Meats and Poultry
- Oven Method: Roast, bake, or broil.
- Air Fryer Conversion: Reduce temperature slightly. Place in a single layer. Flip halfway through. Cooking times will be shorter. Use a meat thermometer to ensure safe internal temperatures.
Baked Goods (Cookies, Muffins, Cakes)
- This is where conversion requires more caution. Air fryers are great for “reheating” baked goods to make them crispy again.
- For baking from scratch, you’ll need to significantly reduce the temperature (often by 50°F / 25°C) and cook time.
- Use smaller, oven-safe ramekins or mini muffin tins that fit comfortably in your air fryer basket.
- The top may brown faster than the bottom, so keeping an eye on it is essential. For cakes, a toothpick test is crucial.
Frozen Foods
- Many frozen foods (fries, nuggets, etc.) are designed for oven cooking but can be excellent in the air fryer.
- Follow the package instructions for oven temperature, but reduce it by about 25°F (15°C) and cut the cooking time in half, checking for crispness.
Troubleshooting Common Issues
* Food is soggy: You likely overcrowded the basket. Cook in smaller batches. Ensure food is patted dry if it’s particularly moist.
* Food is burnt on the outside, raw inside: The temperature was too high, or the cooking time was too long. Reduce the temperature next time, or check for doneness much earlier.
* Food is unevenly cooked: Didn’t shake or flip the food often enough. Ensure even spacing in the basket.
* Air fryer smoking: This can happen if you use too much oil (especially oils with a low smoke point) or if there are food debris in the basket or on the heating element. Clean your air fryer regularly and use minimal oil.
Conclusion: Embrace Your Air Fryer!
Converting oven recipes to your air fryer is a fantastic way to save time, use less oil, and achieve deliciously crispy results. By understanding the fundamental differences in how air fryers cook and making those simple adjustments to temperature, time, and technique, you can confidently air fry a vast array of your favorite dishes. Remember to start with the general guidelines, observe how your food cooks, and don’t be afraid to experiment. Happy air frying!