
This guide provides a comprehensive, step-by-step method for sharpening kitchen knives using a whetstone. You’ll learn about selecting the right stones, preparing them, and the correct techniques for achieving a razor-sharp edge. With this knowledge, you can significantly improve your cooking safety and efficiency.
Key Takeaways
- Choose the Right Whetstones: Select a combination of coarse, medium, and fine-grit stones to address different levels of dullness and achieve a polished edge.
- Proper Stone Preparation is Crucial: Soaking oil stones or splashing water on water stones ensures proper lubrication and prevents the stone from clogging.
- Maintain a Consistent Angle: Aim for a consistent angle (typically 15-20 degrees for most kitchen knives) throughout the sharpening process for an even bevel.
- Work Both Sides of the Blade: Sharpen one side of the blade until a burr forms, then switch to the other side to remove that burr and refine the edge.
- Progress Through Grits: Start with a coarser grit to repair damage or establish an edge, then move to finer grits to hone and polish the blade to sharpness.
- Test for Sharpness: Gently test the knife’s sharpness by attempting to slice through a piece of paper or by observing how it glides through a tomato.
- Regular Honing is Key: Complement sharpening by regularly honing your knives with a honing steel to maintain their edge between sharpenings.
How to Sharpen a Kitchen Knife with a Stone
Welcome to the ultimate guide on achieving razor-sharp kitchen knives using a sharpening stone, also known as a whetstone. A dull knife isn’t just frustrating; it’s dangerous. It requires more force, increasing the risk of slipping and cutting yourself. Thankfully, learning to sharpen your knives is a skill that, with a little practice, will transform your cooking experience. Forget expensive knife-sharpening services or ineffective pull-through sharpeners. We’re going to teach you the time-tested, effective method of using whetstones. By the end of this guide, you’ll understand how to select the right stones, prepare them, and master the techniques to bring your dull blades back to life.
Why Sharpen Your Knives?
A sharp knife glides through food with minimal effort. This means cleaner cuts, better texture preservation in your ingredients, and a much safer cooking environment. Imagine slicing tomatoes with ease, dicing onions without resistance, and filleting fish precisely. This all starts with a sharp blade. Regular sharpening also extends the life of your knives, preventing the need for frequent replacements.
Understanding Whetstones
Whetstones come in various types and grits. The grit refers to the abrasive particles on the stone’s surface. Higher grit numbers mean finer particles and a smoother finish, while lower grit numbers have coarser particles for more aggressive material removal.
Types of Whetstones
The two most common types of whetstones are:
- Water Stones: These are made from a softer material that releases abrasive slurry as you use them. They are known for fast cutting and a fine finish. They require soaking in water before use.
- Oil Stones: These are made from harder materials and require a lubricant, typically honing oil, to prevent the stone from clogging. They are generally more durable than water stones but cut slower.
Grit Combinations
For most home cooks, a combination stone is ideal. Look for stones with at least two different grits, such as:
- Coarse Grit (around 200-400): For repairing chips or restoring a severely dull edge.
- Medium Grit (around 800-1500): For general sharpening and establishing a good working edge.
- Fine Grit (around 3000-8000+): For refining the edge, polishing the bevel, and achieving a razor-sharp finish.
A stone with a medium and fine grit (e.g., 1000/6000) is a great starting point.
Getting Started: What You’ll Need
Before you begin, gather these essential items:
- Your dull kitchen knife(s)
- A whetstone (preferably a combination stone)
- Water (for water stones) or honing oil (for oil stones)
- A stable, non-slip surface (a damp towel or a rubber mat works well)
- A stone holder (optional, but recommended for stability)
- A clean cloth or paper towel
Step-by-Step Sharpening Process
Now, let’s get to the actual sharpening. Remember to work slowly and deliberately, especially when you’re first learning.
Step 1: Prepare Your Whetstone
This step is crucial for optimal performance and to protect your stone.
For Water Stones:
- Submerge the water stone in a container of water.
- Let it soak until it stops releasing air bubbles. This can take 5-15 minutes, depending on the stone.
- Once soaked, place it on a stable surface or in a stone holder. You may need to add a little water periodically as you sharpen to keep the surface wet and create a slurry.
For Oil Stones:
- Apply a thin layer of honing oil to the surface of the stone.
- Spread the oil evenly with your finger or a cloth.
- As you sharpen, add a few drops of oil if the surface starts to look dry.
Step 2: Find and Set Your Angle
The angle at which you hold your knife against the stone is critical. Most Western-style kitchen knives have an edge angle of 15-20 degrees per side. Japanese knives often have a sharper angle, around 10-15 degrees.
Tips for Finding the Angle
- The Coin Trick: Place two US pennies (or similarly sized coins) under the spine of the knife near the edge. This roughly approximates a 15-20 degree angle.
- Visual Approximation: Imagine the angle. A 90-degree angle is perpendicular to the stone. A 45-degree angle is halfway there. Aim for something between a 45-degree angle and perpendicular.
- Practice Strokes: Before placing the edge on the stone, practice holding the knife at your chosen angle and moving it.
Consistency is more important than hitting an exact number. Find an angle you can maintain.
Visual guide about How to Sharpen a Kitchen Knife with a Stone
Image source: i.ytimg.com
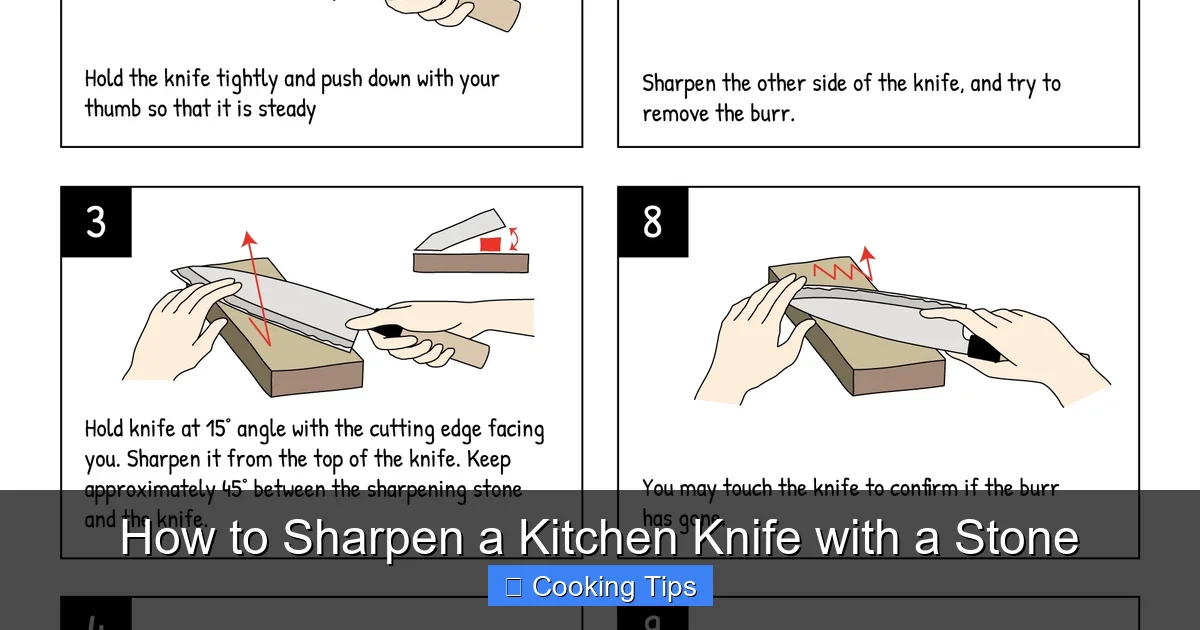
Visual guide about How to Sharpen a Kitchen Knife with a Stone
Image source: cdn.shopify.com
Step 3: Sharpening the First Side (Coarse/Medium Grit)
Start with the coarser grit side of your stone (if using a combination stone) to remove material and establish a fresh edge.
The Motion
Place the heel of your knife (the part closest to the handle) on the stone at your chosen angle. Apply gentle, even pressure. Imagine you’re trying to slice off a thin layer of the stone. Then, push the knife forward and across the stone, moving from the heel to the tip, maintaining your angle. This single stroke should cover the entire length of the blade.
Developing the Burr
Repeat this motion, moving from heel to tip, 5-10 times. Then, lift the knife and return it to the stone, starting with the tip and working your way back to the heel, again at the same angle. You’re essentially working the entire edge.
After several passes, feel for a “burr” on the opposite side of the edge you are sharpening. Gently run your fingertip (carefully!) along the edge, away from the blade, on the side that was not in contact with the stone. You should feel a slight roughness or wire-like edge. This indicates you have ground through to the other side and created a burr.
Step 4: Sharpening the Second Side (Coarse/Medium Grit)
Once you’ve developed a burr on the second side, switch to sharpening the first side again.
Refining the Burr
Repeat the same motion you used in Step 3 on the first side of the blade. The goal here is to raise a small burr on the first side, which helps to center the burr you previously created. Perform about 5-10 strokes on this side.
Now, flip the knife over and repeat the strokes on the second side. Aim to create a burr on the first side again. You might need to do fewer strokes now, perhaps 3-5.
Step 5: Moving to the Fine Grit
Once you’re satisfied with the edge created by the medium grit and have a consistent burr, it’s time to refine it.
Polishing the Edge
Flip your whetstone to the finer grit side. If using a water stone, ensure it’s wet. If using an oil stone, add oil.
Repeat the same heel-to-tip and tip-to-heel motions you used on the coarser grit, but with lighter pressure. Perform about 5-10 strokes on each side.
Finish with one or two very light “stropping” strokes on each side. This involves very light pressure, essentially just gliding the blade across the stone without any real grinding action. This helps to align the microscopic teeth of the edge.
Step 6: Removing the Burr and Testing Sharpness
The final step is to remove any remaining burr and test your newly sharpened knife.
The Burr Removal
Some people like to lightly drag the spine of the knife across the stone a few times. Others find that very light, alternating strokes on the fine grit stone are sufficient.
A very common and effective method is to “strop” the edge on leather, cork, or even the underside of your hand (very carefully!). This aligns the edge and removes the burr.
Testing for Sharpness
- Paper Test: Hold a piece of standard printer paper vertically. A sharp knife should slice through it cleanly with minimal resistance, without snagging or tearing.
- Tomato Test: Try to slice through the skin of a ripe tomato. A sharp knife will bite into the skin easily and slice through without crushing the tomato.
If the knife isn’t as sharp as you’d like, don’t worry. Go back to the medium grit for a few more strokes, ensuring you’re still developing and removing the burr, then finish again on the fine grit.
Troubleshooting Common Issues
Visual guide about How to Sharpen a Kitchen Knife with a Stone
Image source: noshingwiththenolands.com
* **”I can’t feel a burr.”** You might not be using a consistent enough angle, or you’re not applying enough pressure on the coarser grits. Try increasing pressure slightly and ensuring you’re moving from heel to tip and tip to heel consistently.
* **”My knife feels sharp, but it dulls quickly.”** You might not have fully removed the burr, or you skipped the fine grit stage. Ensure you’re working through all the grits and that the burr is completely removed.
* **”I’m creating a burr, but it’s all over the place.”** This often indicates an inconsistent angle. Focus on keeping your wrist locked and maintaining a steady angle throughout each stroke.
* **”My stone is clogging up.”** If using a water stone, ensure it’s adequately soaked. If using an oil stone, make sure you’re using enough oil. Clean your stone with water and a brush if it’s becoming clogged.
Maintaining Your Sharpened Knives
Sharpening is an investment in time. To keep your knives sharp for longer, regular honing is essential. Use a honing steel or ceramic rod frequently (even daily) to realign the microscopic teeth of the blade. This is not sharpening; it’s maintenance that keeps your knife performing at its best between full sharpening sessions. Always wash and dry your knives immediately after use, and store them properly in a knife block or on a magnetic strip to protect the edge.
Conclusion
Mastering knife sharpening with a whetstone is a rewarding skill that will undoubtedly elevate your kitchen game. It requires patience and practice, but the results – a remarkably sharp and responsive knife – are well worth the effort. By following these steps, you’ll gain confidence in your ability to maintain your most important kitchen tool. So, gather your stones, find your angle, and get ready to experience the joy of cooking with a truly sharp knife. Happy sharpening!