
Keep your kitchen grinder parts tidy and accessible with this comprehensive guide. We’ll show you how to declutter, categorize, and store your grinder components efficiently. Say goodbye to lost pieces and hello to a more organized kitchen!
How to Store and Organize Kitchen Grinder Parts
In the bustling world of home cooking, your kitchen grinder can be a culinary workhorse. Whether you have a compact spice grinder, a powerful coffee grinder, or a versatile food grinder, these appliances often come with a collection of parts. From blades and discs to hoppers and cleaning brushes, keeping these components organized can feel like a significant challenge. Loose parts can clutter your countertops, get lost in drawers, and make assembly a frustrating experience. But fear not! By the end of this guide, you’ll be equipped with practical strategies to master the art of kitchen grinder part storage and organization, making your cooking process smoother and more enjoyable. We’ll cover everything from initial decluttering to implementing smart storage solutions that will keep your grinder and its accessories in pristine condition for years to come.
Key Takeaways
- Categorize Your Parts: Group similar grinder parts together based on their function or type.
- Clean Before Storing: Always ensure all grinder parts are clean and dry before putting them away to prevent damage and hygiene issues.
- Utilize Drawer Organizers: Drawer dividers and small containers are excellent for keeping smaller grinder accessories neatly separated.
- Vertical Storage Solutions: Make the most of your cabinet space by using stackable containers or wall-mounted racks for larger parts.
- Label Everything: Clearly label storage containers and areas to quickly identify what’s inside and where it belongs.
- Dedicate a Grinder Zone: Assign a specific area in your kitchen for all grinder-related items to consolidate your efforts.
- Regular Decluttering: Periodically review your grinder accessories and discard any broken or rarely used items.
Step 1: Assess and Declutter Your Grinder Parts
Before you can organize, you need to know what you have. This initial step is crucial for efficient storage. Take all your grinder parts out of their current locations – this might involve emptying drawers, cabinets, or even the grinder itself.
Gather Everything in One Place
The first action is to gather every single piece that belongs to your kitchen grinder(s). This includes blades, grinding chambers, lids, pushers, cleaning brushes, instruction manuals, and any other accessories. Having everything in one central location allows you to see the full scope of what needs organizing.
Inspect for Damage or Wear
As you gather the parts, take a moment to inspect each one. Look for any signs of damage, rust, or excessive wear. Are any blades dull or chipped? Are any plastic parts cracked? If a part is broken or no longer functions effectively, it’s time to let it go. Keeping damaged parts only adds to clutter and can pose safety risks.
Identify Duplicates and Obsolete Items
Do you have multiple sets of blades for the same grinder? Or perhaps you have accessories for a grinder you no longer own? Identify any duplicate items you don’t need. Also, consider if you have accessories for a grinder model that is now obsolete or replaced. If you haven’t used a particular accessory in over a year and don’t foresee yourself using it, it might be time to donate or discard it.
Step 2: Clean and Prepare Parts for Storage
Cleanliness is paramount when storing kitchen appliance parts. Food residue can attract pests, lead to mold, and degrade the parts over time. Always ensure your grinder parts are thoroughly cleaned and completely dry before storing them.
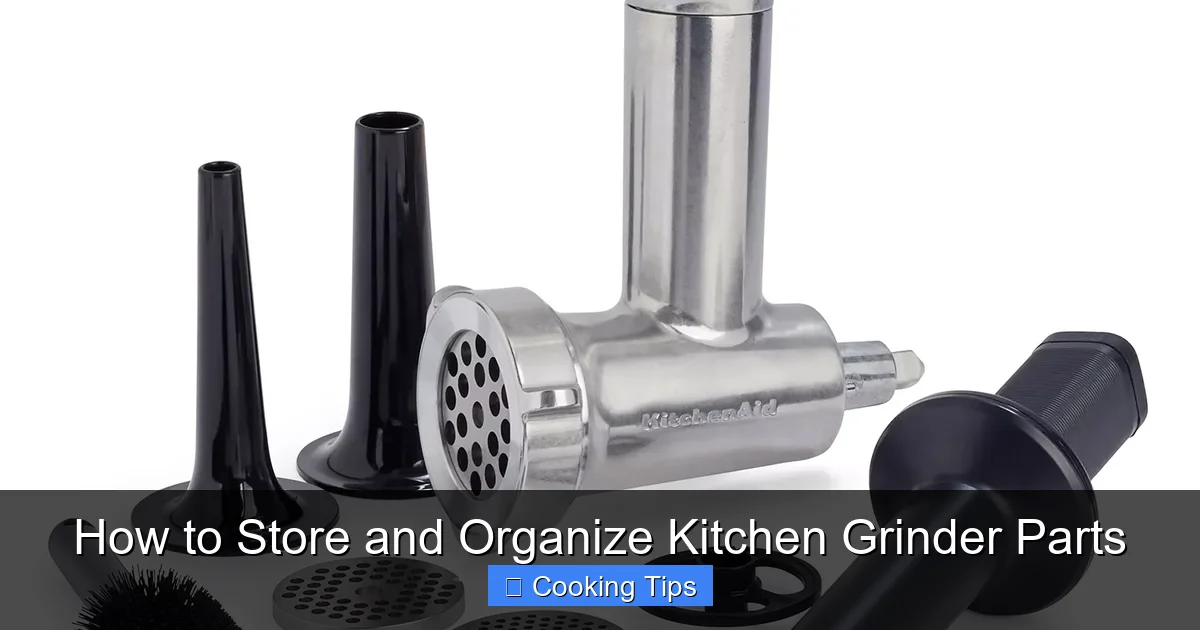
Visual guide about How to Store and Organize Kitchen Grinder Parts
Image source: easiahome.com
Wash All Components
Wash all grinder parts with warm, soapy water. For most components, a sponge or soft brush will suffice. Pay close attention to crevices and blades where food particles might hide. If your grinder parts are dishwasher safe, you can use that method, but always check the manufacturer’s instructions first. For coffee grinders, ensure all coffee grounds and oils are removed. For spice grinders, wash away any residual spices and their oils.
Dry Thoroughly
Moisture is the enemy of storage. After washing, dry each part completely. You can use a clean, lint-free towel. For parts with hard-to-reach areas, you might consider air-drying them upside down on a drying rack. Make sure there is absolutely no lingering dampness before proceeding to the next step. This is especially important for metal parts to prevent rust.
Step 3: Categorize Your Grinder Parts
Once your parts are clean and dry, it’s time to group them logically. Categorization makes it easier to find what you need quickly and ensures that related items are stored together.

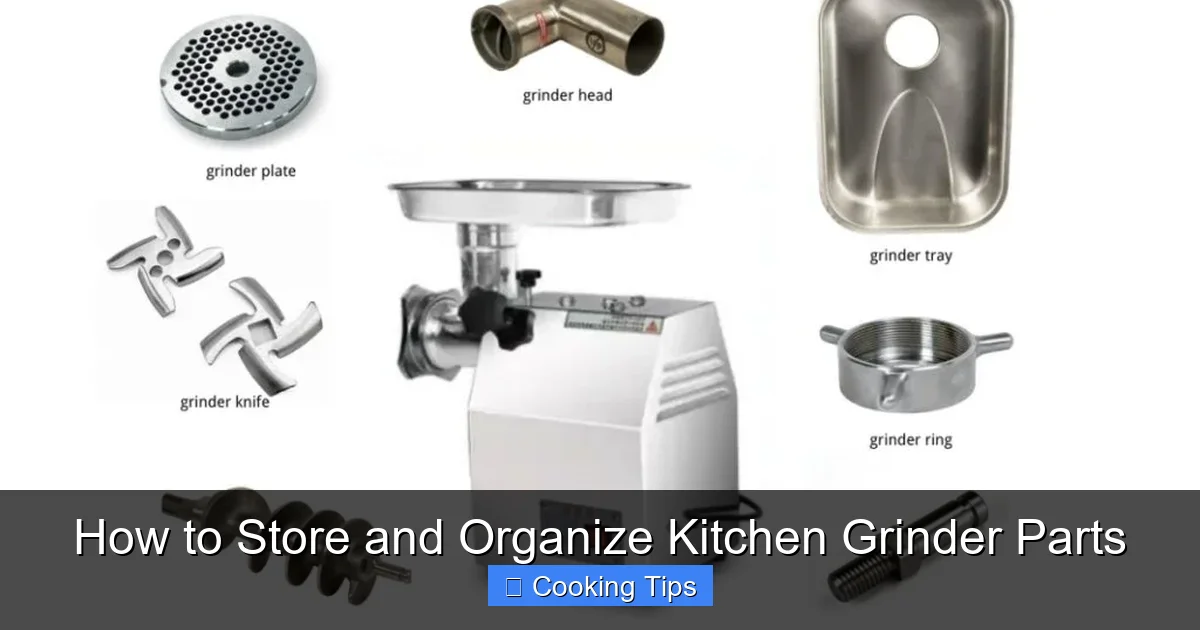
Visual guide about How to Store and Organize Kitchen Grinder Parts
Image source: orpatgroup.com
Group by Grinder Type
If you have multiple types of grinders (e.g., coffee grinder, spice grinder, meat grinder), group the parts for each appliance separately. This prevents accidental mixing of parts and confusion when you need to use a specific grinder.
Sub-categorize by Function
Within each grinder type, further categorize parts by their function. For example, with a food grinder, you might group different cutting discs together, separate the hoppers, and keep the meat pusher and cleaning brush in their own category. For a coffee grinder, you might group the bean hopper, grinding burrs (if removable), and cleaning tools.
Consider Frequency of Use
Another way to categorize is by how often you use a particular part. Parts you use daily or weekly should be more accessible than those you use only occasionally. This principle will guide your storage location choices later.
Step 4: Choose the Right Storage Solutions
The type of storage solution you choose will depend on the size and quantity of your grinder parts, as well as the space you have available in your kitchen.
Visual guide about How to Store and Organize Kitchen Grinder Parts
Image source: assets.surlatable.com
For Small Parts: Drawer Organizers and Containers
Small, loose parts like spice grinder blades, coffee grinder brushes, or extra grinder plates can easily get lost. Drawer organizers with adjustable dividers are excellent for keeping these items separated and contained within a drawer. Small plastic bins, craft supply organizers, or even repurposed small food containers can also work well.
- Example: Use a compartmentalized makeup organizer or a tackle box for very small grinder parts.
For Medium-Sized Parts: Lidded Boxes and Pouches
Parts like coffee grinder lids, plastic hoppers, or manual food grinder attachments can be stored in clear, lidded plastic bins. This keeps them dust-free and visible. Reusable silicone bags or sturdy fabric pouches are also good options for softer or less fragile components. These can be neatly stacked in cabinets or on shelves.
- Example: A set of nesting clear plastic bins with lids can be ideal for storing various food grinder discs and their associated parts.
For Larger Parts: Original Packaging or Dedicated Bins
Some grinder parts, especially those from larger food grinders or juicers, might be bulky. If the original packaging is still intact and sturdy, it can be a good way to store these items. Otherwise, a dedicated larger bin or basket in a cabinet or pantry can house these larger components. Ensure the bin is large enough to comfortably fit the part without forcing, which could cause damage.
Vertical Storage for Space Efficiency
Maximize your cabinet or pantry space by utilizing vertical storage solutions. Stackable bins are a classic choice. For some grinders, you might be able to hang certain parts on small hooks inside a cabinet door, provided they are lightweight and not sharp enough to cause damage.
Step 5: Implement Smart Storage Strategies
Once you have your storage solutions, it’s time to put them into practice. The goal is to create an organized system that is easy to maintain.
Designate a “Grinder Zone”
Assign a specific area in your kitchen for all your grinder-related items. This could be a dedicated drawer, a shelf in a cabinet, or a section of your pantry. Consolidating everything in one place makes it easy to find what you need and prevents parts from migrating to other areas of the kitchen.
Label Everything Clearly
Labeling is your best friend for long-term organization. Use clear, legible labels on all your storage containers. This helps you quickly identify what’s inside without having to open multiple boxes. Label not only the container but also the specific area in your cabinet or drawer where it belongs.
- Example: Label a drawer as “Coffee Grinder Parts” and then label individual containers within it, such as “Coffee Grinder Blade” or “Coffee Grinder Cleaning Brush.”
Store Parts with Their Grinder
If possible, store the most frequently used parts with the grinder itself. For example, if your coffee grinder has a removable bean hopper, store it attached to the grinder or in a readily accessible spot right next to it. This minimizes the steps needed to get your grinder ready for use.
Protect Delicate Parts
Sharp blades and delicate grinder mechanisms need protection. Store blades in a way that prevents them from rubbing against other parts or surfaces. You can use felt pads, small fabric pouches, or ensure they are stored securely within a compartmentalized container. Never let sharp blades rattle loosely.
Step 6: Maintain Your Organized System
Organization isn’t a one-time task; it’s an ongoing process. Regularly maintaining your organized grinder parts will save you time and frustration in the long run.
Regular Check-ins and Purges
Schedule a quick check-in every few months. Review your grinder parts and storage. Are there any new items that need a home? Are any items no longer needed? A small purge every now and then prevents clutter from accumulating again.
Put Parts Back Immediately
The easiest way to maintain organization is to develop the habit of putting parts back in their designated spots immediately after cleaning and use. This small discipline prevents items from being left out and causing future disarray.
Update Your System as Needed
As your kitchen habits or appliances change, your organization system might need to adapt. If you get a new grinder or find that your current storage isn’t working as well as it used to, don’t be afraid to tweak your system. The goal is to find a solution that works for *you* and your kitchen.
Troubleshooting Common Grinder Part Organization Issues
Even with the best intentions, you might encounter some challenges. Here are a few common problems and how to solve them:
Problem: Lost Small Parts
Solution: Invest in very small, compartmentalized containers like jewelry organizers or tackle boxes. Ensure these are stored within a larger, clearly labeled bin or drawer to prevent the small containers themselves from getting lost.
Problem: Grinder Parts Taking Up Too Much Space
Solution: Re-evaluate your needs. Do you really need all those extra attachments? Consider donating or selling any parts you haven’t used in over a year. Look for vertical storage solutions like stackable bins or wall-mounted organizers if drawer and cabinet space is limited.
Problem: Blades Getting Damaged or Dull During Storage
Solution: Never store blades loosely. Use blade guards if they came with your grinder. If not, consider creating simple DIY blade protectors using thick cardboard or felt. Alternatively, store blades individually in small fabric pouches or within a sturdy, padded container.
Problem: Difficulty Finding the Right Part Quickly
Solution: Ensure all your labels are clear and descriptive. If you have many similar parts, consider adding a small symbol or color code to the label to differentiate them quickly.
By implementing these strategies, you can transform your kitchen grinder parts from a source of clutter into an efficiently organized system. A tidy workspace leads to a more enjoyable cooking experience, allowing you to focus on what truly matters – creating delicious meals.