
Achieve restaurant-quality crispiness and browning in your air fryer with our comprehensive guide. Learn essential techniques, from proper food preparation and oil application to temperature and airflow management. Unlock the secrets to perfectly golden fries, chicken wings, and more, making every meal a delightful culinary success.
Key Takeaways
- Proper Preheating is Crucial: Always preheat your air fryer. This ensures consistent cooking temperatures from the start, which is vital for achieving even crisping and browning.
- Don’t Overcrowd the Basket: Allow ample space for hot air to circulate. Overcrowding leads to steaming, not crisping, resulting in soggy food. Cook in batches if necessary.
- Strategic Use of Oil: A light coating of oil (or cooking spray) is key for browning and crisping. Aim for a thin, even layer. Too much oil can make food greasy.
- Shake, Flip, and Rotate: For uniform browning on all sides, regularly shake the basket or flip/rotate the food. This exposes all surfaces to the hot air.
- Temperature and Time are Your Friends: Experiment with temperatures and cooking times. Higher heat often promotes faster browning, but watch carefully to prevent burning.
- Moisture Management is Key: Patting food dry before cooking removes excess moisture. This significantly aids in achieving a crisp exterior, especially for items like fries and vegetables.
Crisping and Browning Tips for Air Fryer Cooking
Welcome to the future of crispy, golden goodness! In 2026, air fryers are a staple in kitchens worldwide, and for good reason. They promise healthier, faster, and incredibly delicious results. But let’s be honest, not every air-fried creation comes out perfectly crisp and beautifully browned. Sometimes, you’re left with food that’s cooked but lacks that satisfying crunch or appealing golden hue.
Fear not, aspiring air fryer chefs! This guide is your ultimate roadmap to mastering the art of air fryer crisping and browning. We’ll delve into the why and how, equipping you with practical, easy-to-follow techniques that will transform your air fryer game. Get ready to elevate your home cooking and impress yourself (and everyone else) with perfectly crisped fries, golden chicken wings, and deliciously seared vegetables.
Let’s dive in and unlock the secrets to consistently perfect air fryer meals.
The Science of Air Frying: Why Crisp and Brown?
Before we get to the how, let’s quickly touch on the why. Air fryers work by circulating extremely hot air around your food at high speeds. This mimics the effect of deep frying, but with significantly less oil. For food to crisp and brown, two main things need to happen:
* Dehydration: The surface of the food needs to lose moisture. This allows for the Maillard reaction to occur.
* Maillard Reaction: This is a complex chemical reaction between amino acids and reducing sugars that happens when food is heated. It’s responsible for the delicious browning and the rich, savory flavors we love.
Achieving both dehydration and the Maillard reaction efficiently is the key to that coveted crispy, brown exterior.
Step-by-Step: Achieving Maximum Crisp and Browning
Here’s your comprehensive guide to getting it right, every time.
1. Start with the Right Foundation: Food Preparation
This is where the magic begins, even before your food hits the air fryer.
Pat it Dry, Really Dry
This is arguably the most critical step for achieving crispiness, especially for items like french fries, potatoes, chicken wings, and even vegetables like broccoli or cauliflower.
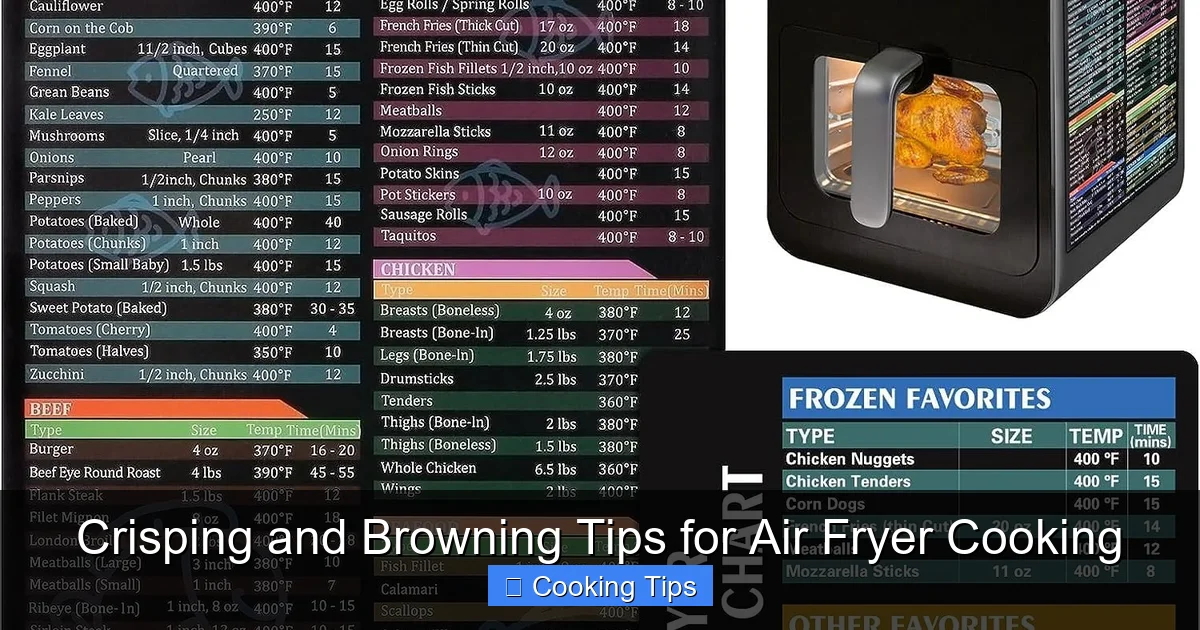
Visual guide about Crisping and Browning Tips for Air Fryer Cooking
Image source: m.media-amazon.com
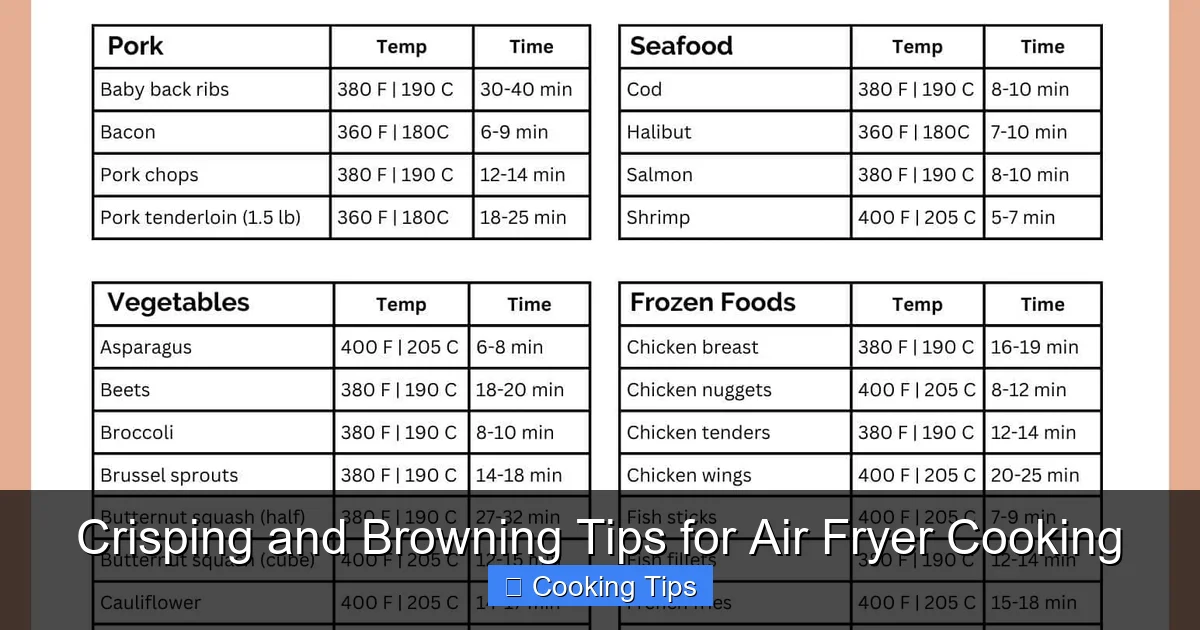
Visual guide about Crisping and Browning Tips for Air Fryer Cooking
Image source: freeprintableinc.org
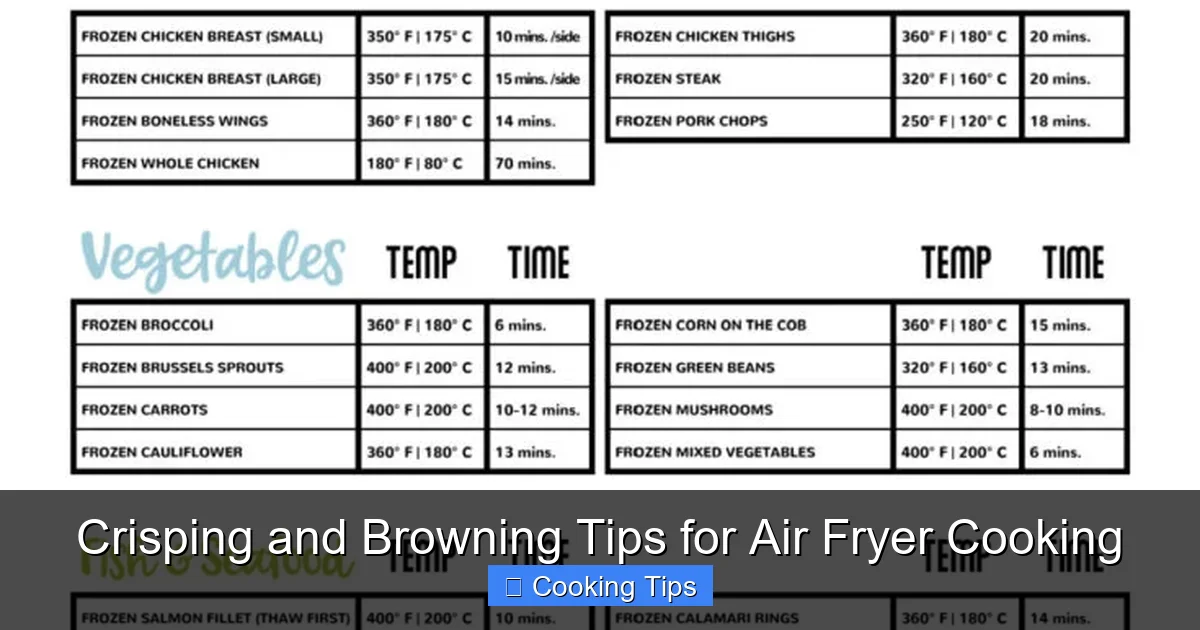
Visual guide about Crisping and Browning Tips for Air Fryer Cooking
Image source: temeculablogs.com
- Why it works: Excess surface moisture will steam your food instead of crisping it. By patting your food thoroughly dry with paper towels, you remove this moisture, allowing the hot air to directly interact with the food’s surface, promoting browning and crisping.
- How to do it: Place your prepared food on a clean kitchen towel or a generous layer of paper towels. Gently press down or dab to absorb as much liquid as possible. For items like fries, you might even let them air dry for 10-15 minutes after patting them dry.
Consider Your Cut
The size and shape of your food pieces matter. Uniformity is key for even cooking.
- For crisping: Smaller, thinner pieces tend to crisp up more readily than larger, thicker ones. Think about cutting fries to a similar thickness, or ensuring chicken pieces are bite-sized.
- For browning: If you want good browning on larger items like chicken breasts or fish fillets, ensure they have enough surface area exposed.
2. The Magic of Oil (But Not Too Much!)
Oil is your best friend for crisping and browning in an air fryer. It helps conduct heat and facilitates the Maillard reaction. However, too much oil can lead to a greasy outcome and less crispiness.
Embrace the Spray or Light Coating
- Use an oil spray: A good quality oil spray is perfect for evenly coating food without overwhelming it. Look for sprays designed for cooking.
- Brush it on: If you don’t have a spray, use a pastry brush to apply a thin, even layer of your preferred cooking oil (like olive oil, avocado oil, or vegetable oil) to all sides of the food.
- Toss gently: For smaller items like fries or diced vegetables, you can toss them in a bowl with a tablespoon or two of oil. Ensure every piece is lightly coated.
Which Oils Work Best?
Oils with a higher smoke point are generally preferred for air frying, as they can withstand the high temperatures without burning and producing unpleasant flavors.
- Avocado oil: Excellent choice with a high smoke point and neutral flavor.
- Grapeseed oil: Another great option with a high smoke point and very mild taste.
- Light olive oil: While extra virgin olive oil can be used, a lighter variety has a higher smoke point and is less likely to burn.
- Vegetable or canola oil: Affordable and effective for general air frying.
3. The Preheating Powerhouse
This step is non-negotiable for optimal results. Think of it like preheating your oven.
Why Preheat?
- Consistent Temperature: An air fryer needs to reach its set temperature before you add food. This ensures that the hot air can immediately start circulating and working its magic on your food.
- Faster Cooking: Starting with a hot appliance means your food will cook faster and more efficiently.
- Better Browning: When food hits a hot basket, it begins to crisp and brown right away, leading to a more uniform and appealing finish.
How to Preheat
- Set it and forget it (for a few minutes): Most air fryers have a preheat function. If yours doesn’t, simply set it to your desired cooking temperature and let it run for 3-5 minutes before adding your food.
- Listen and feel: You’ll often hear the fan kick into high gear and feel heat emanating from the appliance when it’s preheated.
4. Airflow is King: Don’t Overcrowd!
This is the single biggest mistake people make when trying to get crispy results.
The Problem with Overcrowding
When you pack too much food into the air fryer basket, the hot air can’t circulate freely. Instead of crisping your food, it ends up steaming it. This is the enemy of crispiness!
- Solution: Cook in Batches! It might take a little longer overall, but cooking in batches ensures that each piece of food gets direct exposure to the hot air. This is crucial for achieving that golden-brown, crunchy texture.
- Single Layer is Ideal: Aim to arrange your food in a single layer in the basket. If items overlap, they won’t cook evenly or get crispy on all sides.
5. The Shake, Flip, and Rotate Technique
Constant exposure to hot air is vital for even browning and crisping.
For Smaller Items (Fries, Nuggets, Veggies)
- Shake it up: Every 5-7 minutes (depending on the food and your air fryer), pull out the basket and give it a good shake. This redistributes the food and exposes different sides to the hot air.
For Larger Items (Chicken Pieces, Fish Fillets, Patties)
- Flip or Rotate: Use tongs or a spatula to carefully flip each piece of food halfway through the cooking time. For very large items or specific shapes, you might need to rotate them to ensure all surfaces brown.
6. Dialing in Temperature and Time
This is where practice makes perfect.
Temperature Matters
- Higher heat for crisping: Generally, higher temperatures (around 375-400°F or 190-200°C) promote faster browning and crisping.
- Lower heat for tenderness: If you’re cooking something that needs to cook through without burning the exterior, you might opt for a slightly lower temperature.
- Recipe guidance: Always check your recipe, but be prepared to adjust based on your specific air fryer model and the food’s thickness.
Timing is Everything
- Start with recommendations: Use recipe cooking times as a starting point.
- Visual cues: Learn to rely on visual cues – golden brown color, crispy texture – rather than just the timer.
- Check early and often: Especially when you’re new to a recipe or your air fryer, check your food a few minutes before the suggested time to avoid overcooking or burning.
7. Boosting Browning with Seasonings and Marinades
Beyond the cooking technique, what you put on your food can also impact its browning.
Sugar and Protein Power
- Sugars: Ingredients containing natural sugars (like honey, maple syrup, or even just the natural sugars in vegetables) will caramelize and brown beautifully.
- Proteins: The amino acids in proteins are essential for the Maillard reaction.
Marinades and Rubs
- Sticky marinades: Marinades containing honey, brown sugar, or molasses can enhance browning, but watch them closely as they can burn faster.
- Spice rubs: Many spice rubs contain ingredients that help with browning and add fantastic flavor.
Troubleshooting Common Crisping and Browning Issues
Even with the best intentions, things can go awry. Here are some common problems and their solutions:
Problem: My food is cooked but still pale and soggy.
Solution: You likely overcrowded the basket, or your food wasn’t patted dry enough. Try cooking in smaller batches and ensure you’re thoroughly drying your food before cooking. You might also need to increase the temperature slightly for the last few minutes of cooking to encourage browning.
Problem: Some pieces are perfectly browned, while others are pale.
Solution: This is usually due to uneven cooking. Make sure your food pieces are uniformly cut and that you are shaking or flipping the food regularly and thoroughly. Ensure there’s enough space between each piece.
Problem: My food is burning on the outside but not cooked inside.
Solution: Your cooking temperature might be too high for the size of your food. Try reducing the temperature by 25-50°F (10-15°C) and extending the cooking time. Also, ensure you’re not using too much oil, which can sometimes lead to premature browning and burning.
Problem: My air fryer is smoking excessively.
Solution: This is often caused by excess oil or food particles burning off. Ensure your air fryer basket and tray are clean. If you’re cooking fatty foods (like bacon or wings), some smoking is normal, but excessive smoke might mean too much oil is dripping into the heating element area. Check your air fryer’s manual for cleaning instructions.
Conclusion
Mastering air fryer crisping and browning is an achievable goal that will significantly enhance your cooking. By understanding the principles of dehydration and the Maillard reaction, and by diligently applying techniques like proper food prep, strategic oil use, preheating, avoiding overcrowding, and regular shaking/flipping, you’re well on your way to culinary success.
Don’t be afraid to experiment. Every air fryer is a little different, and every ingredient behaves uniquely. Use these tips as your foundation, and soon you’ll intuitively know how to get that perfect golden-brown, irresistibly crispy finish on all your favorite air-fried foods. Happy air frying!