
Struggling to make healthy meals quickly? This guide shows you how to create magnetic cheat sheet guides for your kitchen. These customized reference tools, designed for your refrigerator, provide instant access to healthy cooking information, making meal prep a breeze. Say goodbye to last-minute unhealthy choices and hello to delicious, nourishing food, effortlessly.
- Understand the Core Concept: Magnetic cheat sheets are customized reference guides that attach to your refrigerator, offering quick access to essential healthy cooking information.
- Identify Your Needs: Determine what information is most valuable for your quick healthy cooking journey, such as portion sizes, cooking times, or healthy ingredient swaps.
- Gather Your Materials: You’ll need printable templates, magnetic sheets or paper, a printer, scissors, and optional lamination for durability.
- Design Your Cheat Sheets: Create visually appealing and easy-to-read layouts with clear headings, icons, and essential data points.
- Print and Prepare: Print your designs onto magnetic paper or regular paper to be attached to magnetic sheets, then cut them out.
- Organize and Strategize: Group your cheat sheets by meal type, cooking method, or dietary need for maximum efficiency.
- Utilize and Adapt: Regularly use your cheat sheets and update them as your cooking skills and dietary preferences evolve.
Magnetic Cheat Sheet Guides for Quick Healthy Cooking
In today’s fast-paced world, finding the time to prepare healthy meals can feel like a monumental task. We often resort to quick, processed options when hunger strikes, compromising our well-being. But what if you had a constant, handy reminder right where you need it most – on your refrigerator? This guide will walk you through creating your own magnetic cheat sheet guides for quick healthy cooking. These aren’t just pretty magnets; they are powerful tools designed to simplify your meal prep, boost your nutrition, and save you precious time.
By the end of this guide, you’ll know exactly how to design, create, and utilize personalized magnetic cheat sheets that cater to your specific dietary needs and cooking habits. Get ready to transform your kitchen into a hub of efficient, healthy eating!
Why Magnetic Cheat Sheets for Healthy Cooking?
The premise is simple: convenience meets knowledge. We all have those moments of indecision in the kitchen. “How long does it take to roast broccoli?” “What’s a healthy substitute for white rice?” “What are the basic portion sizes for a balanced meal?” Without readily available answers, it’s easy to grab the quickest, often least healthy, option. Magnetic cheat sheets put this vital information at your fingertips, eliminating mental clutter and empowering you to make healthier choices in seconds.
Think of them as your personal kitchen assistant, always there to offer guidance. They are particularly brilliant for:
- Busy professionals who have limited time for meal planning and cooking.
- Parents trying to whip up nutritious meals for their families.
- Individuals new to healthy eating who need basic reference points.
- Anyone who wants to streamline their cooking process and reduce decision fatigue.
Step 1: Identify Your Core Cooking Needs
Before you even think about designing, take some time to understand what information will be most beneficial for you. What are the common hurdles you face when trying to cook healthy, quick meals? Jot down your thoughts.
Common Areas for Cheat Sheets:
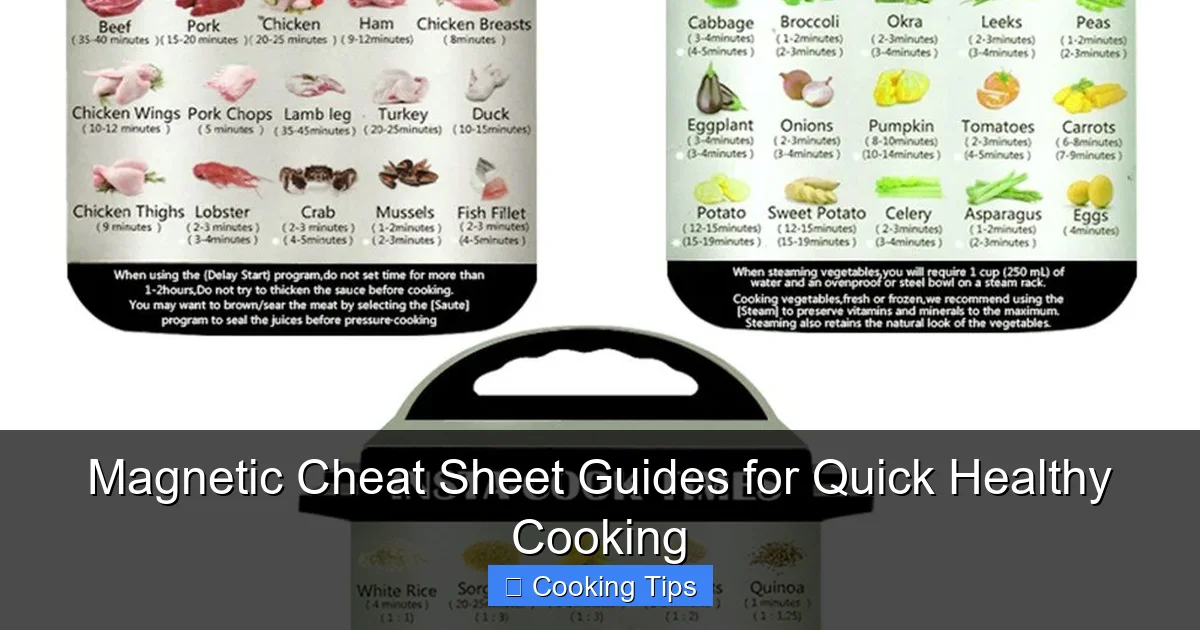
- Portion Control: Visual guides for recommended serving sizes of protein, carbs, and fats.
- Cooking Times & Temperatures: Quick reference for common vegetables, proteins, and grains.
- Healthy Ingredient Swaps: Ideas for replacing less healthy ingredients with nutritious alternatives (e.g., olive oil for butter, whole wheat pasta for white).
- Flavor Pairings: Suggestions for herbs, spices, and sauces that complement healthy ingredients.
- Meal Prep Basics: Tips on batch cooking, storing food, and essential kitchen tools.
- Quick Meal Ideas: Lists of go-to recipes or meal components for busy nights.
- Dietary Guidelines: If you follow a specific diet (e.g., vegetarian, low-carb, gluten-free), a summary of key principles or approved foods.
Example:
Let’s say you struggle with portioning protein. Your cheat sheet might focus on visual guides: a deck of cards for protein size, a cupped hand for vegetables. If you’re always unsure about cooking times, you’d create a section for common vegetables like broccoli, asparagus, and sweet potatoes, listing their typical roasting or steaming times.
Step 2: Gather Your Materials
Once you know what you want to include, it’s time to collect your supplies. Thankfully, creating these guides is very budget-friendly and requires minimal materials.
Essential Materials:
- Computer or Tablet: For designing your cheat sheets.
- Printer: To print your designs.
- Magnetic Paper or Sheets: This is key! You can buy printable magnetic paper or regular paper and adhesive magnetic sheets.
- Scissors or Paper Cutter: For clean, precise cuts.
- Optional: Laminating Sheets or Pouches: To make your cheat sheets more durable and water-resistant, especially if they might get splashed in the kitchen.
- Design Software or Online Tools: Simple word processors, graphic design programs like Canva (free online), or even presentation software can work.
Choosing Magnetic Paper:
Printable magnetic paper is the easiest option. You print directly onto it, and it’s ready to stick. Alternatively, you can print your designs on regular paper and then adhere them to adhesive magnetic sheets. This second method might give you more flexibility with paper types and thickness.

Visual guide about Magnetic Cheat Sheet Guides for Quick Healthy Cooking
Image source: m.media-amazon.com
Visual guide about Magnetic Cheat Sheet Guides for Quick Healthy Cooking
Image source: images.nexusapp.co

Visual guide about Magnetic Cheat Sheet Guides for Quick Healthy Cooking
Image source: images.nexusapp.co
Step 3: Design Your Cheat Sheets
This is where creativity meets functionality. The goal is to create clear, concise, and visually appealing guides that you’ll actually want to look at.
H3: Layout and Visuals
- Keep it Simple: Don’t overload your cheat sheets with too much text. Use bullet points, short phrases, and clear headings.
- Use Icons: Small icons can make information more scannable and engaging. For example, a carrot icon for vegetable cooking times, a fork and knife for portion sizes.
- Font Choice: Select a clean, easy-to-read font. Avoid overly decorative or small fonts.
- Color Coding: Consider using different colors for different categories (e.g., green for vegetables, red for proteins) to help with quick identification.
H3: Content is King (and Queen!)
- Be Specific: Instead of “cook vegetables,” say “Roast Broccoli: 10-15 mins at 400°F.”
- Use Keywords: Ensure the language is clear and uses terms you understand.
- One Topic Per Sheet (Ideally): While you can combine related topics, try not to cram too much onto a single sheet. This will make them easier to digest at a glance.
H3: Practical Design Examples:
- Sheet 1: “Quick Veggie Roasting Times”
- Broccoli: 12-18 mins @ 400°F
- Asparagus: 8-12 mins @ 400°F
- Sweet Potatoes: 25-35 mins @ 400°F
- Bell Peppers: 15-20 mins @ 400°F
- Sheet 2: “Healthy Portion Guide”
- Protein: Palm-sized portion (3-4 oz)
- Vegetables: Two cupped hands
- Complex Carbs: Fist-sized portion (1/2 cup cooked)
- Healthy Fats: Thumb-sized portion (1 tbsp oil/nut butter)
- Sheet 3: “Smart Ingredient Swaps”
- Instead of Butter -> Olive Oil or Avocado Oil
- Instead of White Pasta -> Whole Wheat or Quinoa Pasta
- Instead of Sugar -> Honey, Maple Syrup (in moderation), or Stevia
- Instead of Creamy Dressings -> Vinaigrettes or Greek Yogurt-based dressings
Step 4: Print, Cut, and Laminate
With your designs finalized, it’s time to bring them to life.
H3: Printing Your Designs
Load your magnetic paper into your printer according to the manufacturer’s instructions. If you’re using regular paper and adhesive magnetic sheets, print your designs onto the regular paper first.
H3: Cutting and Preparing
Carefully cut out each cheat sheet. A ruler and a craft knife or a paper cutter will ensure straight edges, making them look more professional. If you’re using adhesive magnetic sheets, peel off the backing and carefully press your printed design onto the magnetic side, smoothing out any bubbles.
H3: Laminating for Durability (Optional but Recommended)
If you’re using laminating sheets, follow the instructions for your laminator or apply them carefully by hand. Laminating protects your cheat sheets from grease, moisture, and general wear and tear in the kitchen. Once laminated, trim any excess laminate around the edges.
Step 5: Organize and Strategize Placement
Now that your beautiful, functional cheat sheets are ready, it’s time to put them to work!
H3: Where to Place Them
Your refrigerator door is the prime real estate. Choose a spot that’s easily visible when you’re standing in front of it, perhaps near your grocery list or calendar.
H3: Grouping Your Cheat Sheets
Consider how you’ll use them. You might want to group:
- Meal Type: Breakfast ideas, lunch components, dinner recipes.
- Cooking Method: Roasting, steaming, sautéing.
- Dietary Focus: High protein, low carb, vegetarian.
- Frequency of Use: Place your most frequently used cheat sheets front and center.
You can use small magnets to attach them, or if you’ve used full magnetic sheets, they’ll stick on their own.
Step 6: Utilize and Adapt
The real magic happens when you consistently use your magnetic cheat sheets.
H3: Make Them Part of Your Routine
Before you start cooking, glance at your cheat sheets. Planning a quick weeknight meal? Check your “Quick Meal Ideas” or “Ingredient Swaps” sheet. Trying to build a balanced plate? Refer to your “Portion Guide.”
H3: Update as You Evolve
Your cooking journey isn’t static. As you learn new recipes, discover new healthy ingredients, or refine your dietary goals, don’t hesitate to update your cheat sheets. Print new ones, or simply swap out older ones. The key is to keep them relevant and useful.
Troubleshooting Common Issues
* “My cheat sheets are peeling off.”
Ensure your refrigerator surface is clean and dry before attaching. If using adhesive magnetic sheets, make sure they are applied firmly and smoothly. You might need stronger magnets or to re-apply adhesive.
* “The text is too small to read.”
Go back to your design software and increase the font size. Remember, these are for quick reference, so clarity is paramount.
* “I’m still forgetting things!”
Perhaps you need more specific information. Create new cheat sheets for those forgotten details or consolidate similar information onto fewer, more comprehensive sheets.
Conclusion
Creating magnetic cheat sheet guides for quick healthy cooking is a simple yet incredibly effective strategy to integrate healthier eating habits into your busy life. By personalizing these handy tools to your unique needs, you empower yourself with immediate access to crucial cooking information, right on your refrigerator door. This means less time spent wondering what to cook, fewer impulsive unhealthy choices, and more delicious, nourishing meals prepared with ease.
So, grab your materials, get creative, and start designing your own kitchen command center. Your future self, enjoying a stress-free, healthy meal, will thank you!