
Unlock the full potential of your Cuisinart food processor with this comprehensive assembly guide. We’ll walk you through each step, from unpacking to securely attaching the bowl, lid, and blades. Mastering assembly ensures safe and efficient food preparation, making your kitchen tasks a breeze. Follow these simple instructions and get ready to chop, blend, and puree with confidence!
How to Put Cuisinart Food Processor Together
Welcome to the ultimate guide on assembling your Cuisinart food processor! You’ve just made a fantastic investment in your kitchen. A Cuisinart food processor is a versatile workhorse, capable of handling everything from finely chopping onions to pureeing velvety smooth soups. But before you can start experiencing its magic, you need to know how to put it together correctly and safely. This guide will take you through every step, ensuring you can assemble your appliance with confidence, no matter which Cuisinart model you have.
We’ll cover everything from identifying the different parts to securely locking the bowl and lid. By the end of this guide, you’ll be a Cuisinart food processor assembly pro, ready to tackle any recipe that comes your way. Let’s get started!
Key Takeaways
- Familiarize Yourself with Components: Before assembly, identify all parts like the motor base, bowl, lid, pusher, and various blades.
- Ensure a Stable Surface: Always assemble your Cuisinart food processor on a clean, flat, and stable countertop to prevent accidents.
- Correct Bowl Placement is Crucial: The food processor bowl must be correctly seated and locked onto the motor base for safe operation.
- Secure Lid and Lock Mechanism: Verify the lid is properly aligned and locked in place; the machine won’t operate if the lid isn’t secured.
- Blade Assembly Requires Care: Handle sharp blades with caution and ensure they are correctly fitted onto the central spindle.
- Understand the Pusher’s Role: The pusher is designed to guide food into the processing area and should be used with the lid securely in place.
- Pre-Operation Checks: Always double-check that all parts are securely connected before plugging in and turning on the appliance.
Understanding Your Cuisinart Food Processor Components
Before you begin the assembly process, it’s helpful to get acquainted with the various parts of your Cuisinart food processor. While models might vary slightly, the core components are generally the same. Taking a moment to identify each piece will make the assembly much smoother and less confusing.
The Motor Base
This is the heart of your food processor. It houses the powerful motor and the control panel (buttons or a dial). The motor base typically has a locking mechanism or a spindle on top where the processing bowl attaches.
The Processing Bowl
This is the main container where all your food preparation happens. It’s usually made of durable, clear plastic so you can see your food as it’s being processed. The bowl has a handle and a specific way it needs to align with the motor base to lock into place.
The Bowl Cover/Lid
This lid fits securely over the processing bowl. It has a feed tube through which you add ingredients. Many lids also have a locking mechanism that ensures the food processor won’t operate unless the lid is properly secured.
The Pusher
This is a smaller piece of plastic that fits into the feed tube of the bowl cover. It’s used to push food down the feed tube towards the blades while the machine is running. It’s designed to fit snugly but should still be removable.
The Blades and Discs
This is where the real work happens! Your Cuisinart food processor comes with various blades and discs for different tasks:
- S-Blade (Chopping Blade): This is the most common blade, used for chopping, mincing, mixing, and pureeing. It has two sharp, curved blades.
- Dicing Disc: For uniformly dicing fruits and vegetables.
- Shredding/Slicing Disc: These often have two sides – one for shredding and one for slicing. They fit onto a spindle.
- Whisk Attachment: For whipping cream or egg whites (found in some models).
Always handle these with extreme caution as they are very sharp.
Accessories
Depending on your model, you might also have a spatula for scraping down the sides of the bowl, a cleaning brush, and storage containers for blades and discs.
Step-by-Step Assembly Instructions
Now that you know your parts, let’s get to the assembly. Remember, safety first! Always ensure the appliance is unplugged before you begin putting it together.
Step 1: Prepare the Motor Base
Start by placing the motor base on a clean, dry, and stable surface, like your countertop. Make sure it’s not wobbly. Ensure there’s enough clearance around it for easy handling of the bowl and lid.
Step 2: Attach the Processing Bowl
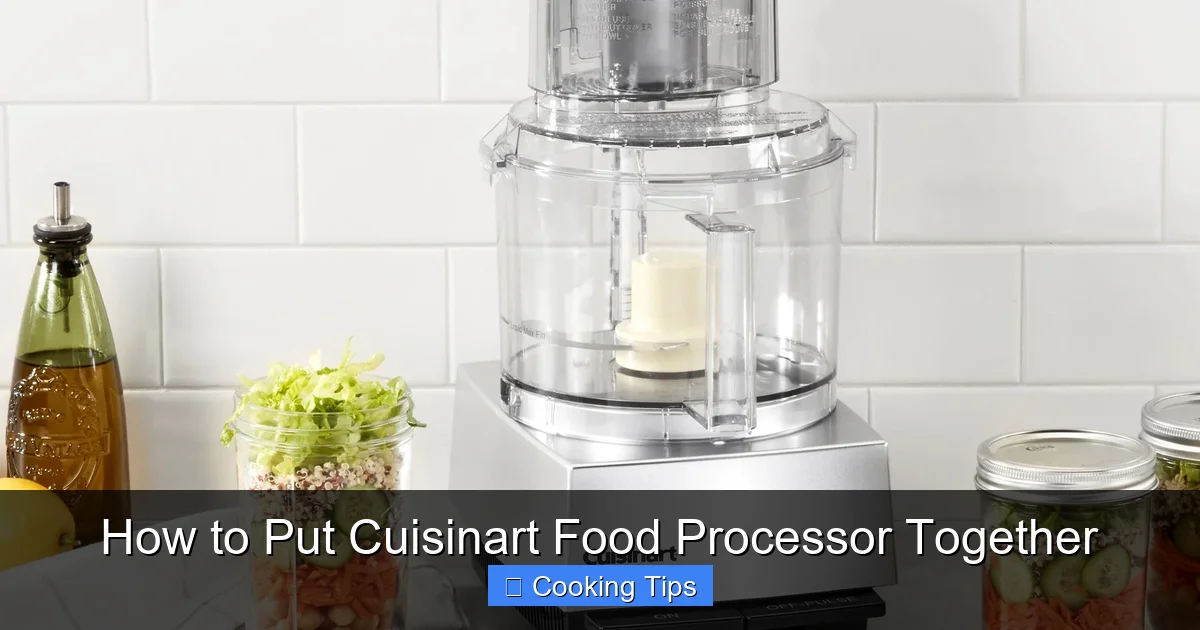
This is a critical step. The processing bowl needs to be correctly aligned and locked onto the motor base.
Aligning the Bowl
Look at your processing bowl. You’ll notice a handle and often a tab or a series of notches. On the motor base, you’ll see corresponding slots or a spindle.
Locking the Bowl
Gently place the bowl onto the motor base. You might need to twist it slightly. The goal is to align the handle or the specific locking indicators on the bowl with those on the base. Once aligned, you should feel or hear a slight “click” as it locks into place. Many Cuisinart models require you to turn the bowl clockwise to lock it.
Tip: Don’t force the bowl if it doesn’t seem to fit. Realign it and try again. A properly seated bowl is essential for the safety interlock system to function.

Visual guide about How to Put Cuisinart Food Processor Together
Image source: storables.com
Visual guide about How to Put Cuisinart Food Processor Together
Image source: storables.com
Visual guide about How to Put Cuisinart Food Processor Together
Image source: storables.com
Step 3: Install the Blade or Disc
This step varies depending on what you’re preparing. Always handle blades and discs by their central hub to avoid cutting yourself.
For the S-Blade (Chopping Blade):
Locate the central spindle on the inside of the processing bowl. Carefully place the S-blade onto this spindle. The spindle has a specific shape that will only allow the blade to fit one way. You may need to gently press down. The blade should sit securely without wobbling.
For Slicing or Shredding Discs:
These discs are typically reversible and fit onto a spindle that protrudes from the top of the processing bowl. Ensure the correct side (slicing or shredding) is facing upwards. Place the disc onto the spindle. It should sit flat and turn freely when you spin it gently.
For Other Attachments (e.g., Whisk):
Follow the specific instructions for any other attachments, as their installation may differ. Generally, they will also attach to the central spindle.
Important: Ensure the blade or disc is fully seated and stable before proceeding to the next step. Loose blades can cause damage and are dangerous.
Step 4: Attach the Bowl Cover (Lid)
The bowl cover is designed to fit snugly and lock into place, activating the machine’s safety features.
Aligning the Lid
Take the bowl cover and position it over the processing bowl. Notice the handle on the bowl cover and the corresponding locking mechanism on the motor base or bowl.
Locking the Lid
Slide the lid into place. You will likely need to turn the lid clockwise until it locks. Again, you should hear or feel a “click.” Some Cuisinart models have a lever or a button that needs to be pressed to fully secure the lid.
Crucial Safety Feature: Most Cuisinart food processors have a safety interlock system. This means the machine will not turn on unless the bowl and lid are both correctly and securely in place. If your machine isn’t working, this is the first thing to check.
Step 5: Insert the Pusher
Once the lid is securely locked, you can insert the pusher into the feed tube.
Positioning the Pusher
The pusher should slide easily into the feed tube. It’s designed to fit snugly enough to prevent food from escaping but loose enough to be removed and repositioned as needed while processing.
Note: The feed tube is for adding ingredients while the processor is running. Never put your fingers or any utensils other than the designated pusher into the feed tube.
Step 6: Final Checks Before Operation
Before you plug in your Cuisinart food processor, do a quick double-check of all the connections.
- Is the bowl securely locked onto the base?
- Is the lid firmly in place and locked?
- Is the blade or disc properly seated and stable?
- Is the pusher in the feed tube?
If everything looks and feels secure, you are ready to plug in your appliance and select your desired speed or setting.
Using Your Assembled Cuisinart Food Processor
With your Cuisinart food processor assembled, you’re ready to start creating!
Adding Ingredients
For most tasks, add ingredients to the bowl before attaching the lid, or through the feed tube while the machine is running.
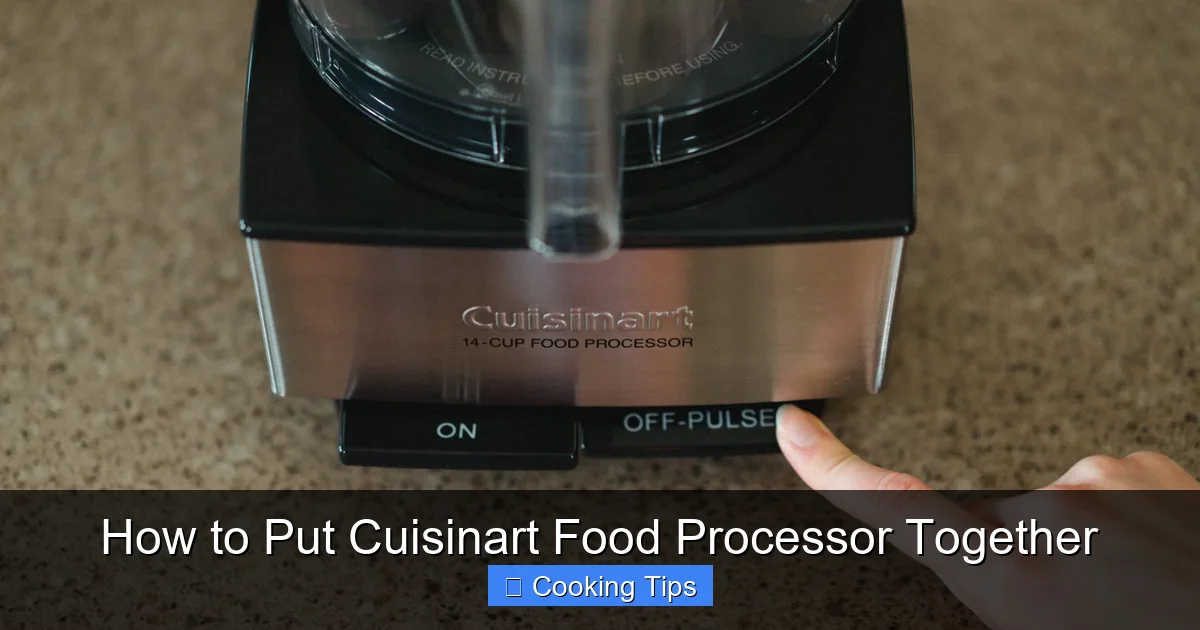
Operating the Machine
Select the appropriate speed for your task. Cuisinart processors typically have an ON/OFF button and a PULSE button. The PULSE function is excellent for giving you more control over the texture of your food.
Disassembling Your Food Processor
When you’re finished, remember to unplug the appliance before disassembling. To disassemble, reverse the assembly steps:
- Remove the pusher.
- Unlock and remove the lid (usually by turning counter-clockwise).
- Carefully remove the blade or disc (handle with extreme care!).
- Unlock and remove the processing bowl.
Cleaning: Refer to your Cuisinart manual for specific cleaning instructions. Most parts are dishwasher safe, but the motor base should never be submerged in water.
Troubleshooting Common Assembly Issues
Even with clear instructions, you might encounter a minor hiccup. Here are a few common issues and how to resolve them:
My Cuisinart Food Processor Won’t Turn On.
This is almost always related to the safety interlock system.
- Check the Bowl: Ensure the processing bowl is fully seated and locked onto the motor base. Try removing it and reattaching it, making sure you hear or feel the lock engage.
- Check the Lid: Verify that the bowl cover is properly aligned and securely locked in place. Again, try removing and reattaching it.
- Check the Spindle: For models with a visible spindle, ensure no food debris is preventing the bowl or lid from seating correctly.
The Bowl Seems Loose or Wobbly.
This means the bowl is not properly locked onto the motor base.
- Realign and Twist: Remove the bowl and carefully re-seat it onto the base, ensuring the alignment tabs are correctly positioned. Then, twist it firmly until it clicks into place.
- Check for Obstructions: Inspect the connection points on both the bowl and the motor base for any food particles or damage that might be preventing a secure fit.
The Lid Won’t Lock.
Similar to the bowl, the lid might not be aligned correctly or is obstructed.
- Ensure Correct Orientation: Make sure you are trying to lock the lid in the correct direction (usually clockwise).
- Clear the Feed Tube Area: Sometimes, if the feed tube isn’t perfectly clean, it can prevent the lid from seating properly.
The Blade/Disc Seems Unstable.
If the blade or disc is wobbly, it’s not properly seated on the spindle.
- Reseat the Attachment: Carefully remove the blade or disc and re-place it onto the spindle. Ensure it’s sitting flush and feels stable.
- Verify Correct Attachment: Make sure you are using the correct attachment for your task and that it’s oriented correctly.
Conclusion
Assembling your Cuisinart food processor is a straightforward process once you understand the function of each part and the importance of secure connections. By following these step-by-step instructions, you’ve learned how to correctly attach the processing bowl, install blades and discs, and secure the lid, all while prioritizing safety. Remember to always ensure the unit is unplugged before assembly or disassembly, and handle sharp blades with utmost care.
Now that your Cuisinart food processor is ready to go, you can confidently explore the vast culinary possibilities it offers. From quick weeknight meals to elaborate entertaining dishes, your food processor will become an indispensable tool in your kitchen. Enjoy the convenience and efficiency it brings to your cooking! Happy processing!