
Discover how to achieve perfectly crisp and delicious oil-free bread and toast using a simple toaster rack insert. This guide provides a step-by-step approach, from selecting the right insert to achieving optimal results. Say goodbye to soggy bread and hello to healthier, satisfying toast!
Toaster Rack Insert for Oil Free Crisp Bread and Toast
Are you tired of soggy toast or bread that just doesn’t get that satisfying crunch? Do you wish there was a way to enjoy crispy, delicious bread without adding a single drop of oil or butter? If you’re nodding your head, then you’re in the right place! In this comprehensive guide, we’ll dive deep into the wonderful world of toaster rack inserts, a simple yet ingenious kitchen tool that can revolutionize your toasting experience.
For many of us, the idea of “crispy bread” conjures images of fried bread or bread slathered in oil and baked. But what if you could achieve that perfect, crackling crispness using just your everyday toaster? That’s where the toaster rack insert comes in. We’ll walk you through everything you need to know to get the most out of this handy gadget, from understanding how it works to mastering the art of oil-free crisp bread and toast. Get ready to elevate your breakfast game and snack time with healthier, tastier, and perfectly crisp results!
Key Takeaways
- Effortless Oil-Free Crisping: Learn how toaster rack inserts allow your bread to be exposed to more direct heat, promoting crispness without any added oil.
- Versatile Bread Options: Explore the range of breads that can benefit from this method, from standard white and whole wheat to sourdough, rye, and even bagels.
- Perfect Toasting Technique: Master the ideal toasting times and temperatures, adjusting based on bread thickness and desired crispness for consistently great results.
- Easy Cleaning and Maintenance: Understand simple methods to keep your toaster rack insert clean, ensuring hygiene and longevity for repeated use.
- Healthier Toasting Alternative: Embrace a healthier lifestyle by eliminating the need for oil, butter, or unhealthy fats in your toasting routine.
- Maximizing Toaster Functionality: Discover how this accessory can enhance your existing toaster, offering new possibilities for creating crunchy snacks.
Understanding the Toaster Rack Insert
Before we jump into the “how-to,” let’s first understand what a toaster rack insert is and why it’s so effective for achieving oil-free crispness.
What is a Toaster Rack Insert?
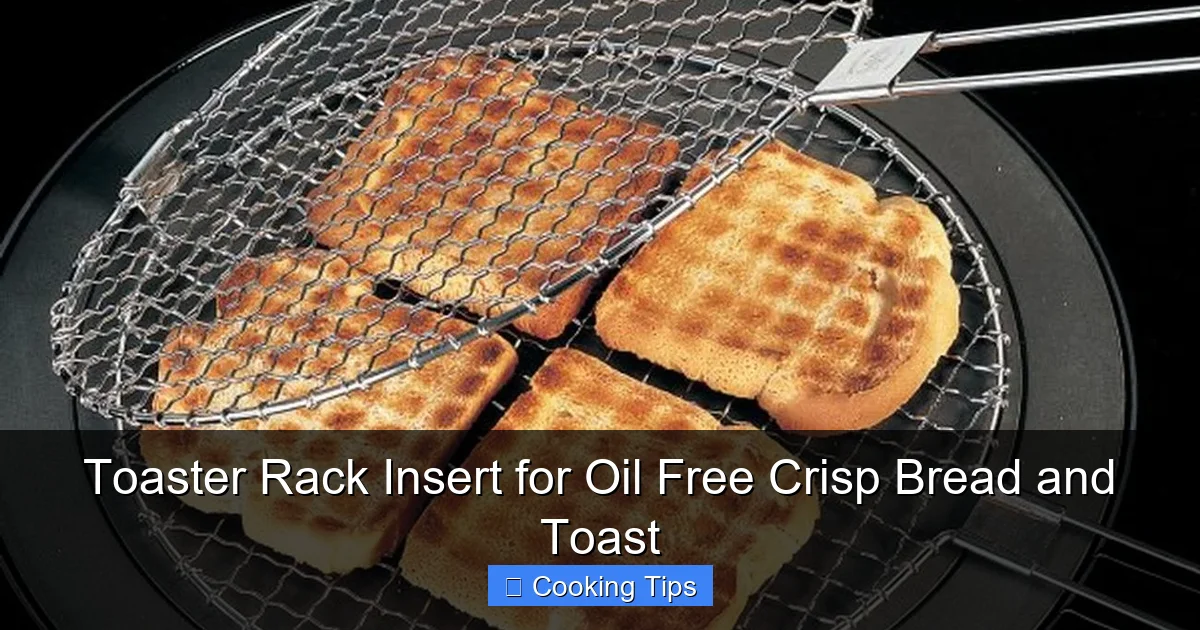
A toaster rack insert is typically a small, perforated metal rack designed to fit inside your toaster. It holds slices of bread or other food items horizontally, elevating them and exposing them to the heating elements more evenly and directly than if they were placed vertically in the toaster slots. Many are made from stainless steel or food-grade silicone, materials that are durable, heat-resistant, and easy to clean.
How Does it Work for Oil-Free Crispness?
The magic of the toaster rack insert lies in its design. When you place bread on a traditional toaster slot, the heat primarily comes from the sides. This can lead to uneven toasting, with the outer edges getting darker while the center remains softer. A toaster rack insert changes this dynamic:
- Enhanced Airflow: The perforations and the rack design allow hot air to circulate freely around the bread. This means all sides of the bread are exposed to heat, promoting a uniform crisping process.
- Direct Heat Exposure: By holding the bread horizontally and closer to the heating elements (depending on your toaster’s design), the insert facilitates a more direct and intense application of heat. This is what helps to draw out moisture and create that desirable crisp texture without needing any added fat.
- Even Browning: The consistent heat distribution prevents hot spots and burnt edges, leading to beautifully golden-brown and evenly crisp bread.
- No Added Fat Needed: Because the crisping is achieved through dry heat and improved airflow, there’s absolutely no need to add oil, butter, or any other fat. This makes it a fantastic option for health-conscious individuals or those following specific dietary plans.
Choosing the Right Toaster Rack Insert
Not all toaster rack inserts are created equal. To ensure you get the best results, consider these factors when making your purchase:
Visual guide about Toaster Rack Insert for Oil Free Crisp Bread and Toast
Image source: thekitchenwhisk.ie
Material Matters
Stainless Steel: This is the most common and often the best choice. Stainless steel is durable, rust-resistant, easy to clean, and can withstand high temperatures without warping. Look for food-grade stainless steel for safety.
Silicone: Some inserts are made from heat-resistant silicone. These can be more flexible and non-stick, but ensure they are rated for high toasting temperatures and are BPA-free.
Size and Compatibility
Toaster rack inserts come in various sizes. It’s crucial to choose one that fits your toaster. Some are designed for specific toaster models, while others are more universal. Measure the inside dimensions of your toaster’s heating chamber (if accessible) or check product descriptions for compatibility with common toaster sizes.
Design Features
- Number of Slots: Inserts often have slots for holding one or two slices of bread. Consider how many slices you typically toast at once.
- Rack Height: The height of the rack can influence how close the bread is to the heating elements. Some inserts offer adjustable heights.
- Ease of Cleaning: Look for designs that are easy to wipe down or are dishwasher safe.
Preparing Your Toaster Rack Insert for Use
Once you have your toaster rack insert, a little preparation can go a long way in ensuring a smooth and successful toasting experience.
Visual guide about Toaster Rack Insert for Oil Free Crisp Bread and Toast
Image source: shoprite.co.za
Initial Cleaning
Before its first use, it’s always a good idea to wash your toaster rack insert thoroughly. Use warm, soapy water and a non-abrasive sponge or cloth. Rinse it well and dry it completely. This removes any manufacturing residues and ensures it’s hygienic for food preparation.
Understanding Your Toaster
The effectiveness of a toaster rack insert can also depend on your toaster. Some toasters have heating elements that are positioned in a way that works exceptionally well with these inserts, providing ample heat to all sides of the bread. Others might be less ideal. Familiarize yourself with how your toaster heats up.
Safety First
Always ensure the toaster is unplugged before you insert or remove the rack. Be cautious when handling the rack after toasting, as it will be hot. Use oven mitts or tongs if necessary.
How to Toast Oil-Free Crisp Bread and Toast
Now for the exciting part – using your toaster rack insert to achieve perfect, oil-free crispness!
Visual guide about Toaster Rack Insert for Oil Free Crisp Bread and Toast
Image source: bonabbetit.com
Step 1: Prepare Your Bread
This method works beautifully with a wide variety of breads:
- Standard Sliced Bread: White, whole wheat, multigrain – all work wonderfully.
- Sourdough: Get that amazing tang with an incredible crunch.
- Rye Bread: Perfect for a savory, crispy base.
- Baguette Slices: Ideal for croutons or bruschetta bases.
- Bagels (Halved): Achieve a consistent crispness throughout.
- Pita Bread (Halved): Creates wonderfully crispy pockets.
For best results, ensure your bread slices are not too thick, as very thick slices might not toast evenly or thoroughly with this method. Aim for slices between ½ inch and ¾ inch thick.
Step 2: Place Bread on the Toaster Rack Insert
Lay your bread slices flat on the rack, ensuring they are spaced apart to allow for maximum airflow. Don’t overcrowd the rack; it’s better to toast in batches if needed.
Step 3: Insert the Rack into Your Toaster
With your toaster unplugged, carefully place the toaster rack insert with the bread into your toaster. Position it so it’s stable and not touching the heating elements directly (unless the design of your specific insert and toaster dictates otherwise, which is rare).
Step 4: Select Toasting Settings
This is where experimentation comes in, as toasting times will vary based on your toaster, the thickness of your bread, and your desired level of crispness. Start with a medium setting on your toaster. If your toaster has a dial, a setting of ‘3’ or ‘4’ (on a scale of 1 to 5 or 6) is often a good starting point.
Tip: For a more even toast, especially with lighter breads, consider using the “bagel” setting if your toaster has one, as it often directs heat more intensely to the outer edges, which is beneficial for crisping.
Step 5: Toast and Monitor
Turn on your toaster. It’s crucial to keep an eye on your toast, especially during the first few uses, as you learn the ideal timing for your setup. Toasting in a toaster rack insert can sometimes be faster than traditional toasting because of the enhanced heat exposure.
Listen for the pop or timer sound of your toaster. As soon as it finishes its cycle, be ready to remove the rack.
Step 6: Carefully Remove the Toaster Rack Insert
Once the toasting cycle is complete, wait a moment for the heating elements to cool slightly. Carefully pull out the toaster rack insert using tongs or by gently lifting it out with oven mitts. Be extremely cautious as the rack and the toast will be very hot.
Step 7: Enjoy Your Oil-Free Crisp Bread!
Admire your perfectly golden-brown, uniformly crisp slices of bread. You’ve achieved fantastic texture and flavor without a drop of oil. Enjoy your healthy and delicious creation!
Tips for Perfect Oil-Free Toasting
To consistently achieve the best results, keep these tips in mind:
- Bread Type and Staling: Slightly stale bread tends to crisp up better than very fresh, soft bread. If your bread is very fresh, you might need to toast it for a little longer.
- Don’t Overcrowd: Always give your bread slices enough space on the rack. Overcrowding will steam the bread rather than crisp it.
- Experiment with Settings: Every toaster is different. The first few times you use the rack, experiment with different darkness settings to find your sweet spot. You might find that a slightly lower setting for a slightly longer time yields better results than a high setting for a short time.
- Watch for Evenness: If you notice one side is browning faster than the other, you can sometimes carefully remove the rack and flip the bread slices midway through toasting.
- For Bagels and Thicker Items: When toasting bagel halves or thicker slices, you might need to adjust your toaster setting to a slightly higher level or toast for a bit longer to ensure the center gets adequately heated and crisped.
- Beyond Bread: While this guide focuses on bread, some toaster rack inserts can also be used for other items like small pastries or even reheating leftovers that you want to be crispy. Always check the manufacturer’s recommendations for what your specific insert can handle.
Cleaning and Maintenance of Your Toaster Rack Insert
Keeping your toaster rack insert clean is essential for hygiene and its longevity.
Daily Cleaning
After each use, once the rack has cooled down completely:
- Wipe Down: Use a damp cloth or paper towel to wipe away any crumbs.
- Soapy Water: For more stubborn crumbs or light residue, wash with warm, soapy water and a non-abrasive sponge. Rinse thoroughly and dry completely.
Deep Cleaning
Periodically, or if you notice persistent residue:
- Soaking: For stainless steel racks with burnt-on crumbs, soak them in warm water with a bit of dish soap or a specialized oven cleaner (follow product instructions carefully).
- Baking Soda Paste: A paste made of baking soda and water can be effective for scrubbing away tough spots. Apply the paste, let it sit for a while, then gently scrub with a non-abrasive sponge.
- Dishwasher Safe: If your insert is dishwasher safe, utilize this for a thorough clean. Make sure to check the manufacturer’s instructions for your specific insert.
Drying is Key
Always ensure the rack is thoroughly dried before storing it. This prevents rust and mold growth, especially for stainless steel inserts.
Troubleshooting Common Issues
Even with a great tool, you might encounter a few hiccups. Here’s how to address them:
Issue: Toast is Unevenly Toasted or Burnt on Edges
Solution: This can happen if the bread is too close to the heating elements or if your toaster has very strong hot spots. Try reducing your toaster’s darkness setting. Ensure the bread is centered on the rack and not touching the sides of the toaster chamber. If your toaster has a convection fan, it can sometimes help with evenness. For some toasters, flipping the bread halfway through may be necessary.
Issue: Bread is Too Soft or Not Crispy Enough
Solution: Your toasting time might be too short, or your toaster’s heat setting is too low. Increase the darkness setting on your toaster or extend the toasting time. Ensure the bread is not too thick; thicker slices require more time. Also, check that there’s good airflow around the bread on the rack.
Issue: Crumbs are Difficult to Remove
Solution: For stainless steel racks, try soaking them in hot, soapy water or a baking soda paste. A soft-bristled brush can help dislodge stubborn crumbs from crevices. Avoid using abrasive scouring pads that can scratch the metal.
Issue: The Rack Doesn’t Fit My Toaster Properly
Solution: This indicates you may have an incompatible toaster rack insert. Double-check the dimensions and compatibility of the insert with your toaster model before purchasing. If it’s a universal fit, ensure you’re placing it correctly within the toaster’s heating chamber.
Conclusion
The toaster rack insert is a simple, effective, and healthy way to achieve perfectly crisp bread and toast without any added oil. By understanding how it works, choosing the right insert, and following these easy steps, you can transform your everyday toaster into a versatile appliance capable of producing delicious, uniformly crisp results. From breakfast bagels to savory sourdough, embrace the simplicity and satisfaction of oil-free toasted goodness. So, get your toaster rack insert, experiment with your favorite breads, and get ready to enjoy toast like never before!