
Is your blender leaking from the bottom? Don’t despair! This comprehensive guide will walk you through identifying and fixing the most common causes. We’ll cover everything from checking the gasket to tightening the blade assembly, ensuring you can get back to smooth blending in no time. With our step-by-step instructions and practical tips, you’ll be able to diagnose the leak and perform simple repairs to save your blender from the bin.
Are you tired of sticky countertops and messy cabinets thanks to a leaky blender? A blender leaking from the bottom can be a frustrating problem, turning your smoothie-making session into a cleaning chore. But before you consider buying a new one, know that most blender leaks are fixable with a little troubleshooting and some simple steps. This guide will equip you with the knowledge to diagnose the source of the leak and bring your trusty appliance back to its former, leak-free glory. We’ll cover common causes, provide clear instructions for each fix, and offer tips to prevent future leaks.
Key Takeaways
- Inspect the Gasket: The rubber gasket is the most common culprit for blender leaks. Ensure it’s clean, properly seated, and not cracked or worn.
- Check the Blade Assembly: A loose or damaged blade assembly can also cause liquid to escape from the bottom of the blender jar.
- Examine the Jar Base: Cracks or damage to the blender jar’s base can lead to leaks, especially with older or heavily used jars.
- Tighten Securely: Always ensure the jar is screwed onto the motor base correctly and tightly to create a proper seal.
- Clean Thoroughly: Regular cleaning, paying attention to the gasket and blade area, can prevent food debris from compromising seals.
- Replace Worn Parts: Don’t hesitate to replace old, worn-out gaskets or blade assemblies to prevent future leaks.
Understanding Why Your Blender Might Be Leaking
Blenders are designed with several seals to keep liquids contained. When these seals fail, even small amounts of liquid can escape, usually from the bottom where the jar meets the motor base. The most frequent offenders are issues with the gasket, the blade assembly, or even the blender jar itself. Let’s break down how to identify and fix these common problems.
Step 1: Safety First! Unplug Your Blender
Visual guide about Blender Leaking from the Bottom How to Fix It
Image source: kitchenadvising.com
Before you do anything, the most important step is to ensure your safety. Always unplug your blender from the power outlet before attempting any inspection or repair. This prevents accidental activation and potential injury.
Step 2: Assess the Leak – Where is it Coming From?
Visual guide about Blender Leaking from the Bottom How to Fix It
Image source: repair2000.com
Take a good look at your blender after a short use (even with just water). Try to pinpoint the exact area the leak is originating from.
Observe the Bottom of the Jar
Is the liquid seeping out from where the jar connects to the motor base? Or is it appearing more around the edges of the blade assembly itself? This observation is key to narrowing down the problem.
Step 3: Inspect the Gasket – The Most Likely Culprit

Visual guide about Blender Leaking from the Bottom How to Fix It
Image source: repair2000.com
The gasket, often a rubber or silicone ring, sits between the blade assembly and the blender jar. Its job is to create a watertight seal. Over time, these can become worn, cracked, or dislodged.
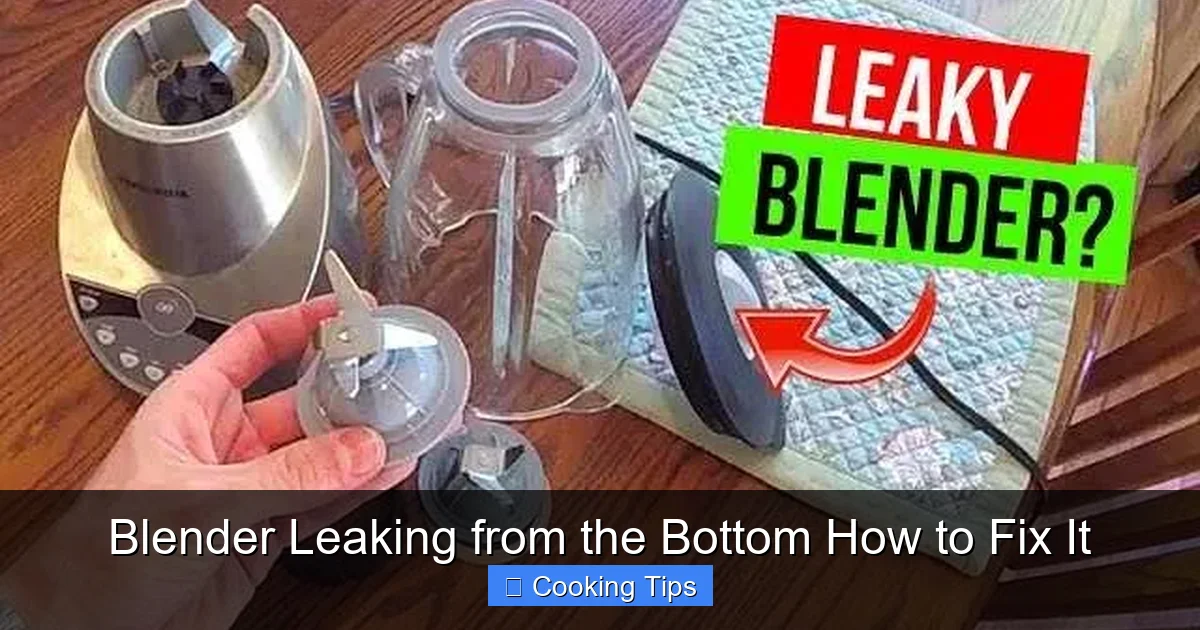
Remove the Blade Assembly
Most blender jars can be detached from the motor base. You’ll then need to unscrew the blade assembly from the bottom of the jar. This might require a bit of force, especially if it’s been sealed tightly. Many blade assemblies have a part you can grip to twist them off.
Clean the Gasket and Surrounding Area
Once the blade assembly is off, carefully remove the gasket. Wash both the gasket and the area where it sits in the jar with warm, soapy water. Look for any food debris or residue that might be preventing a good seal.
Examine the Gasket for Damage
This is a critical step. Check the gasket thoroughly for:
- Cracks: Even small cracks can allow liquid to escape.
- Tears: Similar to cracks, tears compromise the seal.
- Deformation: Has the gasket lost its shape or become flattened?
- Wear and Tear: Is the rubber brittle or unusually smooth?
Reassemble and Test
If the gasket looks okay, clean it thoroughly and ensure it’s seated perfectly back into its groove in the blade assembly or jar. Reattach the blade assembly securely to the jar. Then, reattach the jar to the motor base. Add a small amount of water to the blender and run it for a few seconds. Check the bottom for any signs of leakage.
Step 4: Tighten the Blade Assembly
Sometimes, the blade assembly might simply be loose. This is especially true if you’ve recently taken it apart for cleaning.
Ensure a Secure Fit
When you reattach the blade assembly to the jar, make sure it’s screwed on as tightly as it can comfortably go without stripping the threads. A snug fit is essential for a good seal.
Test Again
Fill the jar with water and run the blender briefly. Check for leaks around the base of the blade assembly.
Step 5: Examine the Blender Jar Itself
While less common, the blender jar itself can be the source of a leak.
Look for Cracks or Chips
Inspect the bottom of the blender jar carefully, especially where the blade assembly screws in. Look for any hairline cracks, chips, or other damage. Even a small imperfection can lead to leaks.
Consider Age and Material
Older plastic jars can become brittle over time and may develop micro-cracks that are hard to see. Glass jars are more durable but can chip or crack if dropped.
Step 6: Check the Motor Base Seal
Some blenders have a secondary seal or connection point where the jar meets the motor base itself.
Clean the Base Connection
Ensure the area on the motor base where the jar sits is clean and free from any debris. Sometimes, dried food particles can prevent a proper connection.
Inspect for Damage
Look for any visible damage to the plastic or metal parts on the motor base where the jar connects.
Step 7: Troubleshooting Specific Blender Brands
Different blender brands may have unique designs and common issues. While the principles remain the same, some specific models might have particular points of failure.
Consult Your Manual
If you’re still struggling, refer to your blender’s user manual. It often has a troubleshooting section that can be very helpful.
Online Resources
Search online for your specific blender model and “leaking from bottom” to see if others have encountered similar problems and found solutions. Manufacturer websites or user forums can be great resources.
Step 8: When to Consider Replacement Parts or a New Blender
If you’ve gone through all the steps and your blender is still leaking, it’s likely time to consider replacement parts.
Ordering Replacement Gaskets and Blade Assemblies
Many manufacturers sell replacement gaskets and blade assemblies for their blenders. Check the manufacturer’s website or reputable appliance parts retailers. Always ensure you order parts compatible with your specific blender model.
When It’s Time for a New Blender
If the blender jar itself is cracked, or if the motor base shows significant damage, it might be more cost-effective and safer to purchase a new blender. A blender that consistently leaks is not only messy but can also be a safety hazard if liquids get into the motor.
Preventing Future Blender Leaks
Once you’ve fixed your blender, you’ll want to keep it leak-free! Here are some preventative measures:
- Clean After Every Use: Don’t let food residue dry on the gasket or blade assembly. Rinse and wash promptly.
- Dry Parts Completely: Ensure all parts are thoroughly dry before reassembling. Moisture can sometimes affect seals.
- Inspect Regularly: Make it a habit to check the gasket for wear and tear during your regular cleaning routine.
- Avoid Overfilling: Don’t fill the blender jar past the maximum fill line. Overfilling can put extra pressure on the seals.
- Handle with Care: Avoid dropping or banging your blender jar, as this can lead to cracks or damage to the seals.
- Proper Assembly: Always ensure the blade assembly and jar are tightened correctly and the gasket is perfectly in place.
Conclusion
A blender leaking from the bottom doesn’t have to mean the end of your blending adventures. By systematically inspecting the gasket, blade assembly, and jar, you can often identify and fix the issue yourself. Remember to always prioritize safety by unplugging your appliance. With regular maintenance and attention to detail, you can keep your blender running smoothly and leak-free for years to come. So, before you toss that leaky blender, give these tips a try – you might be surprised at how easy it is to fix!