
Discover the easiest way to achieve perfectly toasted bread using your air fryer. This guide provides a simple, step-by-step process to get consistently golden and crispy slices, eliminating the need for a traditional toaster. Learn the ideal temperature and time settings, and explore tips for various bread types. Achieve delicious toast faster and more evenly with this convenient method.
Key Takeaways
- Perfectly Toasted Results: Air fryers deliver remarkably even browning and crispiness, often superior to traditional toasters.
- Speed and Efficiency: Toasting in an air fryer is quick, usually taking just a few minutes per slice.
- Versatility for Bread Types: This method works well for a wide range of bread, from simple white bread to sourdough and bagels.
- Simple, Minimalist Approach: Toasting bread in an air fryer requires no oil or special preparation, making it incredibly easy.
- Precise Control: You have direct control over the temperature and time, allowing for customization to your preference.
- Easy Cleanup: Generally, air frying bread results in minimal mess, making cleanup a breeze.
How to Toast Bread in Air Fryer
Are you tired of unevenly toasted bread? Do you wish your toast had that perfect crispy exterior and soft interior? If you own an air fryer, you’re in luck! Toasting bread in an air fryer is surprisingly simple, incredibly fast, and often yields superior results compared to a traditional toaster. Forget burning one side while the other remains pale; the air fryer circulates hot air evenly, ensuring a beautiful golden-brown finish every time.
In this comprehensive guide, we’ll walk you through everything you need to know to master the art of air fryer toast. We’ll cover the basic steps, offer tips for different bread types, suggest delicious topping ideas, and even tackle some common troubleshooting issues. Get ready to transform your breakfast routine with perfectly toasted bread, made easy!
Why Toast Bread in an Air Fryer?
Before we dive into the “how,” let’s quickly touch on the “why.” Many people discover air fryer toasting by accident, but it quickly becomes a go-to method for good reason:
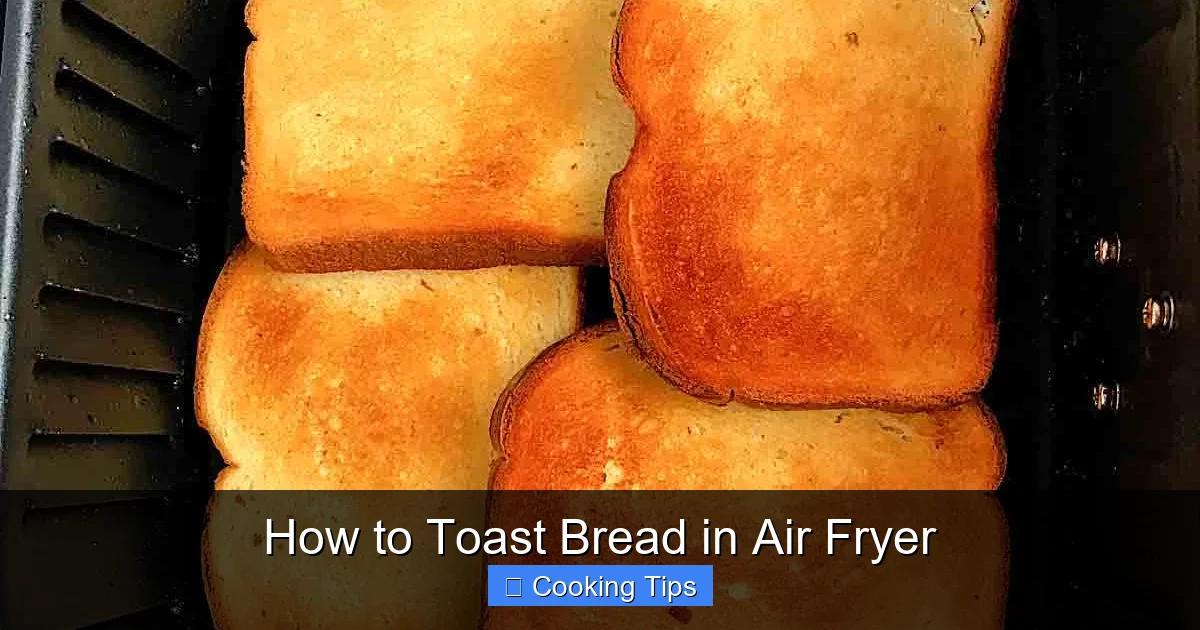
Visual guide about How to Toast Bread in Air Fryer
Image source: airfryeryum.com
- Even Browning: The convection technology in air fryers circulates hot air around the food. This means your bread gets toasted uniformly on all sides, without the hot spots that can lead to burnt edges.
- Speed: Air fryers preheat quickly and cook rapidly. You can have perfectly toasted bread in a matter of minutes.
- Crispiness: The intense hot air circulation creates a wonderfully crisp texture that’s often difficult to achieve with standard toasters.
- Versatility: Beyond basic toast, you can toast bagels, English muffins, thicker slices of artisan bread, and even croutons!
- Minimal Mess: Unlike pan-frying, there’s no need for oil or butter, and cleanup is usually as simple as wiping down the basket.
The Basic Steps to Air Fryer Toast
Toasting bread in an air fryer is as straightforward as it gets. You don’t need any special tools or ingredients beyond your bread and your air fryer.
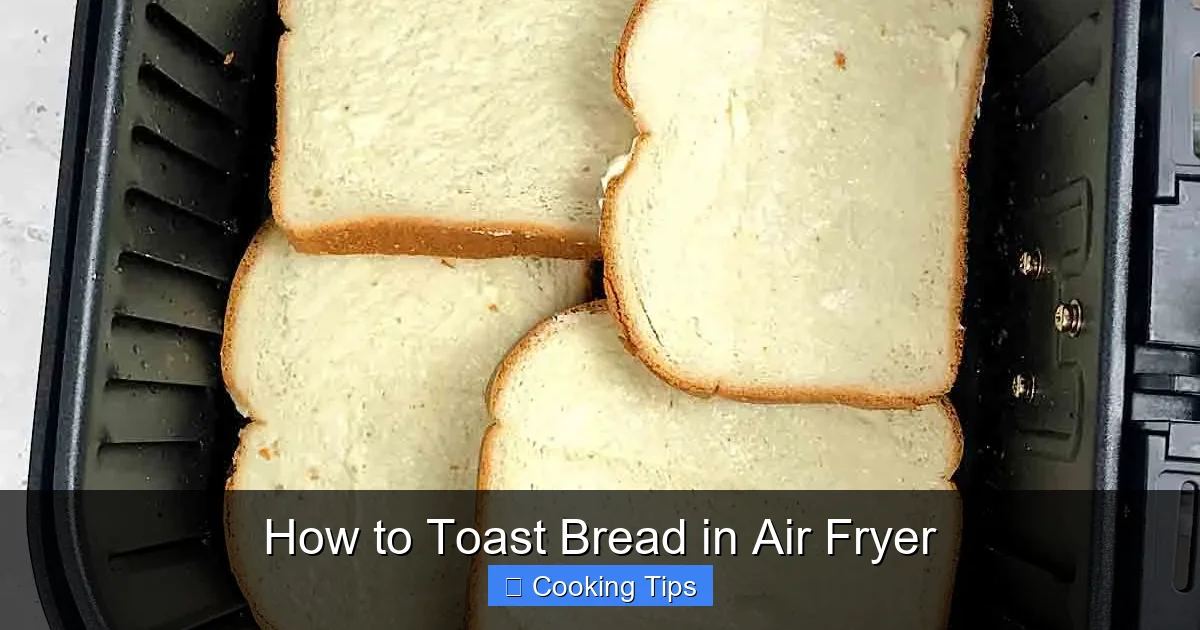
Visual guide about How to Toast Bread in Air Fryer
Image source: airfryeryum.com
Step 1: Preheat Your Air Fryer
While some air fryer recipes don’t strictly require preheating, it’s a good idea for toasting. Preheating ensures that the air fryer is at the correct temperature from the moment you insert your bread, leading to more consistent toasting.
Visual guide about How to Toast Bread in Air Fryer
Image source: airfryerrecipes.com
How Long to Preheat:
Most air fryers will be adequately preheated for toasting in about 2-3 minutes. Set your air fryer to the desired toasting temperature and let it run for a couple of minutes before adding the bread.
Step 2: Prepare Your Bread
This is the simplest step! All you need to do is decide how many slices of bread you want to toast and place them on a clean surface.
Slice Thickness:
Standard sandwich bread slices are ideal. If you’re using a thicker slice of artisan bread, you might need to adjust the cooking time slightly. Avoid overcrowding the air fryer basket; toast in batches if necessary to ensure even toasting.
Step 3: Place Bread in the Air Fryer Basket
Carefully arrange your bread slices in a single layer inside the air fryer basket. Ensure that the slices are not overlapping. Overlapping bread will result in uneven toasting, with the top slices cooking faster than the bottom.
Single Layer is Key:
This is crucial for achieving that perfect, even crisp. If your air fryer is small or you’re toasting many slices, it’s better to do two batches than to compromise on the quality of the toast.
Step 4: Set Temperature and Time
This is where the magic happens! The right temperature and time are key to achieving your desired level of toastiness.
Recommended Temperature:
For most standard bread, a temperature of 350°F (175°C) is ideal. This temperature is hot enough to toast the bread efficiently without burning it too quickly.
Recommended Time:
The toasting time will vary depending on your air fryer model, the thickness of your bread, and how brown you like your toast. Start with a range of 2-4 minutes.
Important Note: Air fryers can be powerful! It’s always better to start with a shorter time and add more if needed than to burn your toast. You can always pop it back in for another minute or two.
Step 5: Check and Flip (If Necessary)
After the initial 2-4 minutes, carefully pull out the air fryer basket to check your toast. If one side is already toasting nicely, and the other side needs a bit more time, you can carefully flip the slices.
Flipping for Evenness:
Flipping is often optional, especially if you’re aiming for a lighter toast. However, if you prefer a deeper golden brown or notice unevenness, a quick flip halfway through the cooking process can ensure perfection.
Tip: If your air fryer has a very strong top element, you might find flipping more beneficial. Observe your toast; it will tell you what it needs!
Step 6: Continue Toasting Until Golden Brown
If your toast isn’t quite done after the initial time, or after flipping, simply put the basket back in and continue toasting. Check every 30-60 seconds until it reaches your desired level of golden brown crispiness.
Listen to Your Toast:
You’ll begin to develop an intuition for how long your specific air fryer takes. The aroma of toasting bread is also a good indicator – when it smells delightfully toasty, it’s usually close to done!
Step 7: Remove and Enjoy!
Once your bread is perfectly toasted, carefully remove the basket from the air fryer. Use tongs or a spatula to remove the toast and place it on a plate. Add your favorite toppings and enjoy your delicious, air-fried toast!
Tips for Perfect Air Fryer Toast
Now that you know the basic steps, let’s explore some tips to elevate your air fryer toasting game:
- Experiment with Bread Types: This method works wonderfully for more than just white bread.
- Sourdough: Sourdough’s slightly denser texture holds up beautifully, yielding a fantastic crispy crust. Try 375°F (190°C) for 3-5 minutes, flipping halfway.
- Whole Wheat and Multigrain: These also toast well. They might take slightly longer than white bread, so keep an eye on them.
- Bagels and English Muffins: Slice them in half. For bagels, you might need a slightly higher temperature (around 375°F/190°C) for 4-6 minutes. For English muffins, 350°F (175°C) for 3-4 minutes should suffice. Be sure to lay them cut-side down initially.
- Thicker Artisan Breads: These benefit from a slightly longer time and perhaps a slightly lower temperature initially (e.g., 325°F/160°C for 5-7 minutes, then check and adjust) to ensure the inside warms up without the outside burning.
- Watch for Burning: Air fryers are efficient! Always start with less time than you think you’ll need. It’s much easier to add time than to salvage burnt toast.
- Don’t Overcrowd: As mentioned, a single layer is key. If you’re toasting for a family, consider doing it in batches.
- Know Your Air Fryer: Every air fryer is different. Some run hotter than others. You might need to adjust the temperature or time after your first attempt. Keep a note of what works best for your specific model.
- Consider a “Toast” Setting: Some newer air fryers have a dedicated toast setting. If yours does, consult your manual for its recommended temperature and time, as it’s likely optimized for this purpose.
Topping Ideas to Complement Your Toast
Once your toast is perfectly golden and crispy, the fun truly begins with toppings! Here are some ideas to inspire you:
- Classic Butter and Jam: The timeless favorite.
- Avocado Toast: Mash avocado with salt, pepper, and a squeeze of lime.
- Peanut Butter and Banana: A satisfying and nutritious combination.
- Cream Cheese and Smoked Salmon: A delicious brunch option.
- Cinnamon Sugar: A simple sweet treat, perfect for dessert or a snack.
- Whipped Cream Cheese with Berries: Elegant and delightful.
- Garlic Butter: Melt butter with minced garlic and brush over the toast right after it comes out of the air fryer.
Troubleshooting Common Air Fryer Toasting Issues
Even with simple tasks, sometimes things don’t go as planned. Here are a few common issues and how to fix them:
Problem: Toast is Burning on One Side, Pale on the Other
Solution: This is usually due to overcrowding or uneven heat distribution in your air fryer. Ensure your bread is in a single layer without overlap. If your air fryer has a tendency to have a hotter spot, try flipping the bread halfway through the cooking process. For future reference, observe where the most intense heat seems to come from and position your bread accordingly.
Problem: Toast is Too Dry and Hard
Solution: You likely cooked it for too long or at too high a temperature. Next time, reduce the temperature by 10-20°F (5-10°C) or shorten the cooking time by 1-2 minutes. Remember, you can always add more time!
Problem: Toast is Not Crispy Enough
Solution: This can happen if the temperature was too low or the time was too short. Try increasing the temperature by 10-20°F (5-10°C) or extend the cooking time by another minute or two. Ensure the bread is in a single layer and the air fryer is properly preheated.
Problem: Bread Sticks to the Basket
Solution: While bread generally doesn’t stick much to air fryer baskets (especially non-stick ones), if you experience this, it might be due to the specific coating of your basket or the type of bread. Lightly spraying the basket with a non-stick cooking spray before adding the bread can help. However, for basic toasting, this is rarely an issue.
Conclusion
Toasting bread in an air fryer is a game-changer for anyone seeking quick, perfectly golden, and consistently crispy slices. With its simple steps and remarkable versatility, the air fryer proves to be a powerful tool in the kitchen, extending beyond its typical “frying” capabilities. Whether you’re toasting a slice of sourdough for your morning avocado toast or a piece of whole wheat for a peanut butter sandwich, this method ensures delicious results every time.
Don’t be afraid to experiment with different bread types and toasting times to find your perfect setting. The convenience, speed, and quality of air fryer toast are undeniable. So, next time you crave a perfectly toasted slice, skip the traditional toaster and reach for your air fryer – you won’t be disappointed!