
Unlock the secret to perfectly cooked ribs in your air fryer! This comprehensive guide walks you through each step, from choosing your ribs to achieving that delicious, smoky flavor. You’ll learn how to prep, season, and cook your ribs to tender perfection, making them a weeknight-friendly delight. Get ready for fall-off-the-bone ribs with minimal fuss and maximum flavor!
How to Cook Ribs in Air Fryer
Love ribs but dread the long cooking times or messy oven/grill prep? What if I told you that you could achieve incredibly tender, flavorful, and juicy ribs right in your air fryer? It’s absolutely possible, and it’s much easier than you might think! This guide will walk you through everything you need to know to cook delicious ribs in your air fryer, making them a fantastic option for a quick weeknight meal or a crowd-pleasing appetizer.
Forget the hours spent babysitting a smoker or the potential for flare-ups on the grill. The air fryer is your new best friend when it comes to perfectly cooked ribs. We’ll cover selecting the best cuts, the essential prep steps, the art of seasoning, and the magic cooking temperatures and times that will transform your ribs from good to unforgettable. Get ready to impress yourself and everyone you share these with!
Key Takeaways
- Choose the Right Ribs: Opt for baby back or spare ribs for the best results in your air fryer.
- Prep is Key: Remove the membrane from the back of the ribs for maximum tenderness.
- Season Generously: A good dry rub is essential for building flavor before cooking.
- Low and Slow (Air Fryer Style): Cook at a lower temperature initially to tenderize, then finish at a higher temp for crispiness.
- Sauce Strategically: Apply BBQ sauce in the last 10-15 minutes to prevent burning.
- Resting is Crucial: Allow the ribs to rest after cooking to reabsorb juices and become incredibly tender.
- Experiment with Flavors: Don’t be afraid to customize your dry rubs and sauces.
Why Cook Ribs in an Air Fryer?
Before we dive into the how-to, let’s talk about why the air fryer is a game-changer for ribs.
Speed: Air fryers circulate hot air rapidly, significantly reducing cooking times compared to traditional methods. You can enjoy delicious ribs in a fraction of the time.
Tenderness: The controlled environment of the air fryer allows the ribs to cook evenly, resulting in super tender meat that practically falls off the bone.
Crispiness: The high-speed air circulation also helps to crisp up the exterior of the ribs, giving you that satisfying bite.
Convenience: No need to preheat a large oven or fire up a grill. The air fryer is quick to heat up and easy to clean.
Flavor: While you won’t get that deep smoky flavor of a true smoker, you can still achieve incredibly delicious results with a good dry rub and sauce.
Choosing Your Ribs
The type of ribs you choose will influence the cooking time and texture. For air frying, two popular choices are:
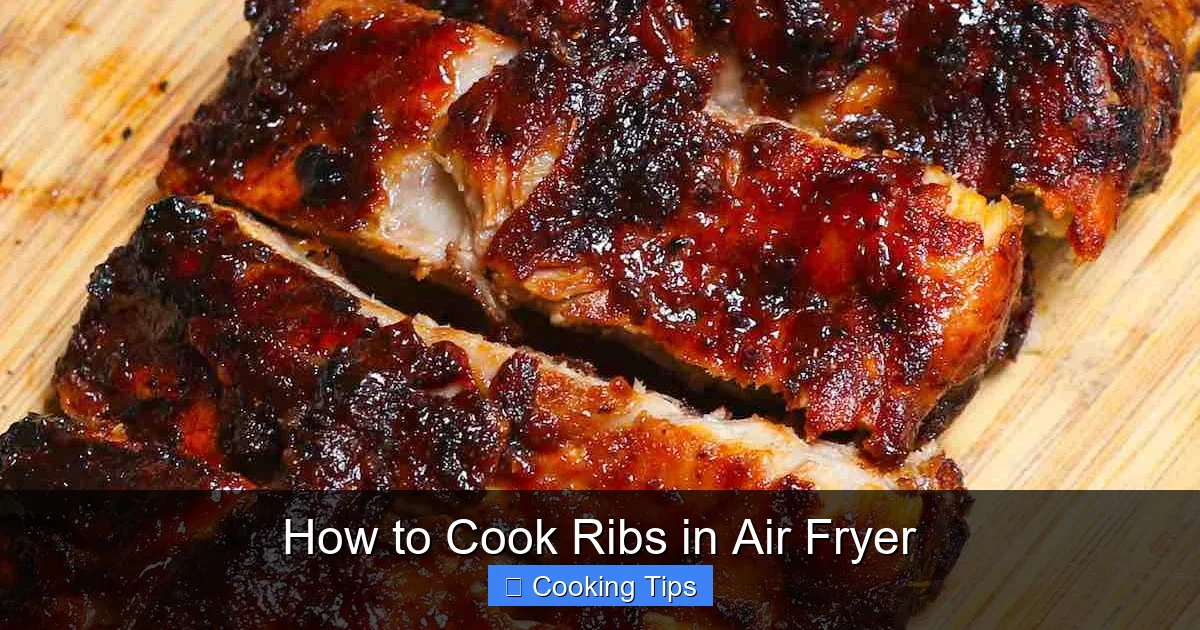
Visual guide about How to Cook Ribs in Air Fryer
Image source: izzycooking.com
Baby Back Ribs
These ribs come from the back of the pig. They are generally more tender and have less fat than spare ribs. They are also smaller, making them a great option for single servings or if you don’t want a huge batch. Baby back ribs cook a bit faster in the air fryer due to their size and leanness.
Spare Ribs
Spare ribs are larger and flatter than baby back ribs, coming from the belly side of the pig. They have more fat and connective tissue, which translates to a richer, more robust flavor when cooked. They will take a little longer to cook than baby back ribs. St. Louis style ribs are a trimmed version of spare ribs, making them a popular choice for their uniform shape.
For this guide, we’ll focus on techniques that work well for both, but keep in mind that cooking times may vary slightly.
Essential Preparation Steps
Proper preparation is crucial for achieving tender, delicious ribs. Don’t skip these steps!
Step 1: Remove the Membrane
This is arguably the most important step for tender ribs. On the bone side of the ribs, you’ll find a thin, papery membrane. This membrane is tough and can prevent rubs and seasonings from penetrating the meat, and it won’t break down during cooking. Removing it is easy and makes a huge difference.
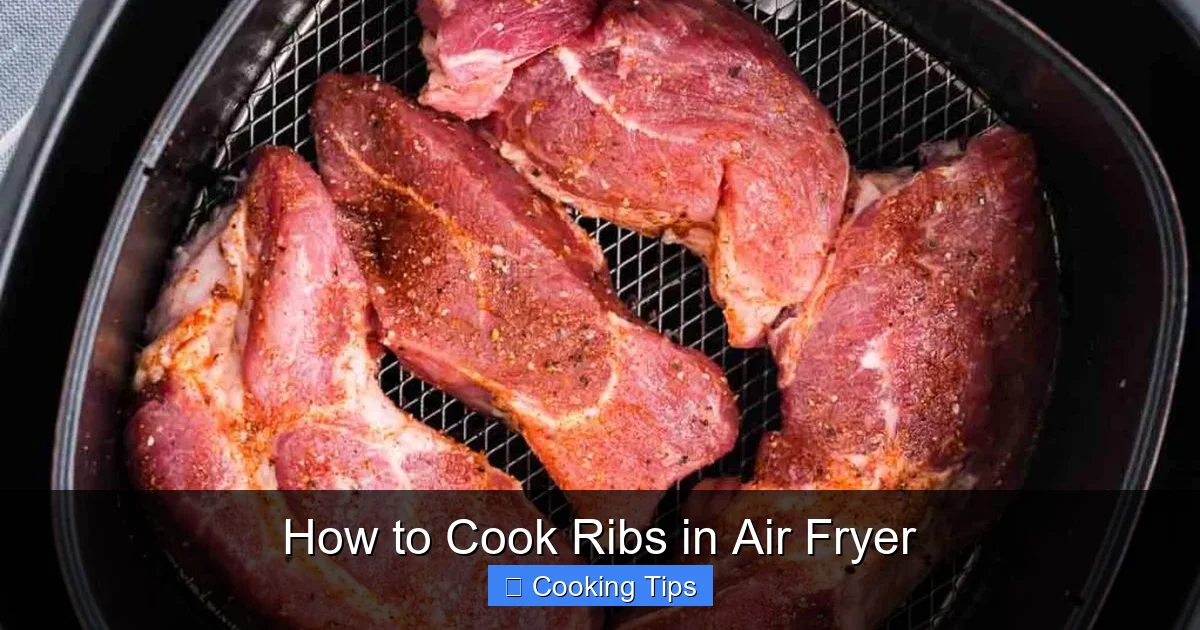
Visual guide about How to Cook Ribs in Air Fryer
Image source: westviamidwest.com
How to Remove the Membrane:
- Find an Edge: Locate a corner of the membrane. Sometimes you can gently lift it with a butter knife or a spoon.
- Get a Grip: Once you have a bit of the membrane lifted, grab it firmly with a paper towel. The paper towel gives you a better grip than your fingers.
- Peel it Off: Gently but firmly pull the membrane away from the bones. It should peel off in one or a few large pieces. If it tears, just try to grab another edge and continue peeling.
- Discard: Throw away the membrane.
Step 2: Trim Excess Fat
Ribs have a good amount of fat, which is important for flavor and moisture. However, there might be some large, thick chunks of hard fat that you can trim. Use a sharp knife to carefully trim these away. Leave the marbled fat within the meat, as this will render down and keep your ribs moist and tender.
Seasoning Your Ribs: The Dry Rub
A good dry rub is the foundation of flavorful ribs. You can use a store-bought rub, or easily make your own. The key is to create a blend that complements the pork without overpowering it.
Basic Dry Rub Recipe:
- 1/4 cup brown sugar (light or dark)
- 2 tablespoons paprika (sweet or smoked)
- 1 tablespoon garlic powder
- 1 tablespoon onion powder
- 1 tablespoon salt
- 1 teaspoon black pepper
- 1 teaspoon chili powder (optional, for a little heat)
- 1/2 teaspoon cayenne pepper (optional, for more heat)
Mix all the ingredients together in a bowl. You’ll have enough for a couple of racks of ribs.
Visual guide about How to Cook Ribs in Air Fryer
Image source: storables.com
Applying the Dry Rub:
- Pat Ribs Dry: Before applying the rub, pat your ribs completely dry with paper towels. This helps the rub adhere better.
- Apply Generously: Sprinkle the dry rub all over the ribs, on both sides. Use your hands to rub it in, ensuring an even coating. Don’t be shy!
- Let it Sit (Optional but Recommended): For best results, let the seasoned ribs sit at room temperature for at least 30 minutes, or refrigerate them, covered, for a few hours (or even overnight). This allows the salt to work its magic, tenderizing the meat and drawing out moisture, which then gets reabsorbed with the flavors of the rub.
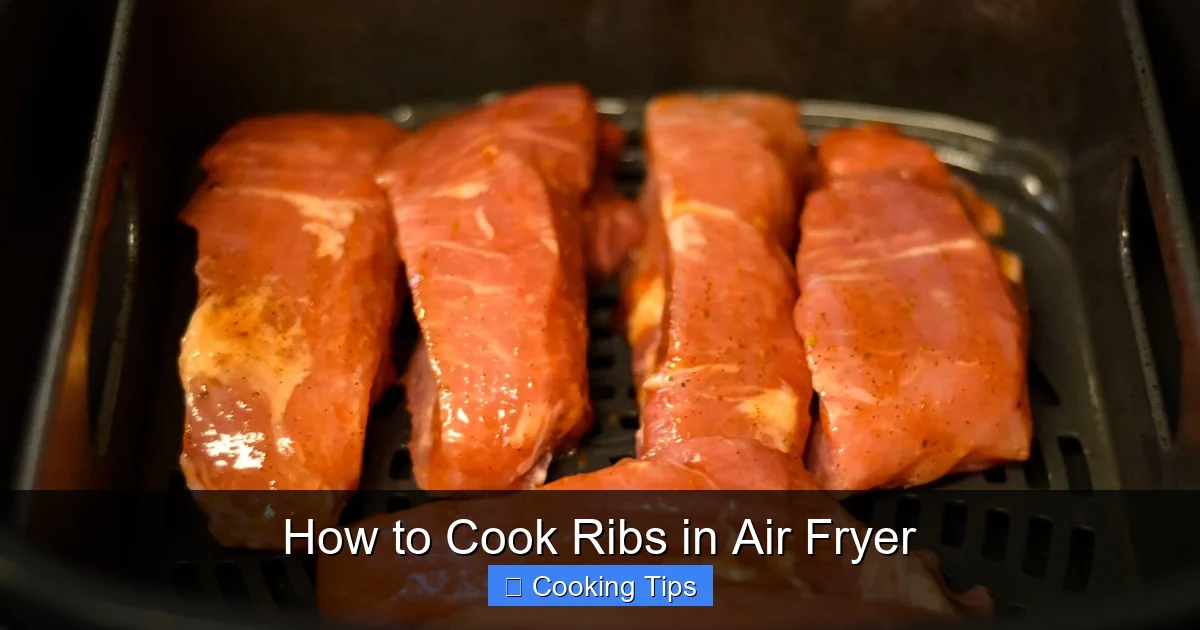
The Air Frying Process: Low and Slow (Air Fryer Style)
The secret to tender ribs in the air fryer is a two-stage cooking process: a lower temperature to tenderize, followed by a slightly higher temperature to crisp them up.
Step 3: Prepare Your Air Fryer Basket
Some air fryers benefit from a light coating of cooking spray in the basket to prevent sticking, especially if you’re not using parchment liners. However, many ribbed baskets prevent direct contact, and the fat from the ribs will help.
Step 4: Initial Cook (Tenderizing)
This is where we gently cook the ribs to break down the connective tissues and make them tender.
- Preheat the Air Fryer: Preheat your air fryer to 300°F (150°C). This usually takes about 3-5 minutes.
- Arrange the Ribs: Carefully place the seasoned ribs in the air fryer basket. You may need to cut them into smaller sections (halves or thirds) to fit without overcrowding. Overcrowding will steam the ribs rather than air fry them, preventing crisping. Cook in batches if necessary.
- Cook Time: Cook at 300°F (150°C) for 20-25 minutes for baby back ribs, or 25-30 minutes for spare ribs.
Step 5: The Flip and Second Cook (Crisping)
After the initial tenderizing cook, it’s time to flip them and increase the heat to get a nice exterior texture.
- Flip the Ribs: Carefully remove the basket and flip the ribs over.
- Increase Temperature: Increase the air fryer temperature to 375°F (190°C).
- Second Cook Time: Cook for another 15-20 minutes, or until the ribs are tender and starting to crisp up nicely.
Step 6: Glaze with BBQ Sauce (Optional)
If you love BBQ sauce on your ribs, this is the time to add it. Applying sauce too early can cause it to burn due to its sugar content.
- Brush on Sauce: In the last 10-15 minutes of cooking (at 375°F/190°C), carefully brush your favorite BBQ sauce onto the ribs.
- Continue Cooking: Continue air frying until the sauce is slightly caramelized and sticky, and the ribs are cooked through and tender. The exact time will depend on your sauce and how thick it is. Keep an eye on them to prevent burning.
Step 7: Rest Your Ribs
This is a crucial step that many home cooks skip, but it makes all the difference in the world for juicy, tender ribs.
- Remove from Air Fryer: Once the ribs are cooked to your liking, carefully remove them from the air fryer basket.
- Tent with Foil: Place the ribs on a clean cutting board and loosely tent them with aluminum foil.
- Resting Time: Let them rest for at least 5-10 minutes. This allows the juices to redistribute throughout the meat. If you cut into them too soon, all those delicious juices will run out onto the board.
Step 8: Slice and Serve
After resting, it’s time to slice those beauties!
- Cutting: Use a sharp knife to cut the ribs between the bones.
- Serve: Serve immediately with extra BBQ sauce on the side, your favorite coleslaw, potato salad, or any other classic BBQ accompaniments.
Tips for Perfect Air Fryer Ribs
Here are some extra tips to help you achieve rib perfection every time:
- Don’t Overcrowd: This is the golden rule of air frying. Ribs need space for the hot air to circulate around them. Cook in batches if your air fryer isn’t large enough.
- Experiment with Rubs: Try different spice combinations. A touch of espresso powder can add depth, while a bit of brown sugar enhances caramelization.
- Sauce Choice Matters: Some BBQ sauces are thicker and sweeter than others. Thicker sauces may need a little thinning with water or vinegar if they’re too sticky to brush.
- Use a Meat Thermometer: While visual cues are helpful, an instant-read meat thermometer can confirm doneness. Pork ribs are typically done when they reach an internal temperature of 195-205°F (90-96°C) for maximum tenderness.
- Adjust for Your Air Fryer: Air fryer models vary. You might need to slightly adjust cooking times and temperatures based on your specific appliance. Keep an eye on the ribs during the last few minutes of cooking.
- Crispier Skin: If you prefer extra crispy bits, you can increase the temperature slightly in the last 5 minutes of cooking.
- “Fall-Off-The-Bone” Texture: For ribs that are extremely tender and almost falling off the bone, you might need to extend the initial low-temperature cooking time by 5-10 minutes.
Troubleshooting Common Air Fryer Rib Issues
Even with the best guides, sometimes things don’t go exactly as planned. Here are a few common issues and how to fix them:
Issue: Ribs are tough or dry.
Solution: This usually means they weren’t cooked long enough, especially at the lower temperature, or they were overcooked at the higher temperature without enough moisture. Ensure you’re removing the membrane and consider extending the initial low-temperature cooking phase. Also, don’t skip the resting step!
Issue: BBQ sauce is burning.
Solution: You’re likely applying the sauce too early or cooking at too high a temperature for too long with the sauce on. Try brushing the sauce on during the final 5-10 minutes of cooking, and consider reducing the temperature slightly if you notice it burning.
Issue: Ribs are unevenly cooked.
Solution: This is almost always due to overcrowding the air fryer basket. Ensure there’s plenty of space for air to circulate. Cook in smaller batches if needed.
Issue: Ribs are falling apart too much (almost mushy).
Solution: This can happen if they’re overcooked. While tender is good, “too tender” can be a thing. Next time, reduce the initial cooking time slightly or watch them carefully in the final stages.
Conclusion
Cooking ribs in the air fryer is a revelation! You can achieve succulent, tender, and flavorful ribs with a fraction of the effort and time required by traditional methods. By following these simple steps – from selecting the right ribs and prepping them properly to using the two-stage cooking method and finishing with your favorite sauce – you’re well on your way to becoming an air fryer rib master.
Don’t be intimidated. These instructions are designed to be straightforward, and the results are incredibly rewarding. Whether you’re a seasoned home cook or just starting out, the air fryer makes delicious ribs accessible for any occasion. So, fire up your air fryer, grab your favorite dry rub and sauce, and get ready to enjoy some of the best ribs you’ve ever made at home. Happy cooking!