
Is your rice cooker not powering on? It might be a blown fuse. This guide walks you through identifying and safely replacing your rice cooker’s fuse. We’ll cover everything from gathering tools to testing your repaired appliance. Don’t let a small electrical issue stop your perfect rice!
Key Takeaways
- Identify a Blown Fuse: Recognize the common signs that indicate your rice cooker’s fuse has blown, preventing it from powering on.
- Safety First: Understand the crucial safety precautions, including unplugging the appliance and discharging any residual electricity, before attempting any repairs.
- Gather Necessary Tools: Compile a list of essential tools and materials, such as screwdrivers, a replacement fuse, and possibly pliers, required for the fuse replacement process.
- Disassemble with Care: Learn the step-by-step process of safely disassembling your rice cooker to access the fuse without causing damage.
- Locate and Remove the Fuse: Understand how to pinpoint the fuse within the cooker’s circuitry and how to properly remove it.
- Install the New Fuse: Follow precise instructions for inserting the correct replacement fuse, ensuring it’s securely in place.
- Reassemble and Test: Learn how to put your rice cooker back together correctly and safely test its functionality after the repair.
Rice Cooker Fuse Replacement Guide
There’s nothing quite like a perfectly cooked pot of rice. It’s a staple in many kitchens and a cornerstone of countless delicious meals. But what happens when your trusty rice cooker suddenly decides to give up the ghost? You plug it in, press the start button, and… nothing. No lights, no hum, no promise of fluffy grains. Before you despair and consider buying a new one, there’s a good chance the problem is something simple and easily fixable: a blown fuse.
This comprehensive guide will take you through the process of replacing a blown fuse in your rice cooker. We’ll cover everything from identifying the problem to safely making the repair. You’ll learn what tools you need, how to take apart your appliance, and how to put it all back together again. By the end, you’ll be empowered to bring your rice cooker back to life and enjoy perfectly cooked rice once more. It’s a rewarding DIY project that can save you money and give you a deeper understanding of your kitchen appliances.
Understanding Why Your Rice Cooker Might Not Be Working
Before we dive into the fuse replacement, let’s briefly touch on why a rice cooker might stop working. While there can be several reasons, a blown fuse is one of the most common and easiest to resolve. A fuse is a safety device. It contains a thin wire that melts and breaks the electrical circuit if too much current flows through it. This protects the appliance and your home from electrical damage or fire. Power surges, electrical faults within the cooker, or simply a fuse reaching the end of its lifespan can cause it to blow.

Visual guide about Rice Cooker Fuse Replacement Guide
Image source: down-ph.img.susercontent.com
If your rice cooker shows absolutely no signs of life – no indicator lights, no heating element activation – a blown fuse is the prime suspect. If it heats up but doesn’t cook, or if there are other strange behaviors, the issue might be more complex. But for a complete lack of power, the fuse is your first stop.
Safety First: Essential Precautions Before You Begin
Working with electrical appliances can be dangerous. Safety should always be your top priority. Never attempt to open or repair any electrical appliance while it is plugged into a power outlet. Make sure the power cord is completely disconnected from the wall socket.
Visual guide about Rice Cooker Fuse Replacement Guide
Image source: ricearray.org
Here’s what you absolutely must do before you even think about unscrewing a single component:
Unplug the Rice Cooker
This might seem obvious, but it bears repeating. Ensure the power cord is unplugged from the wall. Do not rely on just turning off the switch; physically remove the plug.
Allow for Cooling
If your rice cooker was recently used, allow it to cool down completely. Internal components can retain heat and cause burns.
Discharge Residual Electricity
Some appliances can store a small amount of electrical charge even after being unplugged. While less common in basic rice cookers, it’s good practice to wait a few minutes after unplugging before proceeding.
Gathering Your Tools and Materials
You don’t need a professional toolkit to replace a rice cooker fuse. Most of what you need can be found around your home or at a local hardware store.
Visual guide about Rice Cooker Fuse Replacement Guide
Image source: down-my.img.susercontent.com
Essential Tools
- Screwdrivers: You’ll likely need a Phillips head screwdriver. Some models might also use flathead screws. Having a set with various sizes is helpful.
- Pliers: Needle-nose pliers can be useful for gripping and maneuvering small components, including the fuse itself.
- Wire Strippers (Optional but Recommended): If your new fuse has wires attached, you might need these to connect them properly.
- Electrical Tape: For securing wire connections if your new fuse requires it.
- Multimeter (Optional but Recommended): This tool can confirm if the old fuse is indeed blown and if the new one is working correctly by testing continuity.
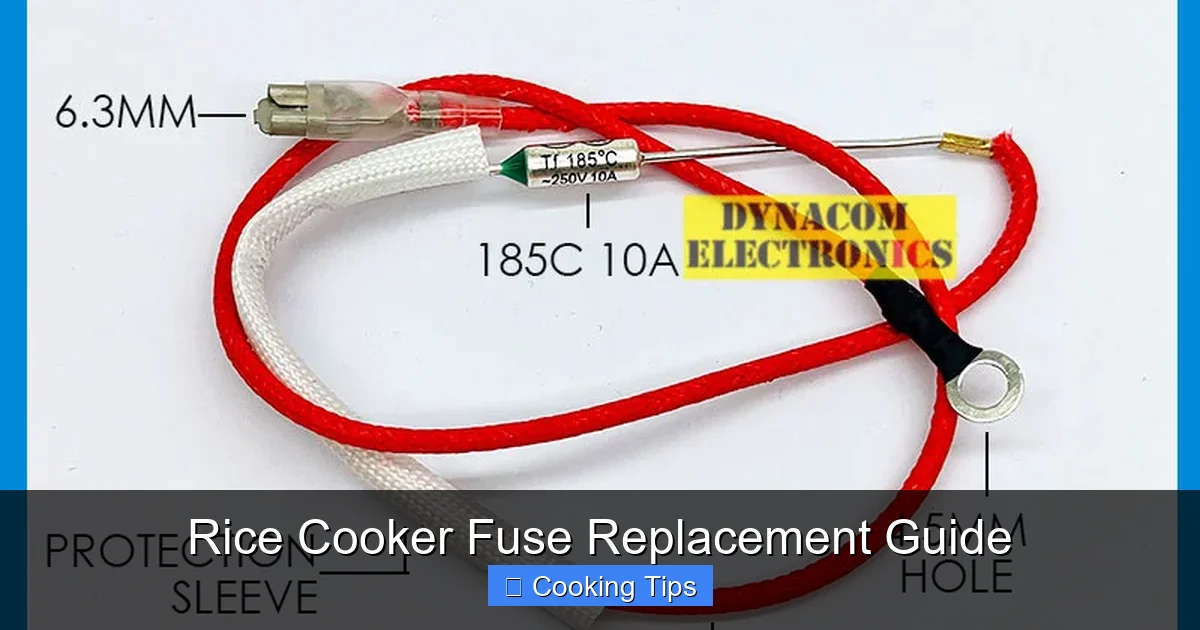
The Replacement Fuse
This is the most crucial part. You need to find the correct replacement fuse for your specific rice cooker model. The fuse will have a rating (e.g., 5A, 10A) and a voltage rating (e.g., 125V, 250V). It’s vital to match these specifications exactly. Using a fuse with a higher amperage rating can overload the appliance and cause damage or fire. Using one with a lower rating will likely just blow again immediately.
How to find the right fuse:
- Check the Old Fuse: The easiest way is to remove the old fuse (which we’ll cover next) and read the numbers printed on its glass or ceramic casing.
- Consult Your Rice Cooker’s Manual: If you still have it, the manual often specifies the fuse type and rating.
- Manufacturer’s Website or Customer Support: Look up your rice cooker model number on the manufacturer’s website. They might have documentation or a support line that can help you identify the correct fuse.
- Online Retailers: Many online electronics part stores sell universal fuses. You can search for the specifications you need.
Replacement fuses are typically small, cylindrical glass tubes with metal caps at each end. They are often called “fast-blow” fuses.
Step-by-Step Guide to Replacing the Rice Cooker Fuse
Now that you’re prepared, let’s get to the actual repair. Remember, patience and careful observation are key.
Step 1: Accessing the Rice Cooker’s Interior
This is where the disassembly begins. The exact process will vary depending on your rice cooker’s make and model. Most rice cookers have a plastic casing that needs to be removed to reveal the internal components.
H3: Identifying Screw Locations
Turn your rice cooker upside down. Look for screws on the bottom panel. These are often Phillips head screws. Some models might have screws hidden under rubber feet or stickers. Carefully pry these off if necessary, but try not to damage them, as you’ll want to reattach them later.
H3: Removing the Outer Casing
Once all visible screws are removed, you can usually gently separate the bottom panel from the main body of the rice cooker. Some models might require you to remove screws from the side or the back. Work slowly and look for any clips that might be holding the panels together. If something feels stuck, don’t force it; double-check for any hidden screws or clips.
Example: On some basic models, the entire base unit might slide off after removing a few screws. On others, you might need to lift the main pot out first, then unscrew the base.
Step 2: Locating the Fuse
With the casing removed, you’ll see the internal wiring and components. The fuse is usually a small, cylindrical glass tube, often with wires connected to it or small metal tabs that fit into sockets. It’s typically located close to where the power cord enters the appliance.
H3: Visual Inspection
Look for a component that matches the description of a fuse. It might be housed in a plastic holder. You may see the wire inside the glass tube; if it’s broken, the fuse is blown. Sometimes, the glass can look discolored or charred if it’s overheated.
H3: Identifying the Fuse Holder
The fuse will be connected to the circuit board or wires. It might be held in place by clips, a small plastic holder, or simply by its wire connections. Note how it’s attached so you can reattach the new one the same way.
Step 3: Removing the Old Fuse
Once you’ve located the fuse, it’s time to remove it. Be gentle to avoid damaging any other components.
H3: Detaching the Fuse
If the fuse is in a holder, you might be able to simply pull it out. If it has wires attached, you may need to carefully detach them. If they are crimped, you might need pliers to gently pull them free. If they are soldered, this task becomes more complex and might require desoldering, which is beyond the scope of a basic fuse replacement. For most basic rice cookers, fuses will have plug-in connectors or wire leads.
H3: Reading the Fuse Specifications
As mentioned earlier, carefully read the amperage (A) and voltage (V) ratings printed on the old fuse. This information is critical for purchasing the correct replacement. If the markings are unclear, try to find your rice cooker’s model number and search online for its specifications.
Step 4: Installing the New Fuse
This is the moment of truth! Installing the new fuse correctly ensures your rice cooker will work again.
H3: Ensuring Correct Fuse Rating
Double-check that the new fuse you have matches the exact amperage and voltage ratings of the old one. Using an incorrect fuse is a safety hazard.
H3: Connecting the New Fuse
If your new fuse has wires:
- Connect the wires of the new fuse to the corresponding wires or terminals where the old fuse was connected.
- If the original connection was a crimp, use pliers to securely crimp the new wires.
- If the original connection was a plug-in terminal, ensure the new fuse’s terminals snap firmly into place.
- If you need to make a more robust connection and the original was soldered, you might need to solder the new wires. For a simpler repair, using electrical tape to secure and insulate wire-to-wire connections is a temporary but often effective solution for basic repairs, though a proper crimp or solder is preferred.
If your new fuse is a plug-in type:
- Simply push the new fuse firmly into its holder or terminals. Ensure it’s seated securely and facing the correct direction if there are any markings indicating polarity (though most fuses are bidirectional).
Step 5: Reassembling the Rice Cooker
Putting your rice cooker back together is the reverse of disassembly.
H3: Attaching the Casing
Carefully align the outer casing or bottom panel with the main body of the rice cooker. Make sure no wires are pinched between the panels. Gently press the pieces together until they snap or fit snugly.
H3: Replacing Screws
Reinsert all the screws you removed. Tighten them firmly, but avoid over-tightening, which could strip the threads or crack the plastic.
H3: Reattaching Feet/Stickers
If you removed any rubber feet or stickers, reattach them to their original positions.
Step 6: Testing the Repaired Rice Cooker
It’s time to see if your hard work paid off!
H3: Initial Power-Up
Plug the rice cooker into a power outlet. If it has an on/off switch, turn it on. Observe the indicator lights. If they illuminate and the appliance seems ready to operate, that’s a good sign.
H3: Running a Test Cycle
Carefully place a small amount of water inside the inner pot (no rice for the first test). Press the “cook” or equivalent button. The rice cooker should begin to heat up and boil the water. If it does, congratulations! You’ve successfully replaced the fuse.
What to do if it still doesn’t work:
If the rice cooker still shows no signs of life, or if it blows the new fuse immediately, there might be another issue. This could be a faulty thermostat, a problem with the heating element, or a short circuit elsewhere in the wiring. At this point, you might consider professional repair or replacement.
Troubleshooting Common Issues
Even with careful work, things can sometimes go wrong. Here are a few common issues and how to address them:
- New fuse blows immediately: This is a strong indicator of another electrical problem within the rice cooker, such as a short circuit. Unplug the unit immediately and do not attempt to power it on again. You may need to consult a professional.
- Rice cooker powers on but doesn’t heat: The fuse might be intact, but the heating element or thermostat could be faulty. This is a more complex repair.
- Loose connections: Ensure all wire connections for the new fuse are secure. Loose connections can cause intermittent power or prevent the cooker from working at all.
- Damaged casing during disassembly: If you cracked the plastic casing, it might still function, but it’s less safe. Consider using strong adhesive or tape to repair minor cracks.
When to Call a Professional or Consider Replacement
While replacing a fuse is a relatively simple DIY repair, it’s not always the best solution. If you’re not comfortable working with electrical components, or if you encounter complex wiring or damage to the internal circuitry, it’s best to seek professional help. A qualified appliance repair technician can diagnose and fix more intricate problems.
If your rice cooker is old, or if the cost of professional repair approaches the cost of a new appliance, it might be more economical to replace it. Many modern rice cookers offer advanced features, so consider an upgrade if yours is significantly outdated.
Conclusion
Replacing a blown fuse in your rice cooker can be a straightforward and satisfying DIY project. By following these steps carefully, prioritizing safety, and using the correct replacement parts, you can often revive your appliance and avoid the expense of buying a new one. Remember to always unplug your rice cooker and work cautiously. With a little patience and the right tools, you’ll soon be back to enjoying perfect, fluffy rice at your table. Happy cooking!