
Keeping your air fryer’s heating element clean is crucial for efficient cooking and preventing smoke. This guide provides a safe, step-by-step process to tackle grease buildup on this vital component. Never submerge your air fryer, and always unplug it before beginning any cleaning. Follow these simple steps to ensure your air fryer functions at its best.
How to Clean Air Fryer Heating Element Safely
Your air fryer is a kitchen superhero, transforming everyday ingredients into crispy, delicious meals with minimal oil. But like any hard-working appliance, it needs a little TLC to keep it running at its peak. One of the most important, yet often overlooked, parts to clean is the heating element. A dirty heating element can lead to less efficient cooking, unpleasant odors, and even smoke. This guide will walk you through exactly how to clean your air fryer heating element safely and effectively, ensuring your culinary creations continue to impress in 2026 and beyond.
You’ll learn what tools you need, the precise steps to follow, and what to avoid to protect your investment. With a little effort, you can keep your air fryer’s heating element in pristine condition, ready for your next culinary adventure.
Key Takeaways
- Always unplug your air fryer: Safety is paramount. Ensure the appliance is completely disconnected from the power source before attempting any cleaning.
- Allow the air fryer to cool completely: A hot heating element can cause burns and damage the appliance. Patience is key.
- Gentle cleaning is essential: Avoid abrasive scrubbers or harsh chemicals that can damage the heating element and its surrounding components.
- Use the right cleaning tools: A soft cloth, a damp sponge, and a mild dish soap are usually all you need for effective cleaning.
- Address grease buildup promptly: Regular cleaning prevents stubborn residue from accumulating, making future cleaning easier.
- Understand what *not* to do: Never immerse your air fryer in water or spray cleaning solutions directly onto the heating element.
Why Cleaning the Heating Element Matters
The heating element is the powerhouse of your air fryer. It’s responsible for generating the hot air that circulates around your food, creating that signature crispy texture. Over time, grease splatters, food particles, and residue from cooking can accumulate on and around the heating element. This buildup isn’t just unsightly; it can:
- Reduce cooking efficiency: A layer of grease can act as an insulator, preventing the element from heating as effectively. This means longer cooking times and less consistent results.
- Cause smoke and odors: When grease and food particles on the heating element get too hot, they can burn, leading to smoke and unpleasant smells that can transfer to your food.
- Potentially lead to damage: Persistent, baked-on residue can, in extreme cases, affect the longevity of the heating element or its protective casing.
Regular cleaning of the heating element is a simple yet crucial maintenance task that will keep your air fryer performing optimally.
What You’ll Need
Before you begin, gather these essential items. Having everything ready will make the cleaning process smooth and efficient.
Visual guide about How to Clean Air Fryer Heating Element Safely
Image source: airfryingfaqs.com
- Soft cloths or microfiber towels: For wiping and drying.
- Non-abrasive sponge: For gently scrubbing away stubborn residue.
- Mild dish soap: A gentle degreaser.
- Warm water: For rinsing and preparing your cleaning solution.
- Small bowl or basin: To hold your soapy water.
- Optional: Baking soda paste: For very stubborn spots (use sparingly).
Step-by-Step Guide to Cleaning Your Air Fryer Heating Element
Safety first! Always remember that electricity and water don’t mix. Follow these steps carefully.
Visual guide about How to Clean Air Fryer Heating Element Safely
Image source: airfryingfaqs.com
Step 1: Safety First – Unplug and Cool Down
This is the most critical step. Before you even think about touching the heating element, ensure your air fryer is completely safe to handle.
Visual guide about How to Clean Air Fryer Heating Element Safely
Image source: airfryingfaqs.com
Unplug the Appliance
Locate the power cord and unplug your air fryer from the wall outlet. Double-check that it is indeed unplugged. Never attempt to clean any part of your air fryer while it’s plugged in, even if it’s turned off.
Allow it to Cool Completely
Air fryers get hot! The heating element, in particular, retains a lot of heat. Allow your air fryer to cool down for at least 30-60 minutes after use. You should be able to comfortably touch the exterior of the appliance before proceeding. A cool appliance prevents burns and protects delicate components from thermal shock.
Step 2: Access the Heating Element
How you access the heating element will depend on your air fryer model. Most commonly, it’s located at the top of the cooking chamber, often covered by a protective grill or shield.
Check Your User Manual
If you’re unsure how to access the heating element or any protective covers, consult your air fryer’s user manual. It will provide specific instructions for your model.
Remove the Basket and Drawer
Start by removing the air fryer basket and the drawer. This will give you better visibility and access to the main cooking chamber.
Locate the Heating Element
Look up into the main cavity of your air fryer. You should see the heating element, usually a coil or a metal element, often positioned at the top. Some models have a removable cover or grill over the heating element for easier cleaning. If your model has one, carefully remove it according to your manual’s instructions.
Important Note: Do not attempt to remove the heating element itself. It is permanently attached and tampering with it can cause significant damage and void your warranty.
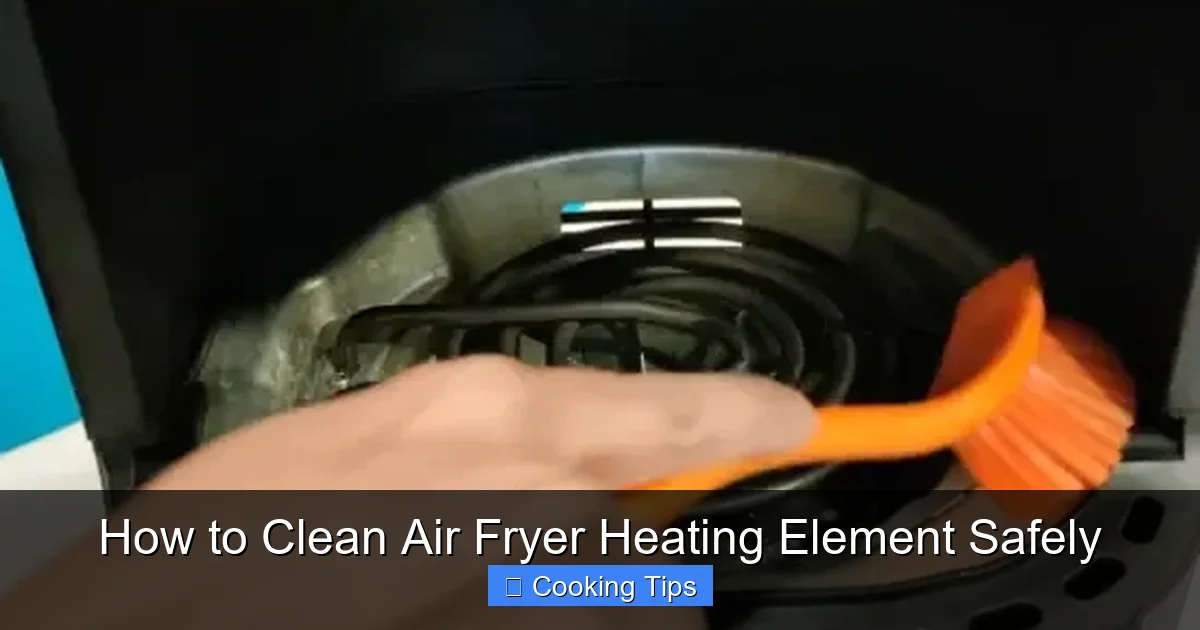
Step 3: Gentle Cleaning of the Heating Element
Now comes the actual cleaning. The key here is to be gentle. Harsh scrubbing or abrasive materials can damage the element or its protective coating.
Prepare Your Cleaning Solution
In your small bowl or basin, mix a few drops of mild dish soap with warm water. You want a lightly soapy solution, not a lot of suds.
Wipe Down the Element
Dampen a soft cloth or microfiber towel with the soapy water. Wring it out thoroughly so it’s just damp, not dripping wet. Gently wipe the surface of the heating element. Focus on areas with visible grease or food debris.
Tip: If you can’t reach certain spots, you can try wrapping a damp cloth around a non-sharp utensil (like the handle of a wooden spoon) to gently maneuver it into place.
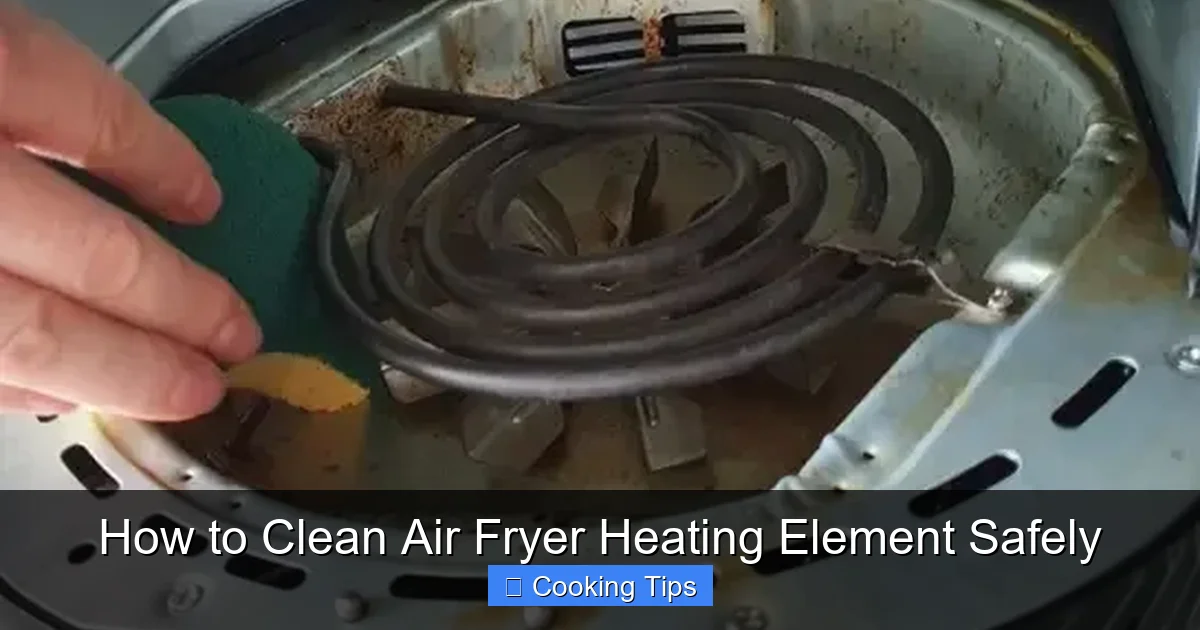
Address Stubborn Residue (Use Sparingly)
For small, stubborn bits of cooked-on food or grease that don’t come off with the soapy cloth, you can try a damp, non-abrasive sponge. Apply a small amount of mild dish soap directly to the sponge. Gently scrub the affected area. If that’s still not enough, you can make a paste of baking soda and water. Apply a tiny amount of this paste to the stubborn spot with a soft cloth and gently rub. Immediately wipe it away with a clean, damp cloth.
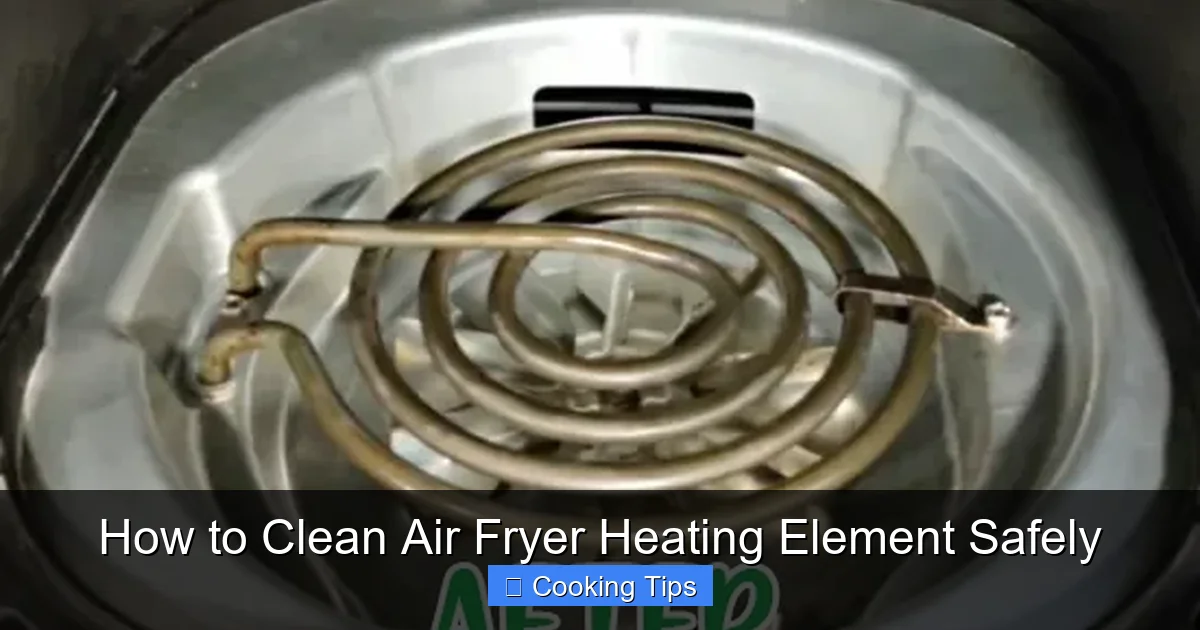
Rinse Gently
Once you’ve removed the debris, use a clean cloth dampened with plain water to wipe away any soap residue. Again, ensure the cloth is only slightly damp.
Step 4: Clean Surrounding Areas
While you’re at it, it’s a good idea to clean the areas around the heating element, as grease and crumbs can accumulate here too.
Wipe Down the Interior Walls
Use your damp, soapy cloth to wipe down the interior walls of the air fryer chamber. Pay attention to any splatters or residue.
Clean the Protective Grill/Cover (If Applicable)
If you removed a protective grill or cover for the heating element, clean it separately according to its material. Usually, a wash with warm, soapy water and a good rinse will suffice. Ensure it’s completely dry before reattaching.
Step 5: Dry Thoroughly
This step is just as important as the cleaning itself.
Dry All Surfaces
Use a dry, soft cloth or microfiber towel to meticulously dry the heating element and all interior surfaces of the air fryer. Make sure there is no residual moisture.
Air Dry (Optional)
For extra peace of mind, you can leave the air fryer basket and drawer out and the lid slightly ajar (if applicable) to air dry completely for a few hours, or overnight if possible, before reassembling and storing.
Step 6: Reassemble and Store
Once everything is clean and completely dry, you can put your air fryer back together.
Reattach Any Covers
If you removed any protective grills or covers, reattach them securely.
Insert Basket and Drawer
Place the clean and dry basket and drawer back into the air fryer.
Store Properly
Store your air fryer in a clean, dry place, ready for its next use.
Troubleshooting Common Air Fryer Heating Element Issues
Sometimes, despite your best efforts, you might encounter a persistent issue.
Persistent Smoke
If your air fryer continues to smoke after cleaning, it’s possible that there is residue in a hard-to-reach spot, or something might have dripped onto the element during cooking and is now baked on. Try a more thorough, but still gentle, cleaning session. If the problem persists, it might be time to contact the manufacturer or a repair professional. For 2026 models, check warranty information.
Unpleasant Odors
Lingering odors are often due to burnt-on food particles. Ensure you’ve thoroughly cleaned the heating element and all interior surfaces. Running the air fryer empty for a few minutes at a moderate temperature (around 350°F or 175°C) after cleaning can sometimes help burn off residual odors. Some people add a slice of lemon or a few drops of vanilla extract to a small oven-safe dish and run the air fryer for a few minutes to freshen the smell.
Difficulty Reaching the Heating Element
If your air fryer model has a non-removable shield or a design that makes reaching the heating element extremely difficult, focus on cleaning the accessible parts thoroughly. Regular deep cleaning of the basket, drawer, and interior walls will help minimize residue buildup on the element itself.
What NOT to Do When Cleaning Your Air Fryer Heating Element
Just as important as knowing what to do is knowing what to avoid. These practices can damage your air fryer.
- Never immerse your air fryer in water or any other liquid. This can cause severe electrical damage and is a major safety hazard.
- Do not use abrasive cleaning pads, steel wool, or harsh chemical cleaners. These can scratch the heating element and its surrounding surfaces, leading to rust or damage.
- Avoid spraying cleaning solutions directly onto the heating element or into the air fryer. Always apply cleaners to a cloth or sponge first.
- Do not force or bend the heating element. It’s a delicate component.
- Never attempt to disassemble the heating element itself.
Conclusion
Cleaning your air fryer’s heating element might seem like a daunting task, but it’s a straightforward process when you follow these safe and simple steps. By dedicating a few minutes to gently clean this vital part of your appliance regularly, you’ll ensure your air fryer continues to deliver perfectly cooked, crispy food, free from smoke and unwanted odors. A clean air fryer heating element means a happy air fryer, and that means more delicious meals for you and your family. Make this simple maintenance a part of your kitchen routine, and enjoy the benefits of optimal air frying for years to come!