
Learn how to effectively use your mixer grinder for both dry and wet grinding tasks. This comprehensive guide covers understanding the differences, selecting the right appliance, and mastering the techniques for various ingredients. Unlock the full potential of your kitchen assistant and elevate your cooking with ease.
Mixer Grinders for Dry and Wet Grinding
Welcome to your ultimate guide on mastering the art of dry and wet grinding with your trusty mixer grinder! This kitchen powerhouse is more than just a blender; it’s a versatile tool that can transform your cooking experience. From grinding spices into fragrant powders to whipping up silky smooth batters, your mixer grinder is capable of so much. But do you know how to get the best results for each task?
This guide is here to demystify the world of mixer grinders and their dual capabilities. We’ll explore the fundamental differences between dry and wet grinding, help you understand what makes a good mixer grinder, and provide step-by-step instructions for achieving perfect results every time. Get ready to unlock the full potential of your kitchen assistant!
Key Takeaways
- Understanding the Difference: Dry grinding focuses on creating powders, while wet grinding produces pastes and batters, each requiring specific blade types and techniques.
- Choosing the Right Mixer Grinder: Consider motor power, jar capacity, blade design, and material quality based on your common kitchen needs.
- Dry Grinding Techniques: Use short bursts, allow ingredients to settle, and avoid overfilling to achieve fine powders without motor strain.
- Wet Grinding Techniques: Add sufficient liquid, use continuous blending, and scrape down sides as needed for smooth batters and pastes.
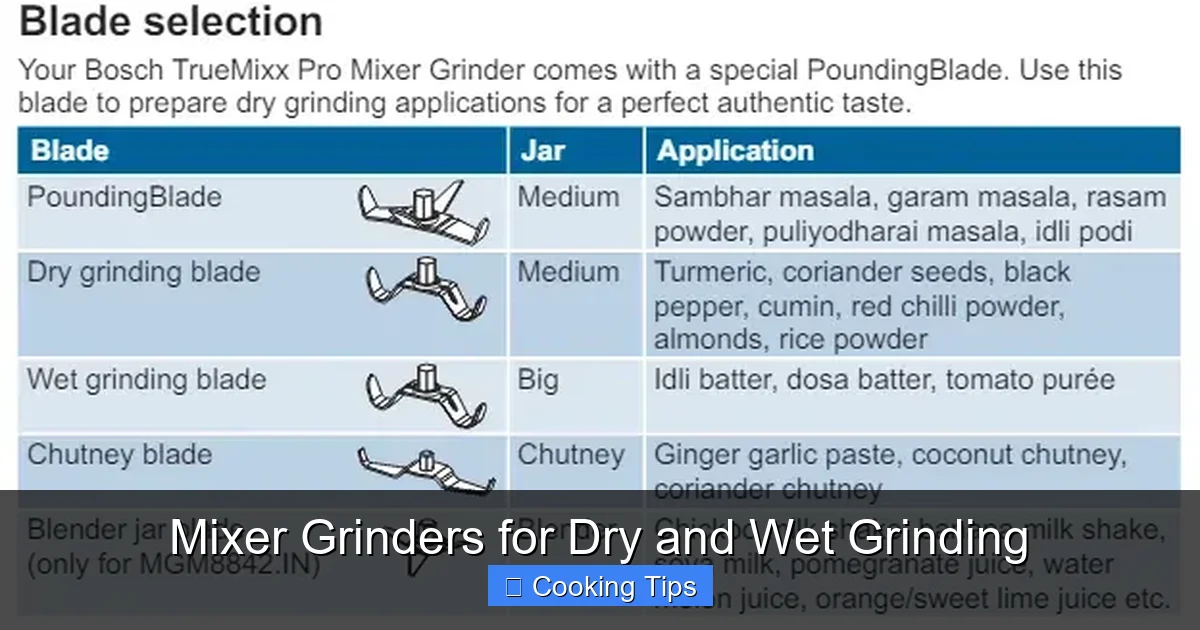
- Blade Selection is Crucial: Different blades are designed for specific tasks; ensure you’re using the correct one for optimal results.
- Maintenance for Longevity: Proper cleaning, drying, and storage will significantly extend the life of your mixer grinder.
- Safety First: Always ensure the lid is secure, never force the appliance, and unplug before cleaning or disassembling.
What Exactly is Dry Grinding?
Dry grinding is all about breaking down solid ingredients into fine powders or coarse granules. Think of grinding whole spices like cumin seeds, coriander seeds, or peppercorns into aromatic powders for your curries. Other common dry grinding tasks include making flour from grains like rice or lentils, or creating spice mixes like garam masala. The key here is to achieve a dry, powdery consistency.
Characteristics of Dry Grinding
- Focuses on reducing solids to a powder or granular form.
- Requires ingredients to be completely dry.
- Often involves ingredients that are hard or brittle.
- Success is measured by the fineness and uniformity of the powder.
What Exactly is Wet Grinding?
Wet grinding, on the other hand, involves blending ingredients with a liquid to create smooth pastes, batters, or purees. This is essential for many Indian cuisines, where pastes of onions, tomatoes, ginger, and garlic form the base of countless dishes. It’s also used for making dosa batter, idli batter, or even smooth chutneys. The addition of liquid helps the blades move freely and emulsify the ingredients.
Characteristics of Wet Grinding
- Involves blending solids with liquids.
- Aims for a smooth, uniform, and often flowing consistency.
- Ideal for ingredients that are softer or when a smooth texture is desired.
- Often requires longer blending times compared to dry grinding.
Why the Distinction Matters
You might wonder why you need to know the difference. It’s simple: different tasks require different approaches and, importantly, different blade designs. While many mixer grinders come with a set of jars and blades, using the wrong one for the job can lead to subpar results, motor strain, or even damage to the appliance. Using a dry grinding blade for wet grinding might not achieve a smooth enough paste, and using a wet grinding blade for dry grinding could overheat the motor or not grind finely enough.
Choosing the Right Mixer Grinder for Your Needs
Before we dive into the how-to, let’s briefly touch upon selecting a good mixer grinder. This will set you up for success with both dry and wet grinding.
Key Features to Consider:
- Motor Power (Watts): For efficient dry grinding of hard spices and for consistent wet grinding, a higher wattage motor (typically 750W and above) is recommended. Lower wattage motors (around 500W) are suitable for lighter tasks.
- Jar Capacity: Consider the quantity of ingredients you usually process. Mixer grinders typically come with multiple jars of varying sizes.
- Blade Design: This is crucial. Most mixer grinders come with interchangeable blades. Look for:
- Dry Grinding Blades: Usually sharp, flat blades designed to pulverize ingredients.
- Wet Grinding Blades: Often designed with more curves and angles to efficiently move liquids and blend ingredients into a smooth paste.
- Chutney Grinder Blades: Smaller, often more powerful blades for making fine chutneys.
- Material Quality: Stainless steel jars are durable, easy to clean, and don’t retain odors. The plastic used for the lids and base should be sturdy.
- Speed Settings: Multiple speed settings and a pulse function offer greater control for different textures.
- Safety Features: Look for features like overload protection to prevent the motor from burning out.
Mastering Dry Grinding: Step-by-Step
Dry grinding is an art that, once mastered, will elevate your spice rack and your cooking. Here’s how to do it effectively.
Step 1: Prepare Your Ingredients
Ensure Dryness
This is the most critical step for dry grinding. Even a little moisture can cause ingredients to clump, preventing them from grinding into a fine powder. Spread whole spices or grains on a clean cloth or tray and let them air dry for a few hours, or gently roast them on low heat to remove any residual moisture. Make sure they are completely cool before grinding.

Visual guide about Mixer Grinders for Dry and Wet Grinding
Image source: 5.imimg.com

Visual guide about Mixer Grinders for Dry and Wet Grinding
Image source: shubz.in
Visual guide about Mixer Grinders for Dry and Wet Grinding
Image source: shubz.in
Cleanliness is Key
Ensure your ingredients are clean and free from any dirt or debris. You can lightly brush them or rinse and dry them thoroughly if needed.
Step 2: Select the Right Jar and Blade
Choose the Appropriate Jar
For dry grinding, smaller jars are often better. They concentrate the ingredients, allowing the blades to work more efficiently and achieve a finer grind. The provided dry grinding jar is usually the best choice.
Attach the Dry Grinding Blade
Ensure the correct dry grinding blade is securely attached to the jar. These blades are designed to cut and pulverize effectively.
Step 3: Add Ingredients to the Jar
Don’t Overfill
This is a common mistake. Overfilling the jar strains the motor and prevents ingredients from being ground uniformly. Fill the jar only about halfway to two-thirds full, depending on the ingredient. For very hard ingredients like whole peppercorns, you might need to fill it even less.
Add in Batches if Necessary
If you have a large quantity, grind in smaller batches. This ensures better results and protects your mixer grinder.
Step 4: Grinding Techniques for Best Results
Use Pulse and Short Bursts
This is the secret to fine dry grinding. Instead of running the mixer continuously, use the pulse function or run the motor in short bursts (5-10 seconds). This allows the ingredients to settle and fall back onto the blades, ensuring even grinding. It also prevents the ingredients from overheating, which can alter their flavour and aroma.
Allow Ingredients to Settle
After each burst, let the mixer stop completely. You’ll hear the ingredients settle. This helps in grinding them more efficiently in the next burst.
Shake or Tap the Jar (Optional but Recommended)
For very fine powders, you can gently shake the jar between bursts or tap the sides to dislodge any ingredients stuck to the walls or lid. Be sure the lid is securely on before shaking!
Check Consistency and Continue
After a few cycles of short bursts, check the consistency. If it’s not fine enough, continue with more short bursts. Be patient; achieving a very fine powder may take several minutes.
Step 5: Empty and Clean the Jar
Scrape Down the Sides
Once you achieve the desired consistency, carefully remove the jar from the base. Use a spatula to scrape down any powder clinging to the sides and lid.
Store Properly
Transfer the powder to an airtight container immediately. This preserves its freshness and aroma. Store whole spices or ground powders in a cool, dark place.
Clean the Jar Promptly
It’s much easier to clean the jar and blade when they are dry. Use a soft brush to remove residual powder. For tougher residues, a damp cloth can be used, followed by immediate drying. Avoid using water unless absolutely necessary, and ensure it’s dried thoroughly.
Practical Tips for Dry Grinding
- Roast for Enhanced Flavor: Lightly roasting whole spices before grinding can enhance their aroma and flavor. Ensure they are completely cooled before grinding.
- Add a Pinch of Salt: For some spices like turmeric, adding a tiny pinch of salt can help in grinding them into a finer powder.
- Don’t Grind for Too Long: Over-grinding can generate heat, which can burn the spices and impart a bitter taste.
- Smaller Batches, Better Results: Always opt for smaller quantities in the jar for optimal fine powders.
- Troubleshooting Clumping: If your ingredients clump, it’s likely due to residual moisture. Try air-drying or lightly roasting them again. Ensure the jar and blades are completely dry.
Mastering Wet Grinding: Step-by-Step
Wet grinding is where many mixer grinders truly shine, allowing for smooth pastes, batters, and purees.
Step 1: Prepare Your Ingredients
Chop Larger Items
For ingredients like onions, garlic, ginger, or tomatoes, chop them into smaller, manageable pieces. This helps the blades catch them more effectively and reduces the strain on the motor.
Measure Liquids
Ensure you have the right amount of liquid ready. The type and amount of liquid will depend on the recipe. For batters, you’ll need enough to create a flowing consistency. For pastes, you might start with a little and add more as needed.
Step 2: Select the Right Jar and Blade
Choose the Wet Grinding Jar
Use the designated wet grinding jar. These are usually larger and designed to handle liquids effectively.
Attach the Wet Grinding Blade
Ensure the appropriate wet grinding blade is securely fitted. These blades are designed to efficiently chop and blend ingredients with liquid into a smooth consistency.
Step 3: Add Ingredients to the Jar
Add Liquids First (Often Recommended)
For most wet grinding tasks, adding the liquid to the jar first helps the blades move freely from the start and prevents dry ingredients from sticking to the bottom.
Add Solid Ingredients
Add your chopped solid ingredients on top of the liquid.
Don’t Overfill
Similar to dry grinding, don’t overfill the jar. Leave enough space for the ingredients to move and blend smoothly. Follow the maximum fill line indicated on the jar.
Step 4: Grinding Techniques for Smooth Results
Start on Low Speed
Begin by running the mixer grinder on a low speed to break down the ingredients. This is especially helpful for larger pieces.
Increase Speed and Blend Continuously
Once the ingredients are partially broken down, increase the speed. For wet grinding, you will typically run the mixer continuously until you achieve the desired smooth consistency.
Scrape Down the Sides
Periodically, stop the mixer and use a spatula to scrape down the sides of the jar. This ensures that all ingredients are incorporated and blended evenly, preventing any lumps from forming.
Add More Liquid If Needed
If the mixture becomes too thick and the blades are struggling to move, add a little more liquid (water, milk, etc.) to achieve the desired consistency. Add it gradually to avoid making the mixture too watery.
Monitor the Consistency
Continue blending and scraping until you achieve a smooth, uniform paste or batter. The time required will vary depending on the ingredients and the power of your mixer grinder.
Step 5: Empty and Clean the Jar
Pour Out the Mixture
Carefully pour the blended mixture into a bowl or container.
Rinse Immediately
Rinse the jar and blade immediately with warm water. This prevents food particles from drying and sticking, making cleaning much easier.
Wash Thoroughly
Wash the jar and blade with soap and water, using a soft sponge or brush. Be careful with the sharp blades.
Dry Completely
Ensure the jar and blade are completely dry before storing them to prevent rust or mold. Air drying or wiping with a clean cloth are good methods.
Practical Tips for Wet Grinding
- Soak Grains and Lentils: For batters like dosa or idli, soaking grains and lentils before grinding is crucial. This softens them and aids in achieving a smooth texture.
- Use Cold Water: For some delicate batters or purees, using cold water can help prevent overheating during grinding, which can affect taste and texture.
- Don’t Rush the Process: Achieving a perfectly smooth batter or paste often requires patience and adequate blending time.
- Troubleshooting Chunky Mixtures: If your wet grind is still chunky, it might be due to not enough liquid, not chopping ingredients small enough, or not blending long enough. Try adding a little more liquid and blending further.
Safety First!
No matter if you are dry or wet grinding, safety is paramount:
- Always ensure the lid is securely locked before operating the mixer grinder.
- Never force the appliance. If it’s struggling, stop and assess the situation (e.g., too many ingredients, wrong blade).
- Unplug the mixer grinder from the power outlet before cleaning, disassembling, or attempting to dislodge any ingredients.
- Keep hands away from the blades when the appliance is plugged in.
- Do not operate the mixer grinder without any ingredients or liquid in the jar, as this can damage the motor.
Conclusion
Your mixer grinder is a versatile kitchen companion that, with the right knowledge, can significantly enhance your culinary skills. By understanding the nuances of dry and wet grinding, selecting the appropriate tools, and following these step-by-step techniques, you’re well on your way to creating everything from perfectly ground spices to silky smooth batters with ease. Remember to prioritize safety and proper maintenance, and your mixer grinder will serve you faithfully for years to come. Happy grinding!