
Learn to brew delicious espresso at home with a stovetop espresso maker. This guide provides step-by-step instructions for assembly, brewing, and cleaning. Discover essential tips for achieving rich flavor and troubleshoot common issues for consistently perfect espresso.
Hello, fellow coffee enthusiasts! In 2026, the quest for that perfect, rich espresso shot at home has never been easier, and it all starts with a simple yet effective tool: the stovetop espresso maker, also known as a Moka pot. Forget expensive machines; this classic Italian device can deliver a potent, flavorful brew right on your kitchen stove.
Are you ready to unlock the secrets to making barista-quality espresso without leaving your home? This comprehensive guide will walk you through every step, from unpacking your new Moka pot to enjoying your first delicious, homemade espresso. We’ll cover everything you need to know, including essential tips and how to handle any hiccups along the way. Let’s dive in and start brewing!
Key Takeaways
- Understand the Anatomy: Familiarize yourself with the three main parts: the base (boiler), the filter basket, and the upper chamber (coffee pot).
- Proper Water Level is Crucial: Fill the base with water just below the safety valve to prevent steam escape and ensure optimal brewing.
- Grind Size Matters for Espresso: Use a medium-fine grind, similar to table salt, for the best extraction. Too fine clogs, too coarse results in weak coffee.
- Don’t Tamp Too Hard: Lightly level the coffee grounds in the filter basket. Over-tamping restricts water flow and can lead to bitter espresso.
- Monitor the Brew Closely: Listen for the gurgling sound and watch for the coffee to flow into the upper chamber. Remove from heat as soon as it’s done to avoid scorching.
- Clean Promptly for Longevity: Disassemble and rinse all parts after each use with warm water to prevent coffee oil buildup and corrosion.
- Experiment for Your Perfect Cup: Adjust grind size, coffee-to-water ratio, and heat source to discover your preferred espresso flavor profile.
Understanding Your Stovetop Espresso Maker
Before you brew your first cup, it’s important to know the different parts of your stovetop espresso maker. These devices are ingeniously simple, typically consisting of three main components:
The Base (Boiler)
This is the bottom part that holds the water. You’ll notice a small safety valve on the side. This valve is crucial and acts as a pressure release if the internal pressure gets too high.
The Filter Basket
This is a cylindrical piece that fits inside the base. It’s where you’ll put your ground coffee. It has a funnel shape and small holes at the bottom that allow the brewed coffee to pass through.
The Upper Chamber (Coffee Pot)
This is the top section where the brewed espresso collects. It has a spout for pouring and a lid to keep your precious coffee warm.
Understanding these parts will make the brewing process much more intuitive.
Step-by-Step Guide to Brewing Espresso
Visual guide about How to Use a Stove Top Espresso Maker
Image source: vunohiking.co.nz
Now, let’s get down to the business of brewing! Follow these steps carefully for a delightful espresso experience.
Step 1: Prepare the Water
This is a critical step. You need to fill the base of your Moka pot with water.
How to Fill the Base
Fill the lower chamber with fresh, cold water. The key here is to fill it up to, but not above, the safety valve. This is usually indicated by a small metal protrusion on the side of the base. Filling it too high can cause steam to escape from the valve, reducing pressure and affecting your brew. Using filtered water can also enhance the flavor of your espresso.
Step 2: Add the Coffee Grounds
Once your water is in place, it’s time for the coffee.
Grinding Your Beans
For stovetop espresso, you want a medium-fine grind. It should feel like table salt between your fingers. If your grind is too fine, it can clog the filter and make it hard for water to pass through, leading to a bitter taste. If it’s too coarse, the water will pass through too quickly, resulting in a weak, watery coffee. If you don’t have a grinder, you can often find pre-ground Moka pot coffee at your local grocery store.
Filling the Filter Basket
Spoon the ground coffee into the filter basket. Don’t press it down or tamp it aggressively! This is a common mistake. Gently level the grounds with your finger or the back of a spoon. A light touch is all that’s needed. You want the coffee to be loose enough for the water to pass through easily. Over-tamping can create too much resistance, leading to over-extraction and a bitter shot.
Inserting the Filter Basket
Carefully place the filled filter basket into the base. Make sure it sits evenly.
Step 3: Assemble the Moka Pot
Now it’s time to put it all together.
Screw the Upper Chamber On
Gently screw the upper chamber onto the base. Ensure it’s tightly sealed to prevent steam leakage. You might want to use a towel to grip the base if it’s wet. Be careful not to overtighten, but make sure it’s snug.
Step 4: Heat the Moka Pot
The stovetop is where the magic happens.
Choosing Your Heat Source
Place the assembled Moka pot on your stove over medium-low to medium heat. Electric stoves are often easier to control, but gas stoves work wonderfully too. The key is to use a heat level that allows the water to heat up gradually. Too high a heat will burn the coffee and create a bitter taste.
Monitoring the Brew
As the water heats up, it will turn into steam and pressure. This pressure will force the hot water up through the coffee grounds in the filter basket and into the upper chamber. You’ll hear a gentle gurgling sound, and then you’ll see dark, rich coffee beginning to flow into the upper chamber.
When to Remove from Heat
This is a crucial part of getting the best flavor. Once the coffee starts to flow, keep an eye on it. The stream should be a rich, syrupy brown. As the color lightens to a golden-brown or straw color, and the gurgling sound becomes more pronounced and hissing, it’s time to remove the Moka pot from the heat. If you let it continue to brew for too long, the coffee will start to taste burnt and bitter because the steam can scorch the grounds.
Step 5: Serve and Enjoy
Your delicious espresso is ready!
Pouring Your Espresso
Carefully remove the Moka pot from the stove. Be mindful of the steam. Pour the freshly brewed espresso into your pre-warmed espresso cups immediately. The aroma alone is worth the effort!
Step 6: Clean Your Moka Pot
Proper cleaning will ensure your Moka pot lasts for years and your coffee always tastes great.
Immediate Cleaning is Best
After the Moka pot has cooled down enough to handle, disassemble it. Discard the used coffee grounds. Rinse all three parts thoroughly with warm water. Do NOT use soap or detergent. Coffee oils are natural and help season the pot, plus soap can leave a residue that affects the taste. If there’s any stubborn residue, use a soft brush.
Drying and Reassembly
Dry all parts completely with a soft cloth before reassembling. Leaving it assembled will prevent any moisture buildup and potential corrosion. Store it in a dry place.
Practical Tips for Stovetop Espresso Perfection
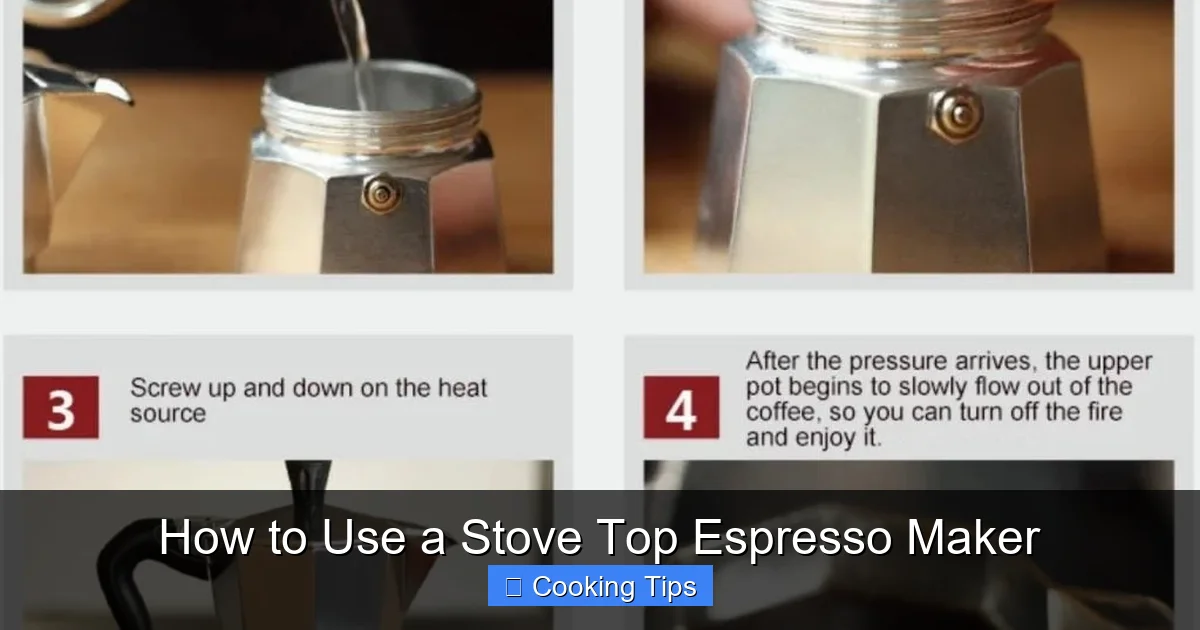
Visual guide about How to Use a Stove Top Espresso Maker
Image source: vunohiking.co.nz
Beyond the basic steps, here are some tips to elevate your Moka pot brewing game:
- Pre-heat your cups: A warm cup will keep your espresso hotter for longer.
- Experiment with coffee-to-water ratio: While the Moka pot has fixed volumes, you can slightly adjust the coffee grounds or water to taste.
- Consider the coffee roast: Lighter roasts might need a slightly finer grind, while darker roasts might benefit from a slightly coarser grind.
- Freshness matters: Always use freshly roasted and ground coffee beans for the best flavor.
- Don’t overfill the water: Seriously, stick to the safety valve line!
- Listen to your pot: The sounds it makes are your best indicator of brewing progress.
Troubleshooting Common Issues
Visual guide about How to Use a Stove Top Espresso Maker
Image source: m.media-amazon.com
Even with the best intentions, you might encounter a few bumps in the road. Here’s how to fix them:
Bitter Espresso
- Cause: Over-extraction, coffee ground too finely, too much heat, or left on the heat too long.
- Solution: Ensure you’re using a medium-fine grind, remove the pot from heat as soon as the espresso is done (listen for the hiss!), and use medium-low heat.
Weak or Watery Espresso
- Cause: Coffee ground too coarse, not enough coffee, or not enough pressure.
- Solution: Try a finer grind, ensure the filter basket is filled with coffee, and double-check that the upper chamber is screwed on tightly.
Espresso Not Coming Through
- Cause: Filter basket is clogged with coffee grounds, or the coffee is tamped too hard.
- Solution: Ensure coffee is leveled, not packed. Clean the filter basket and stem thoroughly.
Water Leaking from Safety Valve
- Cause: Water level is too high, or the valve is clogged.
- Solution: Lower the water level to just below the valve. If the valve is clogged with mineral deposits, you may need to gently clean it with a pin.
Conclusion
The stovetop espresso maker is a timeless tool that brings the joy of rich, authentic espresso into your home. By following these straightforward steps and embracing the tips we’ve shared, you’re well on your way to mastering the art of Moka pot brewing. It’s a simple, rewarding ritual that transforms a humble kitchen appliance into a gateway to delicious coffee. So, grind those beans, heat the water, and get ready to savor the robust flavors of your homemade espresso. Happy brewing in 2026!